It’s those valuable business vendors that we all learn to depend upon; to keep our sales flowing. For the purposes of this section you should consider as a vendor any person, company or organization that you call upon to help you meet the needs of your clients; that’s right anyone, from the historical society that helps you find locations to the guy at the corner deli.
Let’s review what can be entered in the vendor window.
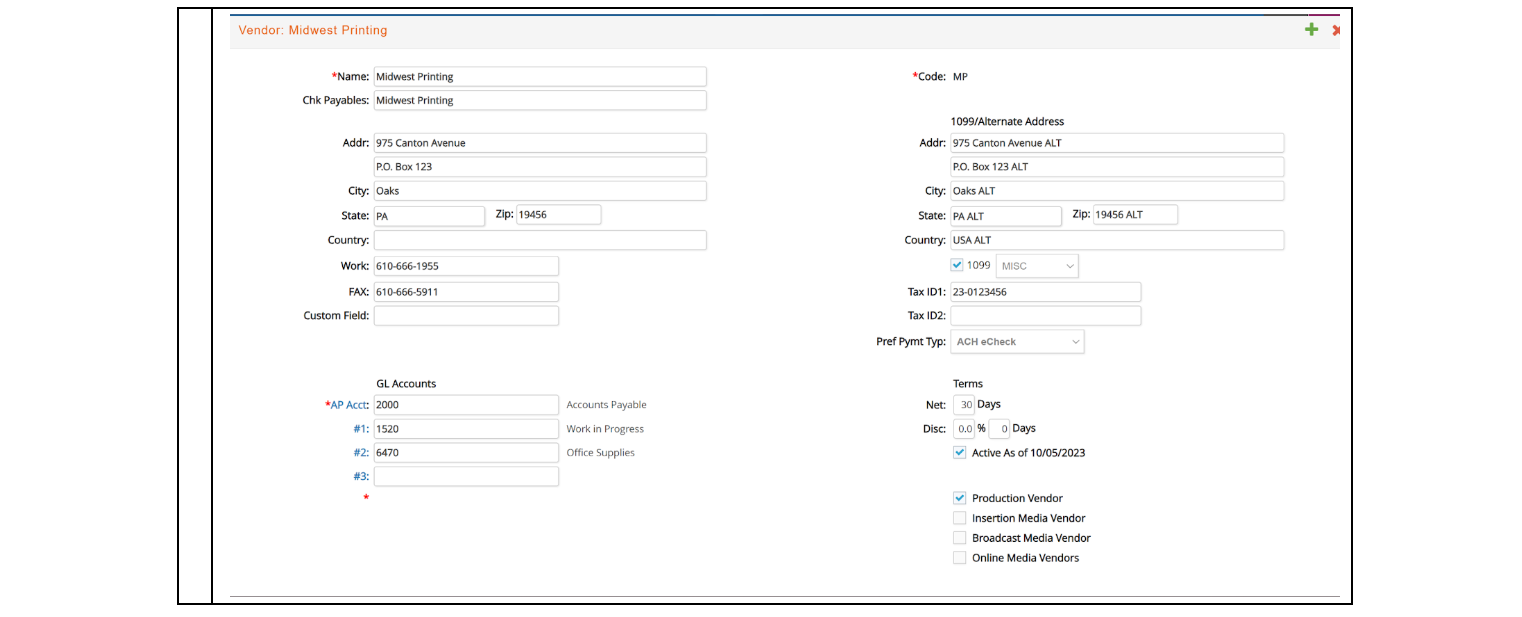
Vendor information you can enter consists of the following:
- * Name. Up to 50 characters can be entered for the vendor name.
- Chks. Payable. Up to 50 characters can be entered for a name to be used when cutting checks, if it is different from the vendor name.
- Addr1. Up to 30 characters can be entered for the first address line.
- Addr2. Up to 30 characters can be entered for the second line of the address.
- City. Up to 20 characters can be entered for the city.
- State. Up to 12 characters can be entered for the state. If the Vendor is an US Vendor, the field will automatically enter the acronym for the state entered.
- Zip. Up to 10 characters can be entered for the zip code.
- Country. Up to 25 characters can be entered for the country.
- Work. Up to 20 characters can be entered for the vendor's main phone number.
- FAX. Up to 20 characters can be entered for the vendor's Fax number.
- AP Acct. The general ledger account used to post any invoice from this vendor.
- GL Accounts #1, #2 and #3. These accounts will populate the GL distribution section when you are entering a vendor invoice under Accounts Payable
- Code. Up to 8 characters can be entered for the vendor code. Two vendors cannot have the same code. In addition, a vendor and an employee cannot have the same code. Vendor code is a required field.
- As of Date. The date the vendor was made active or inactive. This will automatically populate once Active is checked.
- 1099 Addr1. Up to 30 characters can be entered for the first address line. Only applies for 1099 vendors. This information will print on the 1099 report.
- 1099 Addr2. Up to 30 characters can be entered for the second line of the address. Only applies for 1099 vendors. This information will print on the 1099 report.
- 1099 City. Up to 20 characters can be entered for the city. Only applies for 1099 vendors. This information will print on the 1099 report.
- 1099 State. Up to 12 characters can be entered for the state. If the Vendor is an US Vendor, the field will automatically enter the acronym for the state entered. Only applies for 1099 vendors. This information will print on the 1099 report.
- 1099 Zip. Up to 10 characters can be entered for the zip code. Only applies for 1099 vendors. This information will print on the 1099 report.
- 1099 Country. Up to 25 characters can be entered for the country. Only applies for 1099 vendors. This information will print on the 1099 report.
- 1099. A check in this box indicates that the vendor is reported on a 1099. Select type of 1099 from dropdown: Misc, Nec or Misc&Nec - this information will be used when generating 1099 reports.
- Tax ID #1 and #2. A reference for this vendor -- generally this is the social security number if the vendor is a freelance person. Up to two tax ids can be entered up to 20 characters each.
- Pref. Pymt Typ. Preferred payment method.
- Terms. As with other windows, the field immediately following the Terms field allows you to enter the payment terms that your vendor has set.
- Net. The number of days at which a payment is due for a vendor invoice. Early payment discount can also be specified – such as 2% 10 days.
- Active. A check box that indicates the vendor is active. A check in the check box means the vendor is active.
- Production Vendor/Insertion Media Vendor/Broadcast Media Vendor/Online Media Vendor/ Check boxes to specify if this is a production, print media, broadcast media, and/or online media vendor.
Only vendors flagged as:
- Print media show in the pop up help list in the insertion order window.
- Broadcast media show in the pop up help list in the broadcast order window.
- Online media show in the pop up help list in the online order window.
- Production show in the pop up help list in the purchase order window.
Supporting Information
In addition, to the vendor entry/review section, e·silentpartner provides additional information that you can enter about a vendor. Note: The ‘More Info’ selections listed under the  menu in the top right hand corner of the vendor window. Let’s review this area.
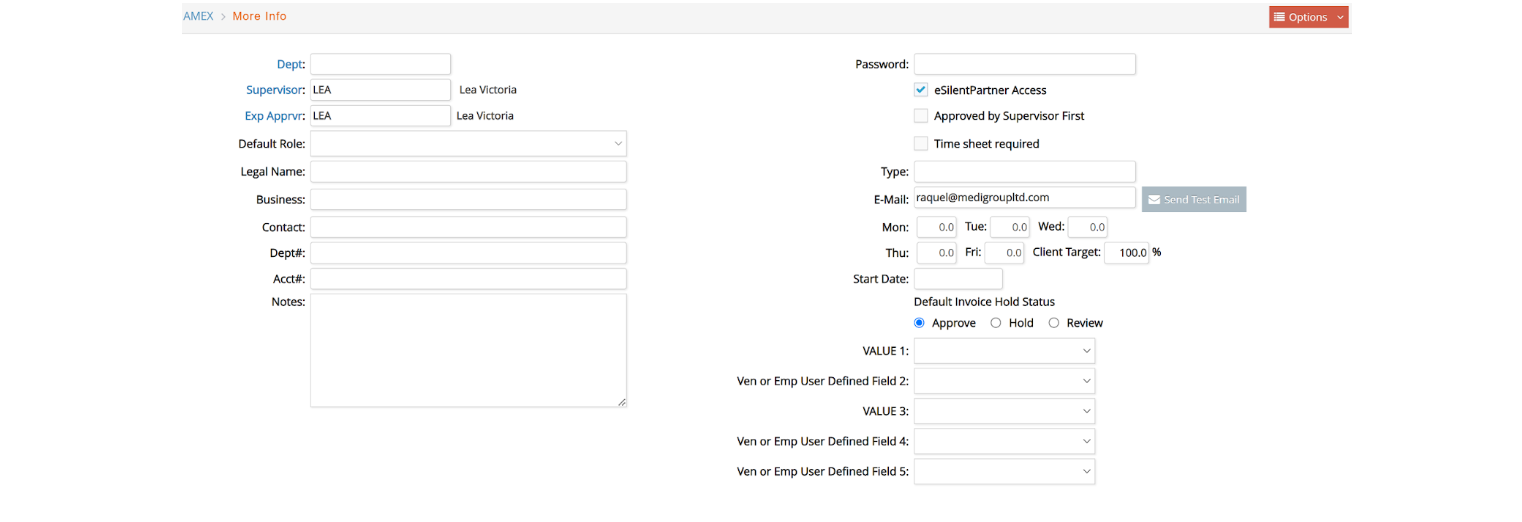
- Dept. If you contract with freelance companies/individuals, this entry would be the operating department within your organization to which this vendor would work.
- Supervisor. If you contract with freelance companies/individuals, this entry would be the individual within your organization to which this vendor would report.
- Default Role. User defined roles in drop down list box. Setup roles in Jobs > Admin > Team Roles.
- Legal Name. Often companies are known by one name, but are officially incorporated under another name. If this vendor fits this profile, enter the legal name here.
- Business. Up to 20 characters can be entered to include specific information on the type of business with which this vendor is associated.
- User defined fields. Up to 5 different user defined field for you to further define each vendor.
- Contact. Up to 20 characters can be entered for the primary contact person at this vendor.
- Dept. Up to 25 characters can be entered to indicate the department to which this contact resides in the vendor organization.
- Acct#. Your company’s account number with this vendor. FYI. Account numbers can be printed on computer checks within e·silentpartner.
- Notes. Up to 1000 characters can be entered for comments about the contact.
- Password. If you give this vendor access to eVendor (e·silentpartner’s portal for vendor review of invoices, purchase orders and requests for bid), enter the password you want this vendor to use when they log in to eVendor.
- e·silentpartner Access. Click the checkbox if you want this vendor to have access to e·silentpartner. Remember you will still need to enter a security record for the vendor and indicate what the vendor can do or view.
- Time Sheet Required. Click if you are contracting with a freelance individual and you require that individual to enter their hours via (e·silentpartner’s time entry window) on a daily basis. If this is selected, enter the hours per day in the day fields at the bottom of the window.
- Type. Up to 6 characters can be entered for coding your accounts by type, e.g., REP for sales rep; VC for vendor, chemical; FL for freelance, lighting; etc.
- E-Mail. Your vendor’s email address.
- Default Invoice Hold Status. There may be vendors with whom you contract that perform work for your clients. In this case, you may have an agreement with the vendor where the vendor will be paid after you have billed the client and the client has paid you. If this is the case with the vendor, you would set the payment status of each vendor invoice to Hold. Select Approve if this requirement does not apply. Select Review if all payments to this vendor must be reviewed before the check is issued.
Entry Rules
The following rules apply when adding, changing, viewing, or deleting a vendor master record.
- When
 adding the vendor, all of the information displayed in the vendor entry window is optional -- except vendor name, code, and AP Acct. Duplicate vendor codes are not allowed.
- When you invoke the Search feature by clicking Vendor on the Setup menu, you can retrieve a vendor master record based on a value entered in the name, code, business, city, state, zip code or location fields, or whether they are print media vendors, broadcast media vendors, on-line media vendors, production vendors, 1099, active or inactive.

- Any information on the vendor entry window can be edited except the vendor code.
- A vendor master record cannot be deleted if that vendor is used anywhere else in the database. For example, if a check has been issued to that vendor and you no longer do business with this vendor then make the vendor master record inactive so the vendor name will not appear in your pop up list of vendors.
- If the vendor is a media vendor, you can also view the publications/stations for the vendor by clicking Outlet listed in the Options menu.
Rate History
This section is where you enter the standard hourly cost and three billing rates for this vendor. Please note you must enter a currency code and an effective date. In addition, you can specify that the vendor has a specific rate for a specific task/item.

If you do not want e·silentpartner to use these rates at time sheet entry, leave the billing rates blank. e·silentpartner will then default to the cost and rate specified when you established your items (price list).
Refer to the Jobs section and Setup Items discussion for additional information regarding billing client jobs.
Outlet
If your vendor is a Media vendor, the list of publications and stations owned by the vendor will show up here and will be created from here. Please, review the Media manual for further instructions.