The following section discusses additional options available to you to further configure e·silentpartner for your organization.
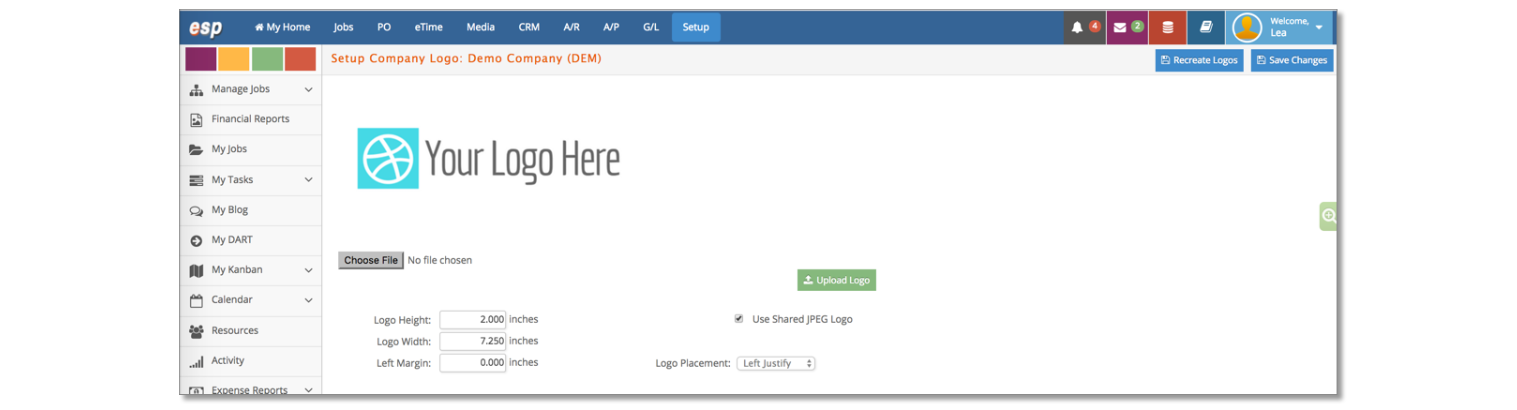
Logo
(also see separate Logo setup guide)
At Setup > Preferences > Logo, you can upload your company logo for printing on estimates, invoices, and other forms. Please see the Logo Setup Guide for more specific information.
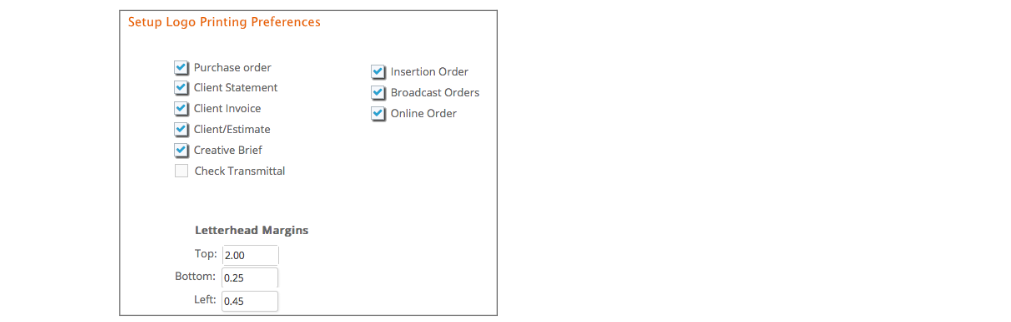
Logo Printing
e·silentpartner can accommodate printing your Logo. Once loaded your logo can print on the options displayed in the logo-printing window.
Set where you want the logo to print and Save Changes.
Formatting
In this area we determine an array of setup having to do with numbering and formatting aspects of Estimates, Client Invoices, Purchase Orders, Checks, etc. as well as other administrative areas.
To define your requirements, click Formatting. The following window will be displayed.
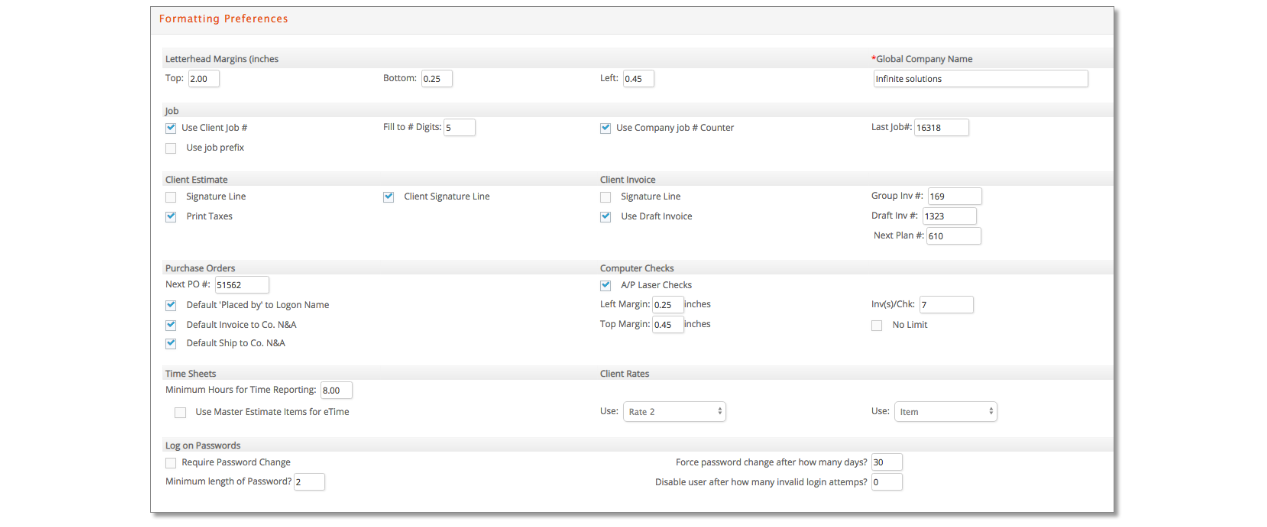
Formatting provides the capability to customize your printing requirements for client estimates and invoices to your letterhead; to activate some options in printing these documents; and to indicate whether you print A/P laser checks.
The parameters that are defined in this window include the following:
Margins
Letterhead Margins. Client estimates and invoices and purchase orders are generally printed on your company letterhead. Recognizing that the logo on letterhead could be at the top, bottom, or side, we give you the option to "shift" the body of these documents to accommodate your specific needs.
Use these margin parameters to move the estimate/invoice and purchase order details if they interfere with your company logo or address. You may adjust the top, bottom and left margins to allow space for your logo. However, there are limitations on how far the documents can be shifted. Print a sample document after placing your logo to make sure the entire document fits on the page. The same parameters apply to all of the above documents. If you have loaded your logo, the letterhead top margin must be consistent with the logo height set in the logo window.
Job Number Structure Definition
Use Client Job #. Within e·silentpartner, the unique numbers assigned to client work (estimates and jobs) are generally numeric. However, you can override this option if you click Use Client Job #. This option will generate a unique identifier to each job that is a combination of the client code followed by a dash followed by a number. Following is more information on job number structures available.
You have several options with which you can set up a Job number structure. They are:
- Use a numeric Job# which is assigned by e·silentpartner when you enter a job. You set up the number initially and it is incremented automatically by one, each time you add a job.
- Use a combination of the client code in conjunction with a sequential number. This is a practice used by many companies. The advantage is that anyone can easily identify the client simply by looking at the Job# (because the client code is the first few characters). The disadvantage is that it requires more keystrokes every time you enter a Job#.
Setting the default to use Client Job Numbers will generate your job numbers, for example, as ATL-150001, NEW-150002, and MED-150003.
Using a combination of the client code with sequential numbers within each client. (i.e., MED-150001, MED-150002, MED-150003; ATL-150001, ATL-150002, ATL-150003; vs. MED-150001, ATL-080002 with option 2 above.) Setting the default to use this option is the same as above except that you do not select Use Company Job # counter. You set the job number under Main > Client > Preferences.
- Enter your own Job# each time you open a job. This is not a practice we recommend, but it does have some merit when you are converting your records to e·silentpartner because it allows you to retain your old job numbers.
- Fill to # Digits. If you use this option, indicate how long the number should be – this will ensure the client job# follows a logical sequence. For example, if you indicate fill the client job # to 5 digits, e·silentpartner will generate a number, such as ATLAS-00001. If you do not indicate a number of digits, e·silentpartner will generate the same number as ATLAS-1.

- Last Job #. The next number will be used when generating a client job or quote. This number series is used ONLY if you select the Use Company Job # Counter.
- Use Job Prefix. Click this and an entry field where appear. Whatever you enter here will be the prefix on the JOB #. For example, enter 15 and all jobs will start with ’15-‘
Client Estimate Parameters
Signature Line. At the bottom of an estimate, you have the option of printing what's known as a signature line, which indicates the company’s representative who is submitting the estimate to the client.
Client Signature Line. At the bottom of an estimate, you have the option of printing what's known as a client signature line, which indicates the client's acceptance of the estimate and permission for you to proceed with the job. To include the signature lines, click the boxes so they have checks as appropriate.
Print Taxes. When this box is checked, the Print Taxes on estimates box from the estimate-printing window will default as checked.
Client Invoice Parameters
Signature Line. At the bottom of an invoice you have the option of printing what's known as signature line, which indicates your business's review of the charges generated for this client. To include the signature line, click the box so it has a check.
Use Draft Invoice. A client invoice generated within e·silentpartner must have a number assigned to it. Your options are: do you want to generate the invoice as a 'Draft' (or pre-bill) for review? Or do you want to generate the invoice as 'final' (non-Draft)? Draft invoices are preceded with a 'D' and use a number generated from the draft invoice number counter; non-draft invoices are not preceded with a 'D' and use a number generated from the invoice number counter. Only non-draft invoices can be posted.
The check box, Use Draft Invoice, is simply a default. Within e·silentpartner, you can generate client invoices from one of four places (three for production; one for media). In each place, you have the option (which is preset with the value you specify here) to generate the invoice with a draft invoice number. Indicate your preference here – a check means generate with a draft invoice number; a blank box indicates generate with a non-draft invoice number.
Group Inv #. The next number that should be used when generating a group invoice for a client.
Draft Inv #. The next invoice number to be used when generating a draft invoice.
Next Plan #. The next plan number to be used when generating media plans.
Purchase Order Parameters
Next PO #. If you plan to generate purchase orders from within e·silentpartner, indicate here what the next purchase order number should be.
Default ‘Placed by’ to Logon Name. If this box is checked, when new POs are added, the name of the employee who creates the Purchase Order will be displayed in the Purchase Order Entry window.
Default ‘Invoice to’ to Company Name and Address. If this box is checked, when new POs are added, the company name and address will automatically populate.
Default ‘Ship to’ to Company Name and Address. If this box is checked, when new POs are added, the company name and address will automatically populate.
Computer Checks Parameters
Top and Left Margins. If you use checks designed for a laser printer, you may have to adjust the top and/or left margins to indicate where the first line should be printed on the check form.
Invoices per check. This can be set with the number of invoices you would like to include on one check. Typically, this is set to 16.
No Limit checkbox means that one check per vendor will be printed in the computer check process. The check will NOT list any invoices. Rather the invoices paid by the check will be printed on a Check Transmittal report available in the check process.
Time Sheet/Client Rates Parameters
Minimum Hours for Time Reporting. Should reflect the number of hours per day that the employee is expected to work. The default value is 8.
Use Master Estimate for eTime means that only items listed on the JOB’S Master Estimate can be used in time entry.
Client Rates/Use Rate X/Use (Item or Employee). This is the default for a time entry that is against a job that ‘bills at’ client rates and if no client rate is defined for that time item entered
Password Rules
Require Password Change. If checked requires users to change password at interval specified in “Password can be retained for how many days?” setting.
Minimum length of Password? Indicates the minimum length passwords the system will accept.
Password can be retained for how many days? Set the number of days before password change is required.
Disable user after how many invalid login attempts? This is set to lock users out of e·silentpartner after the specified logon attempts are unsuccessful. Their security record then needs to be unlocked by a security administrator.
Holidays
You can enter yearly Holidays and Company Days so that no one can be booked on these days.
As you know, time records require a Job, item and quantity to be created. The first step is to set this information under SETUP > PTO > PTO SETUP:
- Only Jobs that are set up as Internal and have a JOB status will show up to be selected.
- Only non-billable time items will show up to be selected.
When clicking the ‘Create Time Charges’ on the top right corner of this window, time charges will be created for all active employees and Holidays/Company Days set up, using the Jobs and items defined.

Language Definitions
While e·silentpartner is a pre-designed product, we try to incorporate as much flexibility as possible – so that you can modify some components to meet your specific needs. Language Definitions addresses some of those needs.
Labels and titles can be renamed to meet your company's specifications. For example, some companies prefer to call their Employees - Associates. With e·silentpartner you can easily change the Employee field, using the following instructions, to display the field name - Associate. Click Language Definitions from the Setup Menu.

Import Lang Def
Periodically, we will add new columns to your database that allow you to change labels you see on your windows. When we do that, we provide import files, which initially set the text for these new columns. Accordingly, the purpose of this feature is to allow you to import this information.
The process is extremely straightforward. Select IMPORT
Click Choose File and locate the File we provided. e·silentpartner will do the rest!

Titles
As with Language Variables, Titles for Reports can be defined.
Click Titles from the Setup Menu.
Client Defined Fields
As mentioned in the sections on client and contact setup, e·silentpartner provides the ability to further qualify your clients and contacts with the application of user-defined values. The same capability also is available in the job section. This is the area where you define those values.
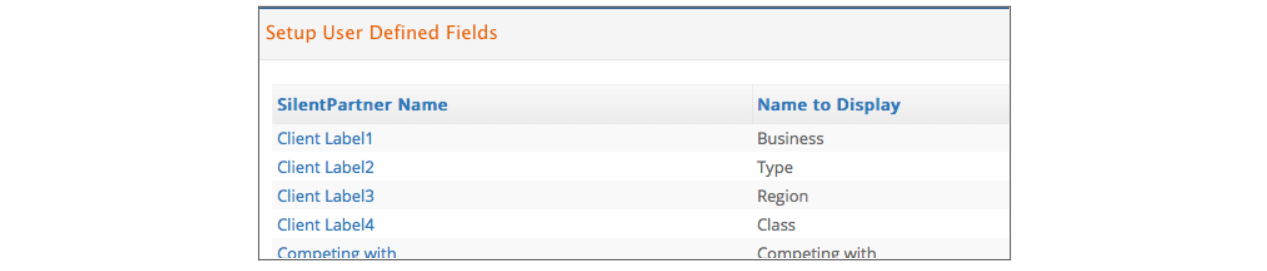
Simply click on the appropriate blue link under the e·silentpartner name. The repository for those values for the particular link will display.
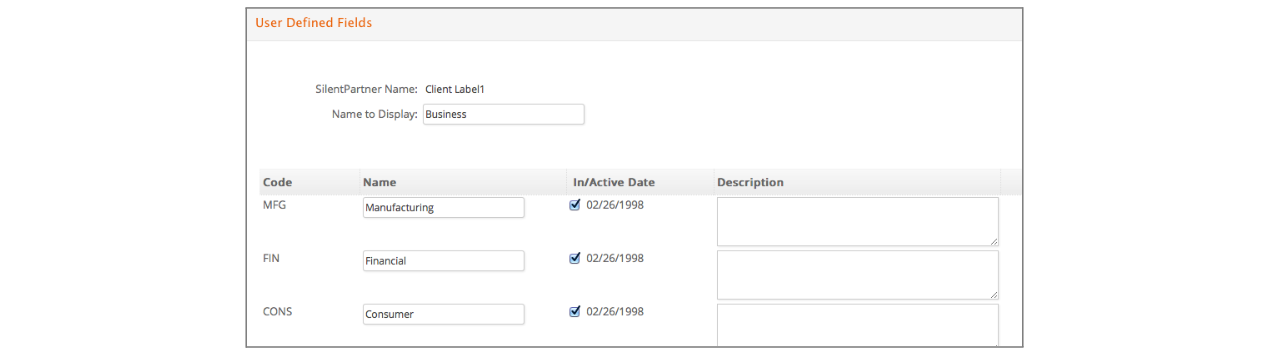
Simply add, change any of the values you view in this window. These values will then be available to further qualify a client, a contact or any job.
The second part of this feature is to rename these labels so it better describes tour intent of their use. Return to the section, Language Definitions and search for Client label, contact label and job label. Change the field name to your preferred parlance.