Contacts are individuals within a client company. Although a client can have as many contacts as needed, all clients need to have at least one contact in order to create a job. A contact is a necessary field when creating a job for a client, since it is the contact that is linked to an Accounts Receivable account and dictates the billable currency for the job, and the AR account that will be used when posting client invoices for that job.
For multi-currency companies, this is the way to be able to create jobs in different currencies for the same client.
The information on the Contact window is quite self-explanatory.
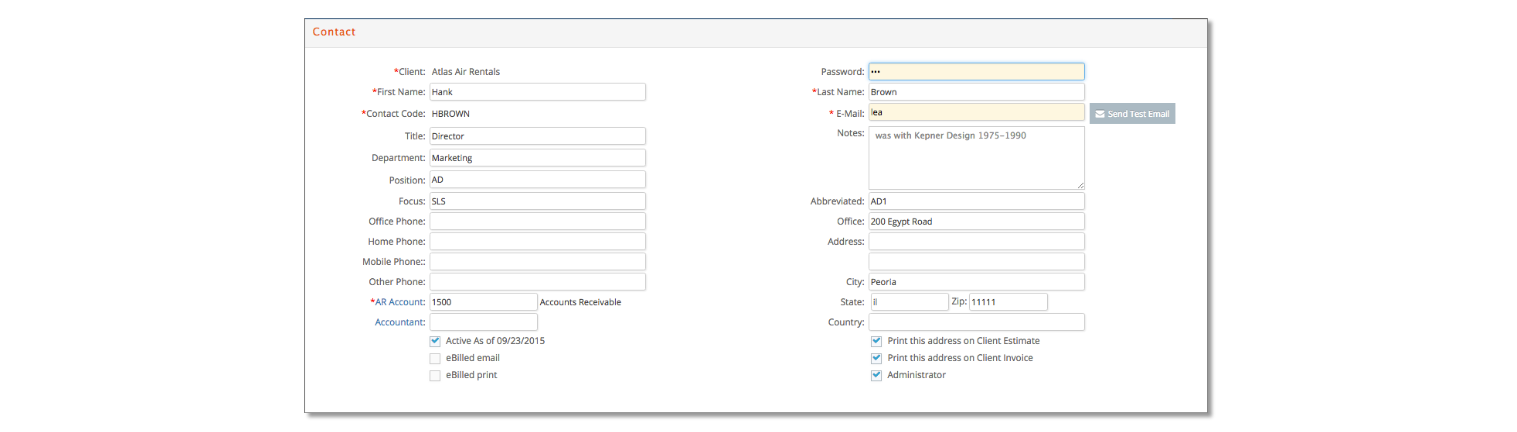
However, to qualify a contact in some additional manner, you can define a couple of fields, Contact Label 1 and Contact Label 2, for example as Position and Focus.
These fields combined with qualified fields from the Client definition can be used to generate selective mailings.
Contact information you can or must enter consists of the following:
Left Column:
- Client. The client (company, organization) with whom this contact is associated. This is a required entry
- First Name. Up to 15 characters can be entered for the contact's first name. This is a required entry.
- Contact Code. Up to 10 characters can be entered for the contact code. Two contacts cannot use the same code. Contact code is a required entry.
- Title. Up to 25 characters can be entered for the contact's official title.
- Department. Up to 25 characters can be entered for the contact's department.
To qualify your contact, you can define the next two fields.
- Contact Label 1. Up to 10 characters can be entered. See additional information on User Defined Fields and Language Definitions.
- Contact Label 2. Up to 10 characters can be entered.
- Office Phone. Phone/extension for the contact.
- Home Phone. Up to 20 characters can be entered for the contact's home phone.
- Cell Phone. Up to 20 characters can be entered for the contact's cell phone.
- Other Phone. Up to 20 characters can be entered for another phone number for the contact.
- AR Account. The Accounts Receivable account to which any invoice generated for this client is posted. This is a required entry.
- Accountant. This is the default Accounting person for that contact, so when a job is created for that client/contact combination, there will be an accounting person by default. This has an impact on our eBilling functionality - please, review Billing documentation for further information.
- Active. A check in the check box indicates the contact is active. A blank check box indicates the contact is inactive. As of is the date the active/inactive status was made.
- eBilled email. For eBilling. Only applies to international accounts.
- eBilled print. For eBilling. Only applies to international accounts.
Right Column:
- Password. This is used for eClients. Please review the eClients documentation to setup eClients access for this contact if so desired.
- Last Name. Up to 17 characters can be entered for the contact's last name. This is a required entry.
- E-Mail. The email address for this contact.
- Administrator. This is used for eClients. Please review the eClients documentation to setup eClients access for this contact if so desired.
- Notes. Up to 1000 characters can be entered for comments about the contact.
- Abbreviated. This is a handy feature with which you can group "like" positions. Let's say you wanted to send a mailer to the Number 1 person in each company. In some companies, this could be the CEO or President or owner or COO. The list could be endless. By developing your own code, such as #1, to identify the # 1 contact in companies, you can quickly generate your list. Up to 3 characters can be entered for the contact abbreviation.
- Office. Drop down list box with user defined offices for all contacts.
- Address/City/State/Zip/Country / Print on Client Estimate / Print on Client Invoice. This is an area where you could enter an alternate mailing address and addressee for special purposes. Check the box on “Print this address on Client Estimate” and/or “Print this address on Client Invoice” can activate these fields. When either of these boxes is checked e·silentpartner will use the Alternative Address in place of the Address listed on the Client window.
Entry Rules
The following rules apply when adding, changing, viewing, or deleting a contact master record.
When  adding the contact (or prospect), all of the information displayed in the contact entry window is optional--except client code, contact first and last name, contact code, and AR Account. Duplicate contact codes are not allowed.
If you should try to use a duplicate contact code, you will receive the following message:

Any information on the contact entry window can be edited except the client code or the contact code.
A contact master record cannot be deleted if that contact is used anywhere else in the database. For example, if a job had been previously been opened for this contact. If you no longer do business with this contact and if a job or estimate is in your database for this contact, then make the contact master record inactive so the contact name will not appear in your pop up list of active contacts.
To find a contact, click Contact from the Setup menu. You are presented with a search window where you can click Search to view a list of all contacts in the database, or qualify the search by entering criteria in any of the fields.

If you want to view inactive contacts, for example, uncheck Active and click Search or select a client to view a list of all contacts for a specific client.

Click the (Blue) Contact Code link to view the details for the Contact.
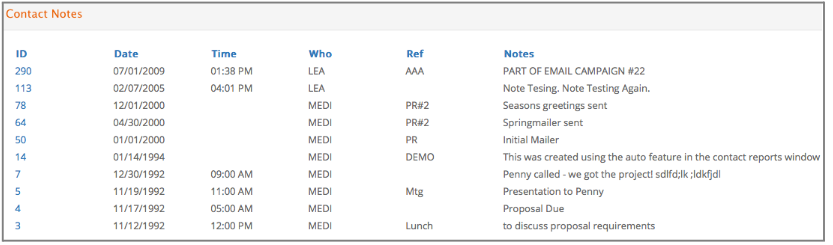
Notes
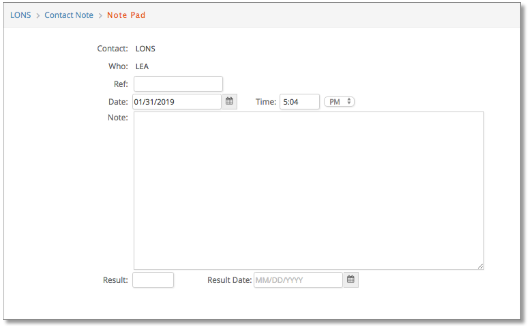
This section of e·silentpartner helps you keep track of all your activities with a specific contact. You can record phone conversations, sales contacts, bids received and sent, or whatever you require, and all of the activity records are linked to the contact. You can access the Contact Note window by clicking on the  button in the top right section of the contact window.
The Contact Notes feature is comprised of two windows:
The list of Contact Notes window that displays an abbreviated version of each note entered.
The second window is the Contact Note Pad with which you can insert, edit or delete contact notes.
Keep in mind:
- Contact notes can be added or changed from the Contact Notepad only.
- Contact notes can be deleted by clicking the X.
- Clicking the printer icon can print contact Notes.
Information that can be entered for a contact note consists of the following:
- Who. The identity of the individual who entered this note. e·silentpartner automatically tags this note to the resource code of the individual who signed on to the system.
- Ref. Up to 10 characters can be entered for the type of note.
- Date. Date of the note.
- Time. Time of the note.
- Note. Up to 2500 characters can be entered for the note.
- Result. Three characters
- Result Date. MM/DD/YYY
Sometimes it is necessary to have a "hard copy" of the notes entered for a contact. You have three options:
- Click the Printer icon on the Contact Notes window to get a report of notes.
- Click the Printer icon on the Note Pad window to get a print out of one note.
Use the Contact Notes reporting option from the Reports menu under the Main section.