Before you delve into entering your client information, there are just a few points to remember and consider. Much of the information maintained within this section is optional and dictated by you. You can keep current, past and prospective clients here.
Before you enter your first client, let's review the client window and the options available to you. You can add a new Client by selecting Setup > Client 
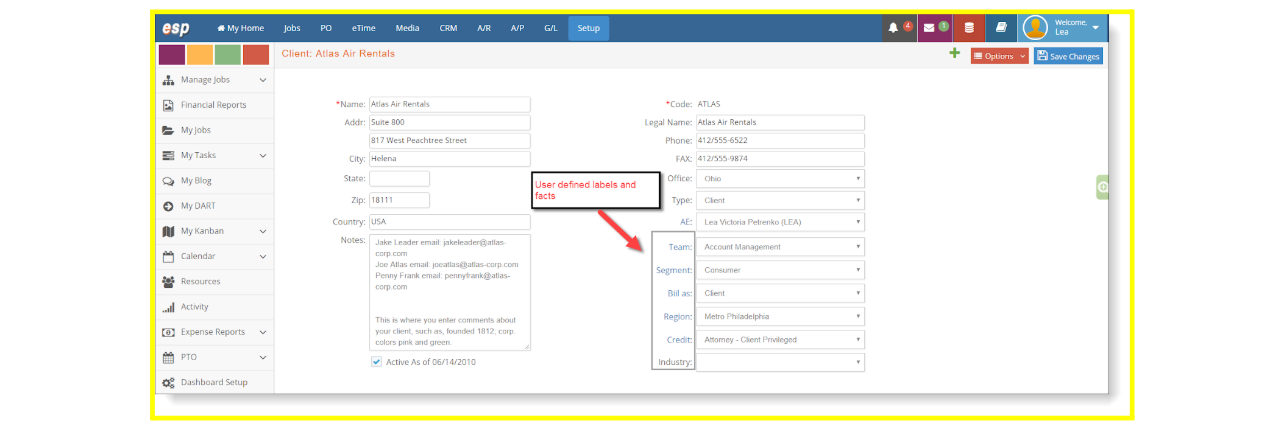
Client information consists of the following:
- Name. Up to 45 characters can be entered for the Client Name. This is a required entry.
- Address. Up to two lines of 50 characters each can be entered per line of the client's address.
- City. Up to 25 characters can be entered for the Client City.
- AE. The default account executive or sales rep assigned to this Client. The AE code MUST already be setup in the employee file.
- State. Up to 12 characters can be entered for the Client State. This is to accommodate international addresses.
- Zip. Up to 15 characters can be entered for the Client Zip code.
- Country. Up to 30 characters can be entered for the Client Country.
- Notes. Up to 5000 characters can be entered for the Client Note.
- Active. Indicate if this client is active or inactive. A checkmark in the box means that the client is active. A check box without a checkmark means the client is inactive. The date the active or inactive status took place is also displayed.
- Code. Up to 5 characters can be entered for the Client Code. Use of the same code for two clients is not allowed. This code is used to reference the account for contacts, estimates, invoices, client reports, etc. Once a client is entered, any of its identifying information (name, address, type, etc.) can be changed EXCEPT client code. Client code is a required entry.
- Legal Name. If Company legal name is different than the display name. Up to 36 characters can be entered for the Legal Name field.
- Phone. Up to 20 characters can be entered for the Client phone number.
- Fax. Up to 20 characters can be entered for the Client Fax number.
- Office. If you use Offices (setup under G/L), an office can be designated for this client.
- Type. You can select whether this is a client, prospect or other from a drop-down list.
- Team. You can designate a default team for this client. The default code (and name) of the team assigned to this Client. The team must be defined in the Jobs > Admin > Teams.
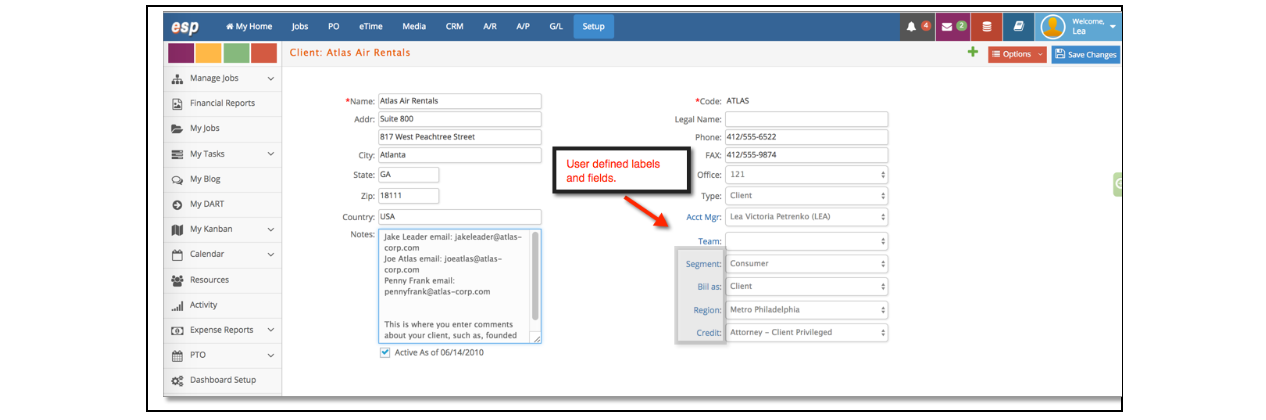
- User Defined Fields. There are four user-defined fields. To qualify your clients in any way you desire, you can define these four fields. As an example, you could define the fields as Segment, Bill as, Region, and Credit. The field names are defined in Setup > Preferences > Client Defined Fields.
Some examples of how these fields could be used are the following:
- Segment could be the type of business. Some examples of client segments might be: manufacturing, financial, consumer, etc.
- Bill as could define how the client billing parameters are defined, such as, client, pro-bono, or not for profit.
- Credit can be used to describe the payment record of this client, or class can be used to describe the size of the client. The use of this field is up to you!
- Region can designate the geographic area of the client.
The following rules apply when adding, changing, viewing, or deleting a client master record.
- Contacts Under the Client Options menu, you can see a list of contacts setup for the client.

Click on any Contact Name to navigate to the contact window and view and/or change the information set up for the contact. You can also quickly add a new contact by clicking on the green plus icon by Contacts. View Contacts section for additional information on how to create a new contact.


Client Entry Rules
When adding the client (or prospect), all of the information displayed in the client entry window is optional--except client name and code. Required fields are indicated by an *. Duplicate client codes are not allowed.
Any information on the client entry window can be edited except the client code.
A client master record cannot be deleted if that client is used anywhere else in the database. For example, if a job had been previously opened for a client. If you no longer do business with this client and if a job or estimate is in your database for this client, then make the client master record inactive so the client name will not appear in your pop up list of active clients.
Client Options
Within the client section, you have additional options. Note the options button, , that is available to you when you have a client record on your screen. Your options are:
Rates
Occasionally you'll come across a client that requires you to bill them at rates negotiated between your company and the client's. While your standard rates can be overridden every time you enter a charge to any of this client's jobs, e·silentpartner provides an easier approach -- set up the rates for the client, enter them once, and use them whenever a job for this client is undertaken.
The composition of all materials, services, rates, and/or markups are then known as the client rate schedule.

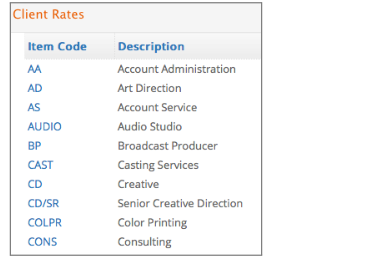
Client rates are directly linked to the client master record and are accessed by clicking Rates on the Options menu.
To display all values for a previously entered client item, click on the blue item code to display the complete details.
Once the rates are established, they are automatically applied to any job (for the estimate or when charges are entered), simply by setting the Bill at - Client Rates option in the Client Preferences section.
Entry Rules
The following rules apply when adding, changing, viewing, or deleting a client rate master record.
-
When
 adding a new line to the client rate schedule, you must use an item code that was previously set up in your company list of materials and services. Refer to the Setup > Item section of this manual for additional information.
 -
When
adding a rate from window, which lists all rates, e·silentpartner assumes you are adding a rate for an item that is not in the current list.

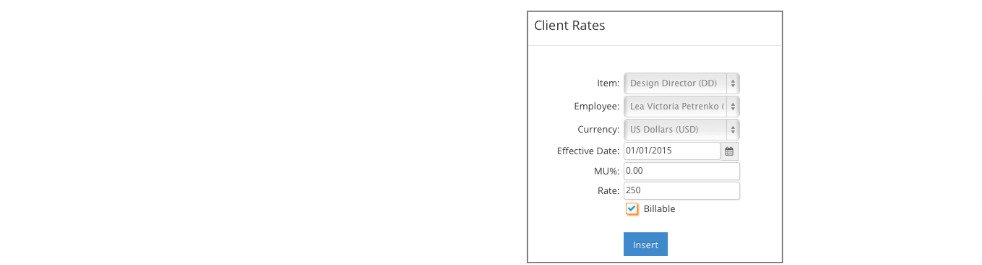
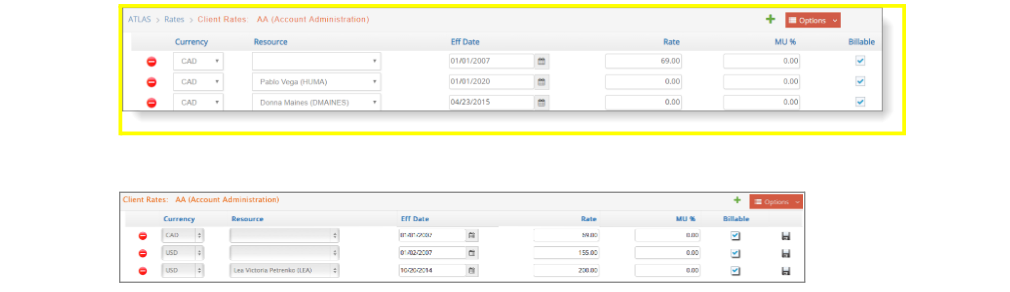
- Item. This field is a drop-down list with the Item Codes. This is a required field.
- Date. Effective date of the rate enterable or selectable from the calendar icon.
- Employee. This field is a drop-down list with Employee names and codes and is optional.
- Effective Date. The beginning date the rate should be used.
- Currency. This field is a drop-down list of Currency codes. This is a required field.
- MU%. The mark up percentage for external items such as printing, for example, 15%.
- Billable. Check box that indicates whether the item is billable. Non-billable items would not be checked.
- Rate. The hourly rate for time items, for example, $95 per hour.
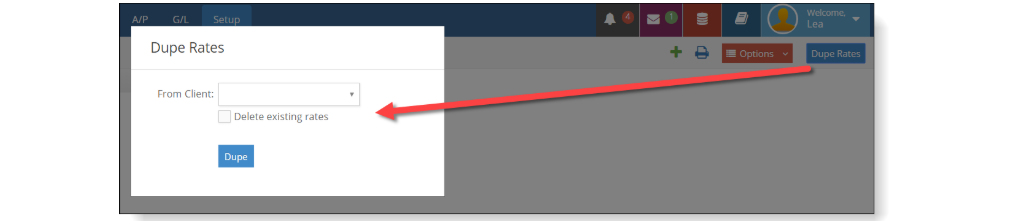
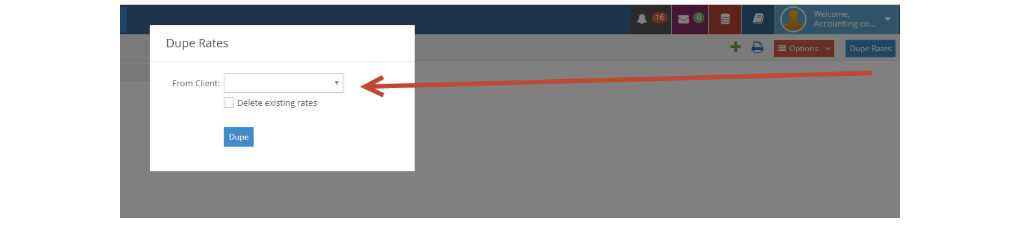
There is also an option to duplicate existing rates for a different client. If you have set up a group of rates and would like to use the same rates for a different client, please, click the Dupe Rates option on the top right side of the window. You will be given the option to import them and keep the existing rates in the ‘receiver’ client, or to delete them.
Divisions
If you are working with large client organization, you may want to further qualify the client projects by indicating a client division for the project. e·silentpartner allows for multiple divisions within any client. Using the Divisions screen, invoked by selecting Divisions from the Options menu, you can enter each division independently.
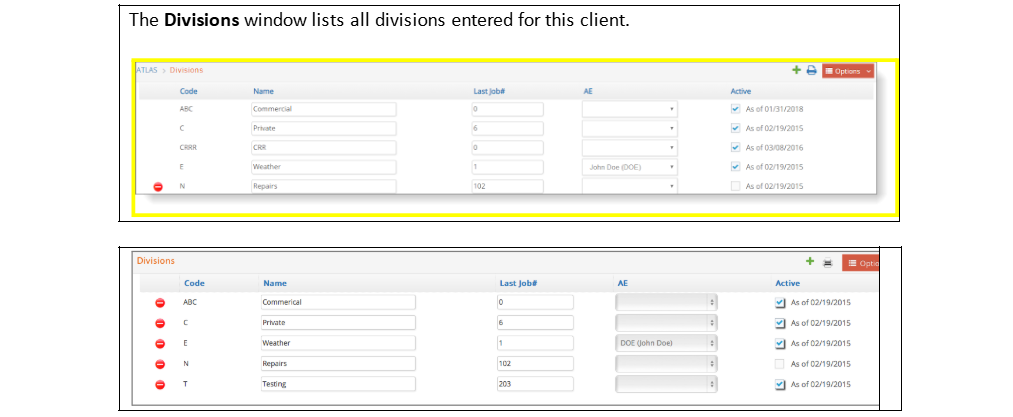
Division information consists of the following:
- Code. Up to 5 characters can enter for the division code. Two divisions cannot use the same code. Division code is a required entry.
- Name. Up to 30 characters can be entered for a division name. Division name is a required entry.
- Last Job #. If you enter a job number here, e·silentpartner will create job numbers for this client/division combination if you have Division Job Numbering functionality enabled for your database. Once the first job is created for this client division, e·silentpartner will update the job counter accordingly.
- Acct Exec. When a job is added to your database, the default account manager or account executive for the client comes from the client section. However, you can specify a different account executive for a client division.
- Active. A blank check box indicates that the division is not currently active. If the box is checked, the division is active. Inactive divisions will still show in the display area. The ‘As of date’ is the date the division became active, inactive or was reactivated.
Client Divisions can be printed by clicking on the Print icon on the top right corner of the window.

Entry Rules
The following rules apply when adding, changing, viewing, or deleting a client division.
- When
 adding the client division, a division code and a division name are required. Duplicate division codes are not allowed within the same client.
 - The division code cannot be edited. Any of the other fields on this window can be edited.
- A client division record cannot be deleted if that division is used anywhere else in the database. For example, if a job had been previously opened for that client division. If you no longer do business with this division and if a job or estimate is in your database for this division, then make the client division record inactive. Red delete icons will only show up in those records that are not used and can actually be deleted.

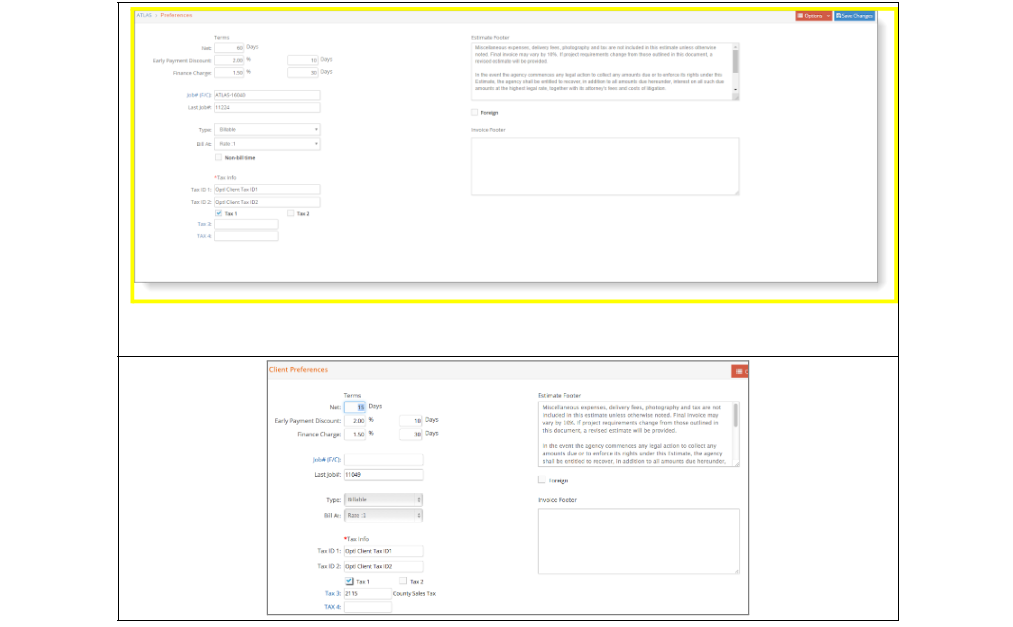
Client Preferences
This section of e·silentpartner provides the capability to customize each client's individual preferences, including Terms, Tax Information, specific Estimate, Invoice Footer comments and the default Bill At rate. To define your client's requirements, click Preferences on the  menu.
menu.
The following options are available:
- Terms. Your payment terms established with this client. These can include an early payment discount (2.00% if paid within 10 days), the generally accepted net payment of 15 days, and/or the late payment or finance charge rate (1.5% if not paid within 30 days), for example. Payment terms, if entered, are printed on client invoices, group invoices and optionally on estimates if the Print Terms checkbox is checked on the estimate printing selection window.
- Job#(F/C). This field displays for entry only if you had checked Use Client Job #s in the Setup > Preferences > Formatting window. If you checked this option, e·silentpartner will generate job numbers that are a combination of the client code followed by a dash (-) followed by the number entered (or displayed) in this window.
- Last Job#. If you are using a job number counter by client, this is the last job number entered for this client. Several of our clients enter a new starting number at the beginning of each year, such as 170001 for calendar year 2017.
- Type. This is the default value for the billing status of jobs for this client when they are added to your database. Generally, the majority of your jobs should be billable. However, you may also specify non-billable, or internal.
- Estimate/Invoice Footer. e·silentpartner gives you the option to print a client specific footer at the bottom of each client estimate and invoice. If you enter text in either of these fields, e·silentpartner will print this text at the bottom of the appropriate form (estimate or footer). If these fields are left blank, e·silentpartner will default to the global footers that you defined in the General Ledger Company Section.
- Bill At. This is the default value for the rate schedule to be used for this client’s jobs when they are added to your database. Your options are Client Rates, Rate: 1, Rate: 2, Rate: 3 or Cost.
- Non-bill time. This is the default value if time charge needs to be billable or non-billable for this client when new jobs are added to your database.
- Tax ID# 1 and 2. Your client’s tax ID numbers. Up to 20 characters can be entered for each number.
- Tax1, Tax2, Additional Sales Taxes (Tax 3 and Tax 4). Information on whether materials and services for this particular client are taxable or not. You may choose to set up one, both, all or none at all. You also have the ability to set two additional sales tax accounts if needed.
As the client preference is an extension of the client master record you can only edit the information presented in the window. You cannot delete a client preference record. If you do not want to use any option in this window, simply edit the record and erase the information that you do not want to use.
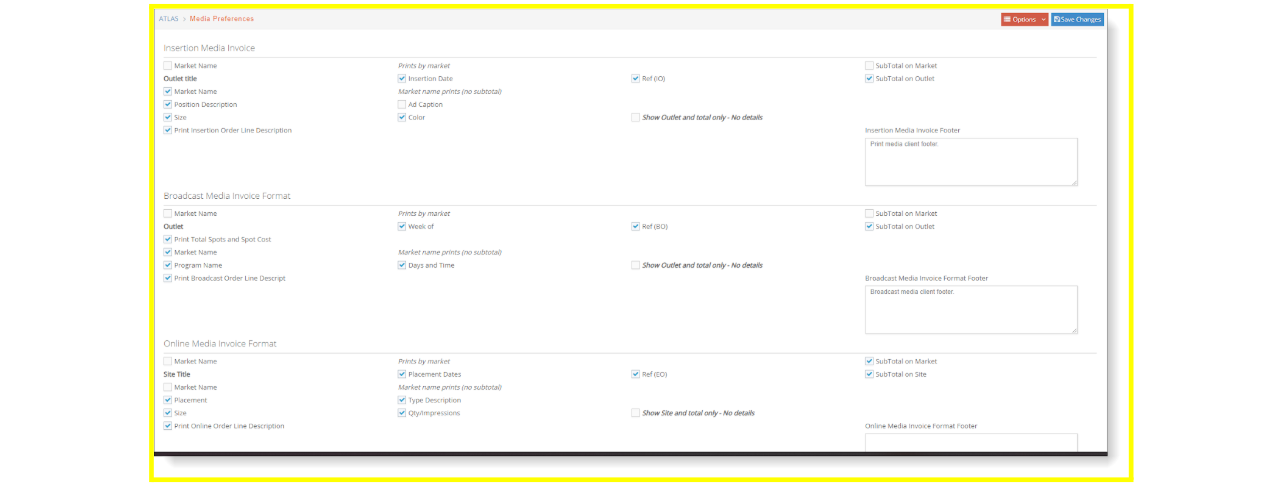
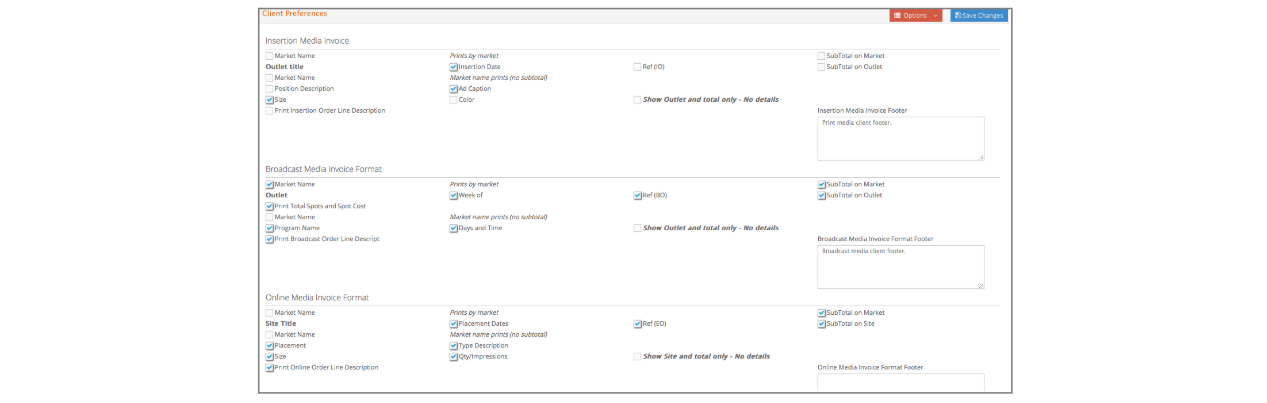
Media Prefs
If you bill a client for media placement, this window allows you to define the default invoice format (what prints, what subtotals do you want, etc.) for each type of invoice: Print, Broadcast and Online.
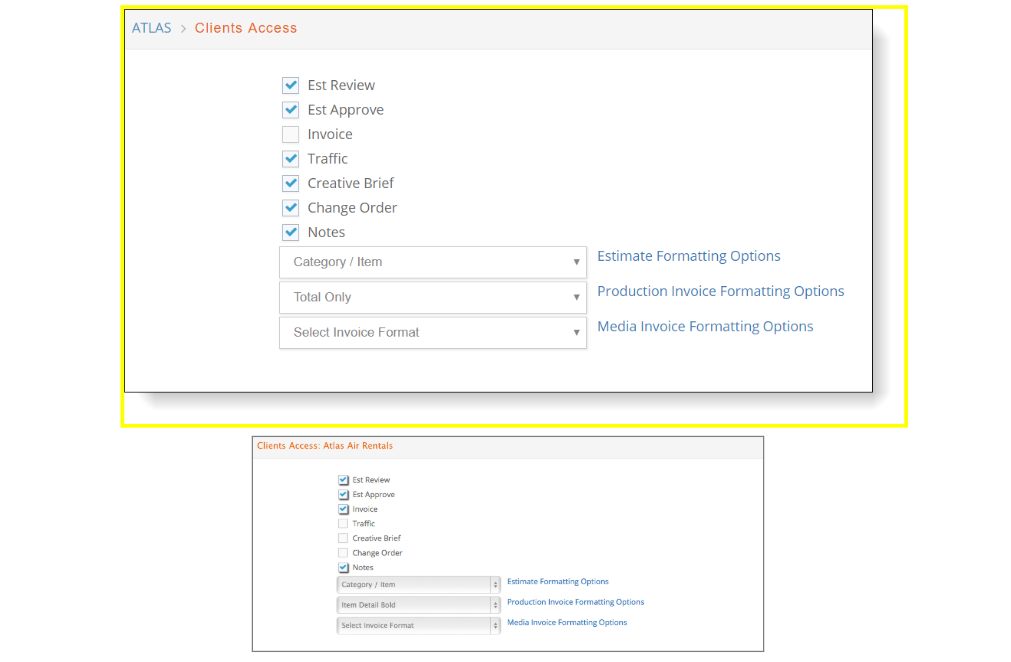
Client Access
e·silentpartner provides a portal for client access to estimates, schedules, digital assets, etc. The purpose of this window is to define what your client can view. Using this feature, you also indicate the format of a project estimate and invoice the client will view when they select to display the content of both.
Notes
‘Notes’ is the last selection under Options. Use this area, notes, to record information that you may want to refer to in the future. Select Notes to view a list of notes entered for this client.


Navigation of the client notes area is discussed in the following:
- Click the blue ID to view the note in detail.
- Click on the + to add a new note.
- Click on the Printer icon to print a single note or all notes
- Click on the X to delete a note when you are viewing it in the notepad area.