ON THIS PAGE
Set Up Vendor Invoice Schedule
The first step is to add or select a Vendor Invoice to be the ‘Original’ Invoice, and that will be used to recreate ‘replicas’ moving forward. You can add a new one, or use an existing one: any non-deleted invoice with a status of OPEN (posted) or PAID (posted and fully paid) will show a button on the top right corner to ‘Set schedule’.

The schedule window will present you with the following information (mandatory fields are identified with an asterisk) that you need to populate in order to create a schedule:

-
Title (mandatory - text): use a title that will help you identify this set of invoices. Like ‘Office Rent’, ‘Monthly Phone Bill’ or ‘Project A Consulting’
-
RSN (mandatory): (mandatory) will show you a combination of the Bill RSN # (the unique identification number that e·silentpartner provides to each vendor invoice), the vendor invoice number and the vendor code. You can go back to the invoice by clicking on this blue link.
-
Active (mandatory - checkbox): Set as checked by default, will indicate if this schedule is active, meaning need to be run, or not. You can activate or deactivate as needed.
-
Start Date (mandatory - date): date to be used as starting date for the schedule
-
End Date (non-mandatory - date): date to be used as ending date for the schedule. If empty, the schedule will continue running with no end.
-
Recurrency Type (mandatory - dropdown): frequency to be used to create the schedule. Pick between: Daily, Weekly, Week of the Month, Day of the Month, Week and Month of the Year, Day and Month of the Year
-
Run Every (mandatory - dropdown): depending on the Recurrency Type picked, this field will readjust to show you
○ a list of numbers- Daily - every how many days you want an invoice to be created
- Day of the Month - what day of the month you want an invoice to be
created
○ a list of numbers + additional options - Weekly - every how many weeks and on what day of the week you want
an invoice to be created - Week of the Month - every how many months, on what day of the week,
and on what week of the month you want an invoice to be created
-
Week and Month of the Year - every how many years, on what day of the
week, on what week of the month and on what month you want an
invoice to be created -
Day and Month of the Year - every how many years, on what day of what
month you want an invoice to be created -
Identifier Pattern (mandatory - combination of entry field + dropdown): by default, the system will assign automatically vendor invoice numbers to the invoices created via schedule by using the original vendor invoice number and the new invoice creation scheduled date. But you can use the Identifier pattern to create vendor invoice numbers that will adjust to your needs.
- Enter a number or text that will be used to identify the invoice, like ‘RENT’ or ‘PHONE’
- Select a ‘_’, ‘-’ or ‘.’
- Select date format: yyyymmdd, yyyymm, yyyy (options will be available based on recurrency type selected)
Example
we have created a schedule for our ‘Office Rent’: every 2nd of each month, starting in November and for a year, we want to create an invoice. We will then select the option ‘Day of the Month’ as it best suits our needs. The ‘View Sample Run Dates’ will show the initial dates for our schedule, as well as the last day where that recurrency will be available to create an invoice.

Or if you need to create this same invoice every first Monday of the Month. And in that case, the ‘Week of the Month’ should be the Recurrency type chosen, like the below example.

Make sure to click ‘save changes’ before leaving the page to record your data.
Run recurring Vendor Invoice
Once your schedule is set, it is time to run this process to generate invoices under ‘AP > Vendor Invoice > Run recurring VI’.
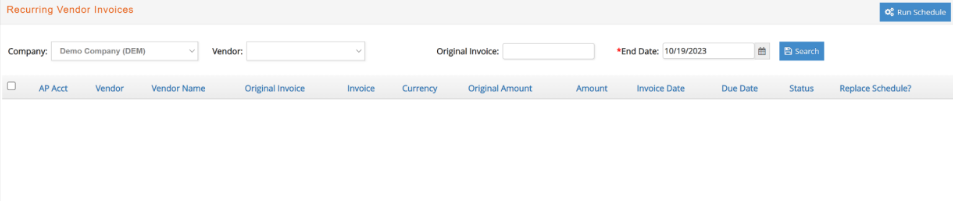
In this window you can select:
- Company (mandatory - dropdown): by default, this field will be pre-populated with the location your user’s profile belongs to. In the event of a multi-company database, you will be able to navigate throughout different locations if you have the security to do so.
- Vendor (non-mandatory - dropdown): populate this field ONLY if you want to run the schedule for a specific Vendor. Otherwise, leave blank.
- Original Invoice (non- mandatory - entry field): populate this field ONLY if you want to run the schedule for a specific Vendor Invoice. Otherwise, leave blank.
- End Date (mandatory - date): until what date you wish to create invoices for. Following our previous example, if you want to create ALL the invoices for your ‘Office Rent’ for a year, you will type here 12/31/2024, and the system will create one invoice per month, for all the months between now and that date, following the recurrency set up.
After clicking search, the system will present you with a list of all the invoices that can be created following the entered criteria.
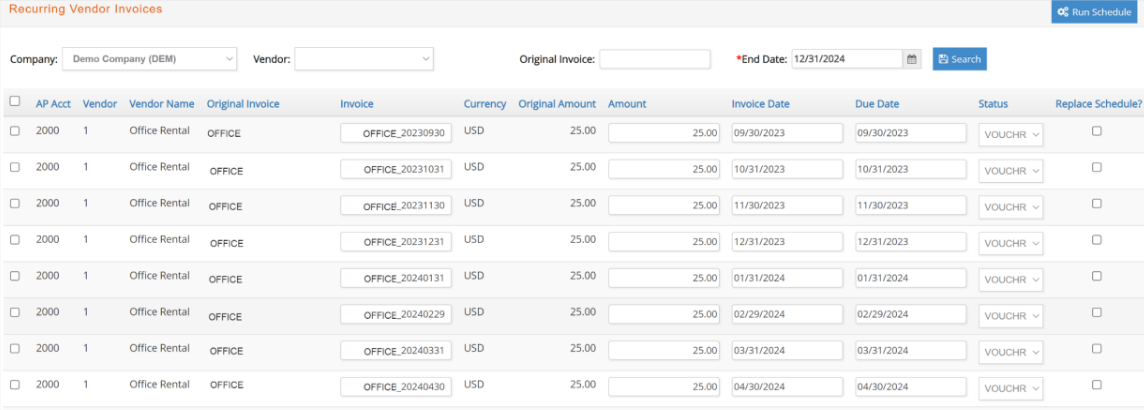
This window will present you with the following information:
- AP Acct: Account Payable account the original invoice is posted to
- Vendor: Vendor Code
- Vendor Name: Vendor Name
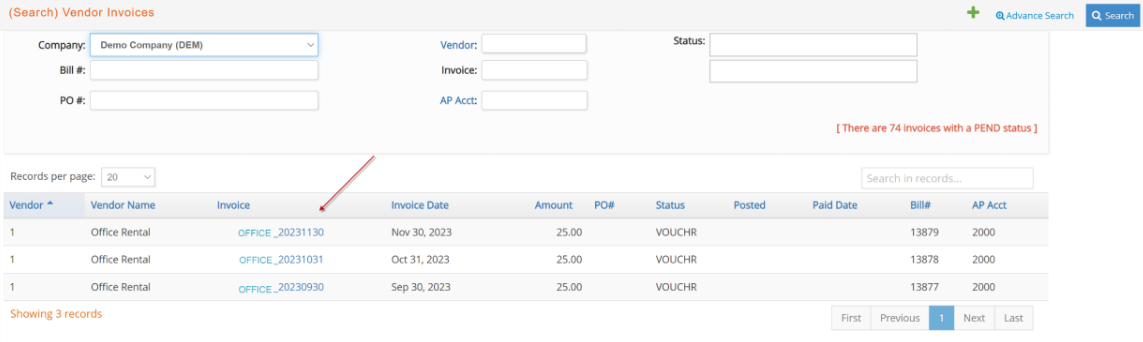
- Original Invoice: Original Invoice number. To facilitate the recurrency process, we recommend you use a vendor invoice number that will help you to identify the invoice you are creating recurring invoices for.
- Invoice: Vendor Invoice number for the recurring invoice to be created. By default, the system will automatically populate this field with a concatenation of the original vendor invoice number and invoice date. It can be modified - just type in the field the vendor invoice number that you wish for your new invoice to be created
- Currency: Vendor Invoice currency. Can’t be modified, as it is linked to the original vendor invoice AP Acct currency
- Original Amount: Original vendor Invoice amount
- Amount: Invoice amount for the recurrent invoice to be created. By default, it will reflect the original invoice amount, but you can change it if you need to
-
Invoice Date: By default, invoice based on schedule, but can be modified if needed.
-
Due Date: By default, due date based on invoice date and net terms set for Vendor
-
Status: Only two options will be available VOUCHR (non-posted, but with right GL and Job distribution) or PEND (non-posted, either GL and or Job distribution require correction)
- VOUCHR status will be automatically selected if no changes are done to invoice amount or date, or option to ‘Replace Schedule’ is selected
- PEND status will be automatically selected if there are changes done to invoice amount, or option to ‘Replace Schedule’ is selected
-
Replace Schedule: In the event that your recurrency amount changes (your office rent increases mid-year), you can always decide to adjust your recurrency by using the ‘Replace Schedule’ option.
- the system will automatically inactivate the related recurrency
- will create a new one. As soon as the new invoice is posted, the recurrency will continue with the new amount set up.
Use the checkboxes on the left side to decide what invoices you wish to create: you could decide to create ALL invoices in a recurrency, or just a few.
Once ready, click the ‘Run Schedule’ blue button. You will be presented with a success message that contains a link to the list of invoices generated through the process.

Review, fix any adjustments needed (if invoices were generated with a PEND) status and post when you are ready.
Edit recurring Vendor Invoice Schedule
Under the Accounts Payable Module, you will also have an option to quickly review any Recurring Vendor Invoice Schedule set in the system, active or not.
This window will provide links to either the Recurrency Window - in the event that changes are needed - or to the original invoice itself.
