This section provides you with a brief overview of how to navigate within the e·silentpartner application and provides insight into common features within windows.
Interface Basics
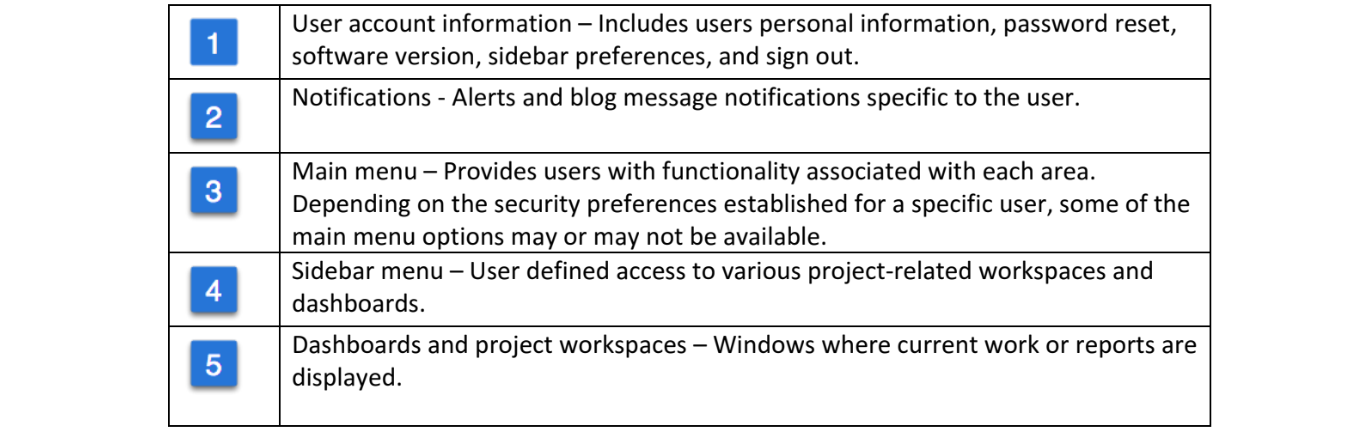
Main Menu
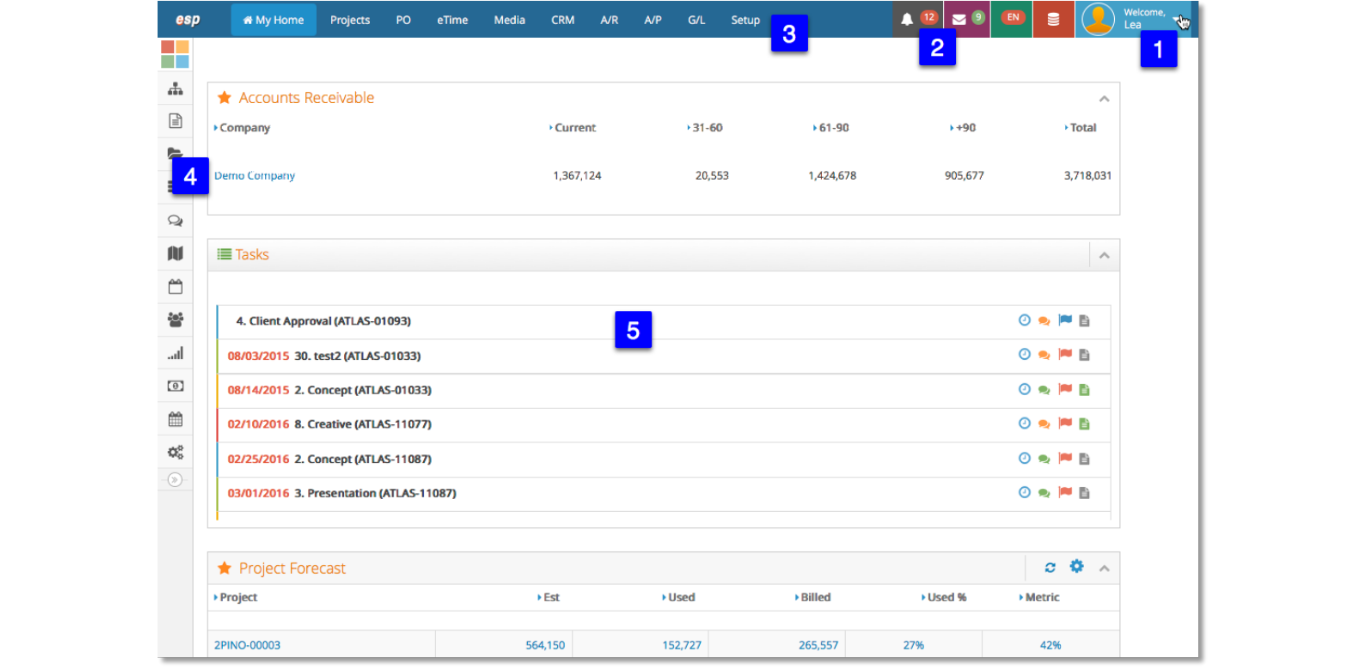
Upon entering e·silentpartner, each user is presented with the main dashboard and top navigation options at the upper portion of the browser window as shown here:

Depending on the security preferences established for a specific user, each of the menu options may or may not be available.
Side Menu and My Account Settings
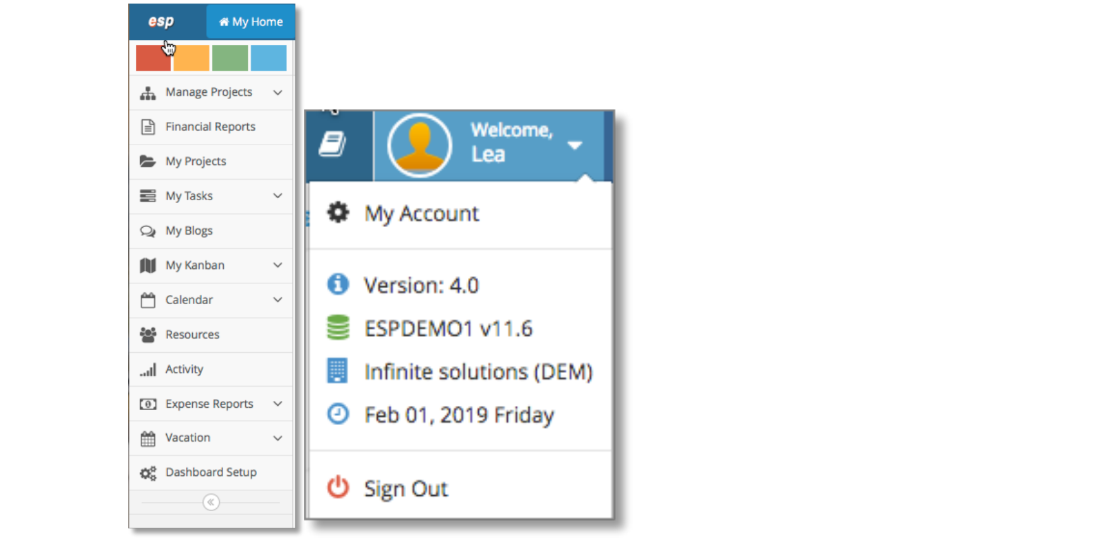
e·silentpartner’s side navigation provides users with valuable and user-specific project management dashboards and reporting windows. By selecting the ‘My Account’ drop-down from the Welcome bar in the top right, users can decide which sidebar menu items they want to see, and which dashboard is presented upon log in. To allow for a larger working space, users can collapse the sidebar menu using the sidebar’s << arrow button.
Navigation Tips
For ease of use throughout e·silentpartner, there are aspects that remain consistent.
-
Any time a user sees an orange plus sign (
 ) this will allow for the creation of NEW entry such as a new Job or a new Vendor Invoice as shown at these drop-down menus. To begin a new entry, click on the orange plus sign and it will turn
  .
.

-
Any field denoted with a red asterisk (
 ) indicates the field is required to have information entered before the overall entry/record will save to the data base. In the Job Start window example shown below, required fields include Company, Client, Job Title, and Contact.

-
Field labels displayed in
 indicate a pop-up window will be displayed when the user clicks on the label name. The pop-up window will generally provide the user the ability to search for and select a specific item which can then be entered in the field. A sample pop- up window is shown here:

-
In any search results window where the column heading has a sorting symbol,
 , the results can be sorted in ascending or descending order by clicking on the title of the desired column as shown:

-
In most search results windows and pop-up windows, a ‘search in records’ option is available to further aid the user in finding a specific record or series of records. To do so, enter the field and begin typing a search string such as Name or Account Number and the window will display the results:

-
In some fields, especially for Vendors or General Ledger accounts, the field value may be from one of hundreds of entry options. In this case, the user may use the ‘type ahead’ feature by typing the portion of a name such as “Withholding.” Result options are automatically displayed in a drop-down list.

-
In the example above, upon typing “with” all accounts that have “Withholding” in the account name are displayed. The user may select one account from the results by moving down the list with the down arrow on their keyboard or selecting one with their mouse.
Type ahead is also available in the eTime Charge Entry window where the user is able to type a portion of a Job name or Job number for the specific job to display:

- Another common feature throughout the application, is the manner in which the user may enter a date. In fields that are based upon an accounting period, the date entry format will be YYYYYMM in numerical digits. One sample field using this format is shown here:

In other date fields, the date format will be MM/DD/YYYY as shown here:

For example, to enter a date in this field, the user may type 0301 and tab out of the field. e·silentpartner will complete the entry to display 03/01/2017. To enter a date for a prior year, the user may type 030117 which autocompletes to 03/01/2017. Alternatively, the user can click on the calendar icon and a pop-up calendar will display from which the user can select a date.
Search Windows
Throughout the application, the user will be able to conduct record searches such as Open Jobs, Media Orders, Client Invoices, Vendor Invoices, Journal Entries, etc.
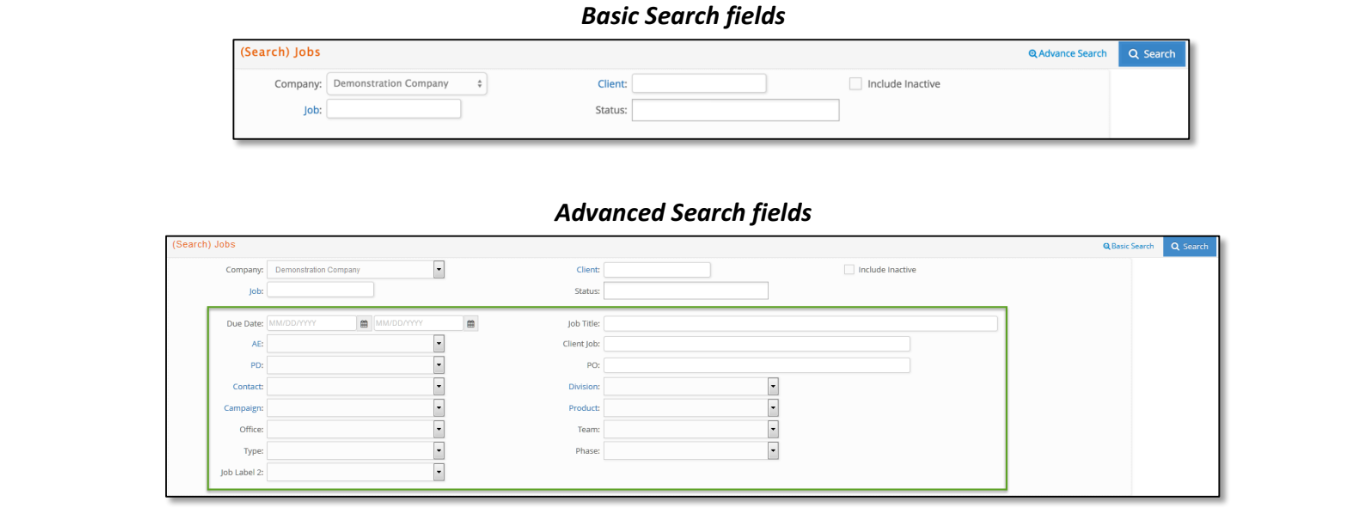
Depending on the search window, the user may also be presented with ‘Basic’ and ‘Advanced Search’ options. To include Advanced Search options, click on this  icon within the upper right tool bar. Doing so will expand the search window as shown here:
To conduct a search, enter your search criteria and click the blue search icon  in the toolbar.
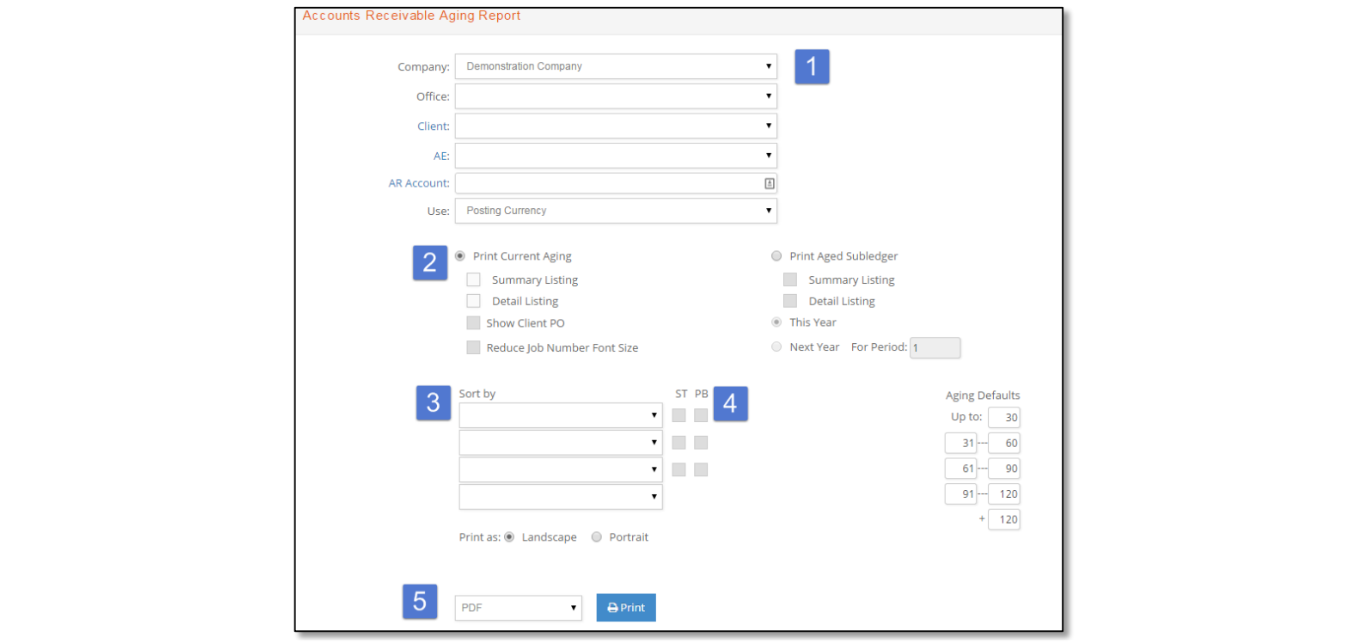
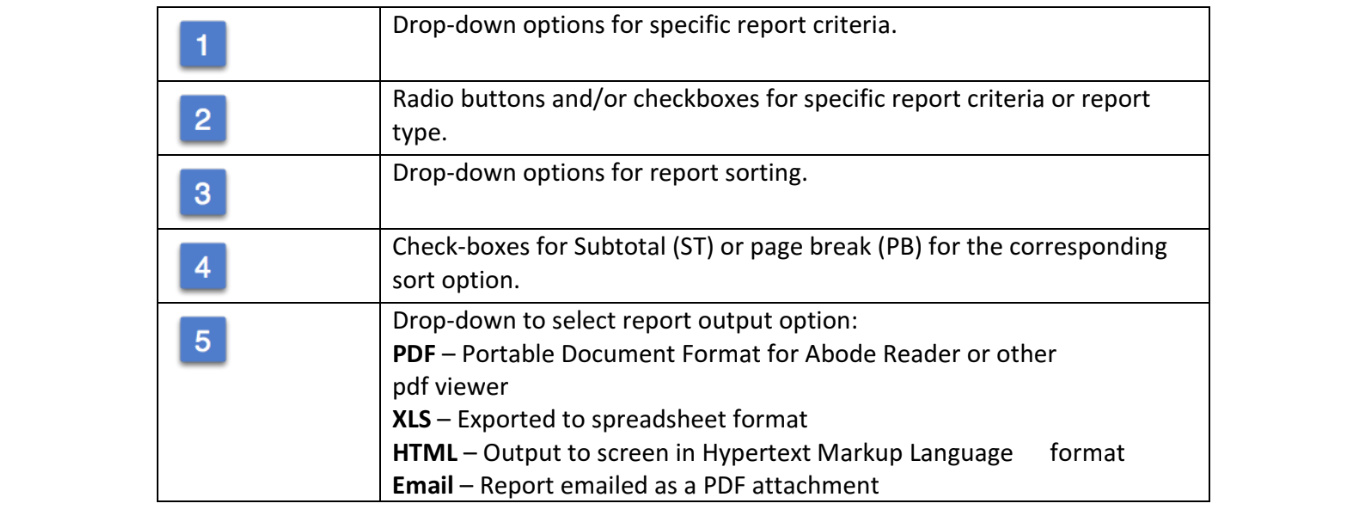
Report Printing Options
e·silentpartner contains an extensive number of reports for the user to generate and use. The report windows are consistent throughout the application and the general aspects of reporting will be reviewed using the graphic shown below:
Setup Tips
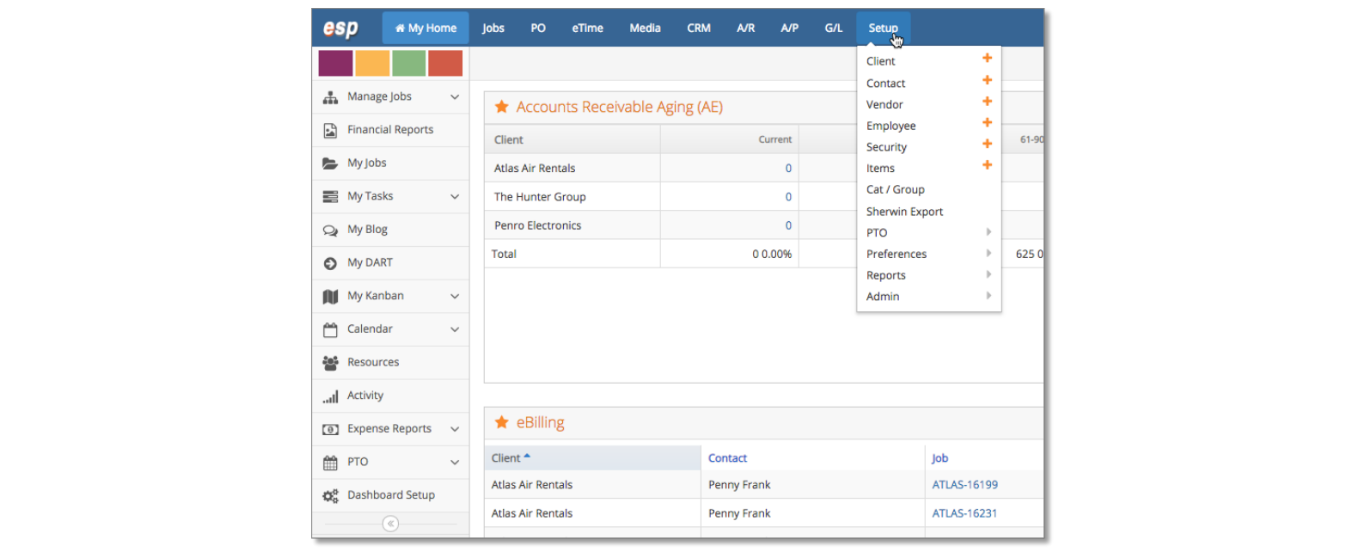
In order to effectively use esilentpartner, various elements must be initially set up. This overview will cover setting up Clients and Contacts as these two are needed for the creation of a Job. To do so, navigate to Setup and select either the orange plus sign ( ) next to ‘Client’ or ‘Contact’ as shown here:
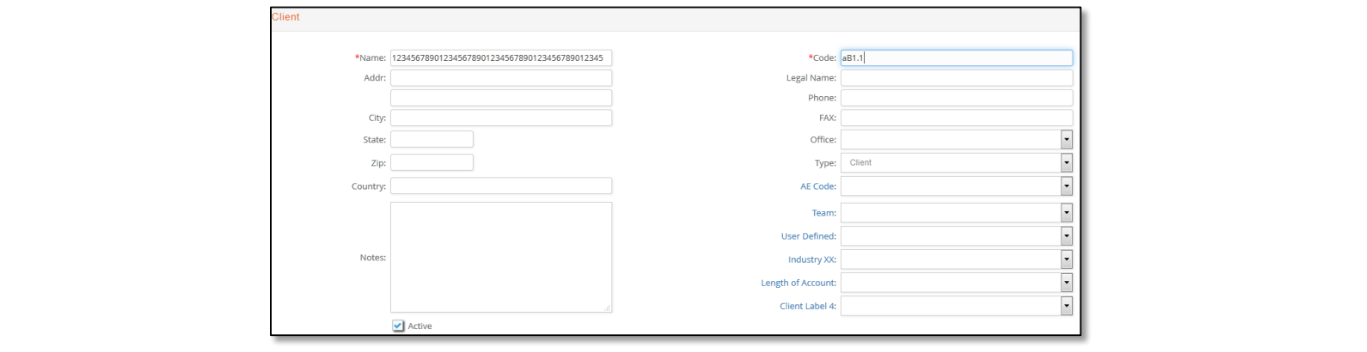
Upon electing to setup a new Client, you are presented with a data entry window where a minimum of two entries are required, Client Name and Client Code. The client name may contain alpha numeric characters and be up to 45 characters in length. The client code may contain alpha numeric characters up to 5 characters in length. It is recommended to enter as much information as possible during the initial Client or Contact entry.
Upon entering the necessary information, insert the entry into the database by clicking on the blue insert button ( ) located in the upper right portion of your browser window.
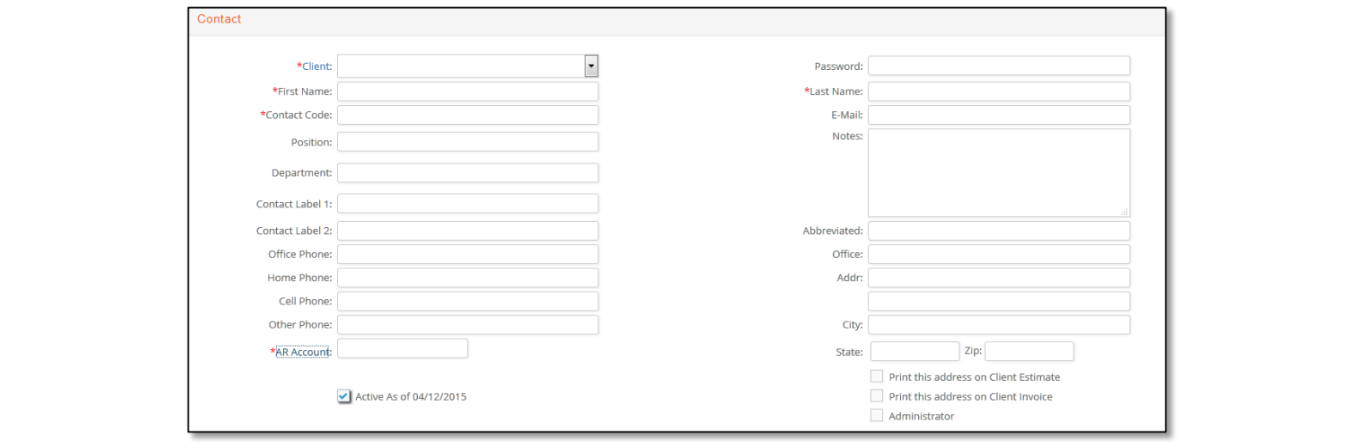
Since any Job within e·silentpartner must have both a Client and Contact, the next step will be to enter a Client Contact. For any Client there can be an unlimited number of Contacts. The Contact is generally the primary person for whom the specific Job is being performed.
Similar to the Client entry window, the Contact entry window has a minimum number of fields that must be entered, including Client, First Name, Last Name, Contact Code, and AR Account.