Add a Purchase Order
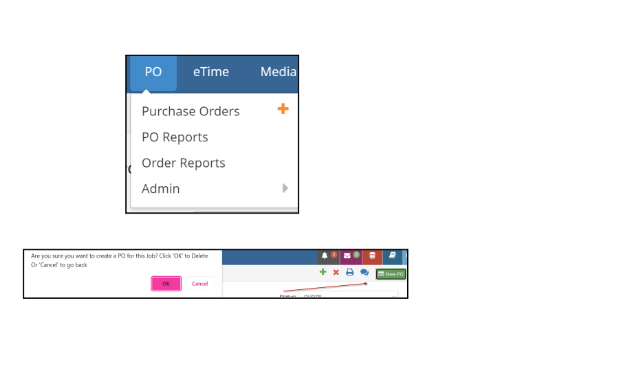
To begin the process to add a Purchase Order, click the orange plus icon from the PO sub menu, or the green plus icon in the main search window.
Additionally, clicking the ‘New PO’ icon within an existing Job will create a new PO.
From the window that is displayed, enter the initial PO information. Please note that this window will present information based on your PO Preferences settings (Check the Purchase Order Approvals (Business Rules) section):
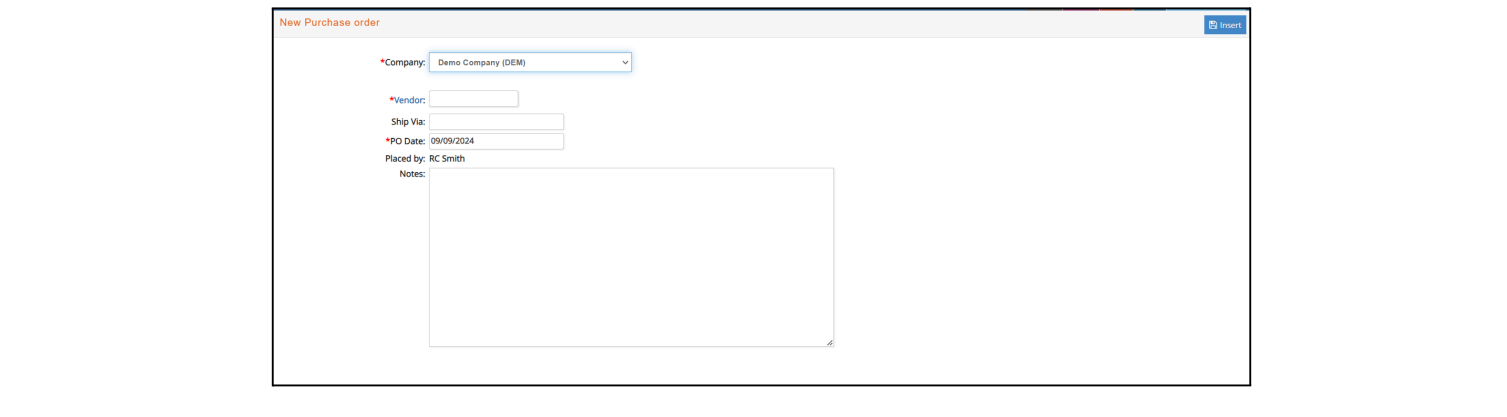
- Vendor: The vendor code to which this purchase order is issued. Click on the blue label ‘Vendor’ to display a list of active vendors to select from. You may also key the first few letters of the vendor name to display a list populating those letters. This entry is REQUIRED.
- Job: For which the Purchase Order is being created. This field will be mandatory if the company has set up a preference to create Purchase Orders by Job.
- Ship Via: A 10 character field that you can use to indicate how the materials should be shipped. This entry is OPTIONAL.
- PO Date: The actual date the PO was entered into the system. It is automatically populated with the current date. It can be changed if the status is not DONE.
- Placed by: A field that indicates who placed (or originated) this order with the vendor. This field will be automatically populated with the name of the user logged in.
- PO Notes: A 1,500 character field that you can use to notify the vendor of your terms and conditions, cancellation clause, or special instructions relating to this purchase order. This entry is OPTIONAL.
Click the Insert button,  , to continue to the next data entry window.
Upon clicking insert, you are presented with a window as shown here:
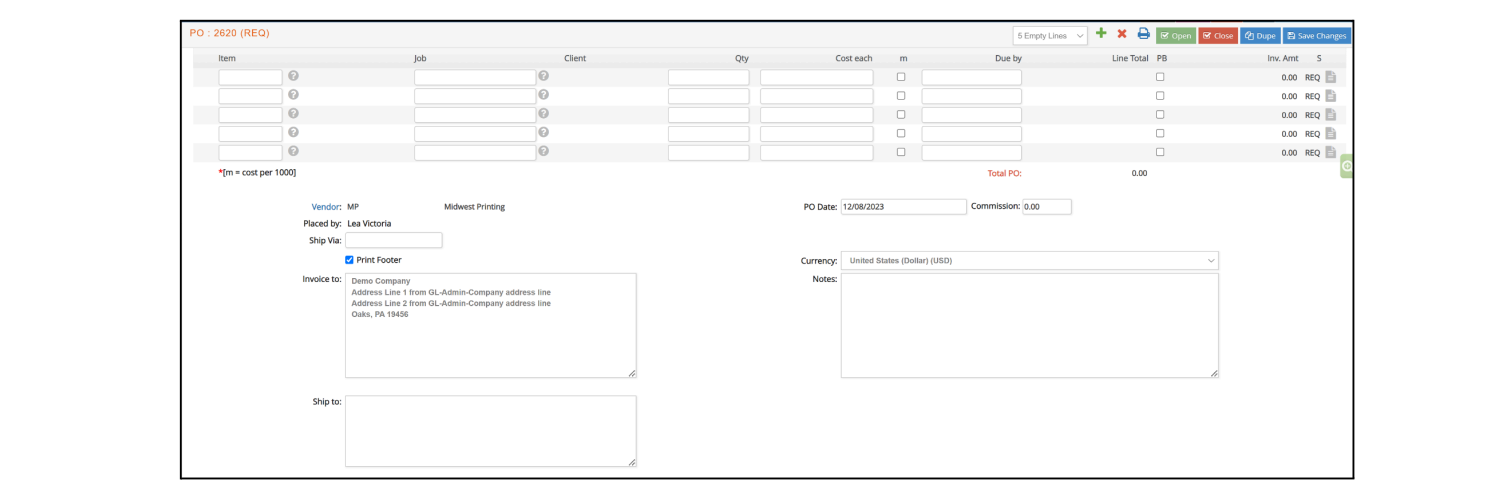
This is where you enter the tasks, services, items, and materials associated with this order. The entry rules for the purchase order lines are:
- Item: The item code for this detail line. This entry is REQUIRED. The item code must have been created under the Setup module. Either key in the item code or click on the gray question mark icon,
 , to select from a popup list.
 - Job: The job code for this detail line. This entry is REQUIRED. Either key in the job number or click on the gray question mark icon to select a client and then a Job.
- Client: This field will populate with the client associated with the Job selected.
- Qty: The number of units you are ordering of this item. This entry is OPTIONAL.
- Cost: The unit cost of this item to you. This entry is OPTIONAL.
- m. A checkbox to indicate that the cost specified is per 1,000 pieces. This entry is OPTIONAL.
- Due by: The scheduled delivery date of this item. This entry is OPTIONAL.
- Line Total: The total of the line which is quantity multiplied by unit cost.
- PB: indicates a line that has been client billed when checked.
- Note pad,
 : When you click on or tab into the notepad icon you can enter notes to further describe the requirements of this line item you are ordering. This is limited to 2,000 characters. This entry is OPTIONAL.
 - Invoice To: A field that you can use to indicate where the invoice for this order should be sent. However, e•silentpartner automatically fills this value with your company name and address if you set the default (for purchase order addresses) in the Setup Preferences formatting window. The field limit is 250 characters. This entry is OPTIONAL.
- Ship To: A field that you can use to indicate where the goods for this order should be sent. However, e•silentpartner automatically fills this value with your company name and address if you set the default (for purchase order addresses) in the Setup Preferences formatting window. The field limit is 500 characters. This entry is OPTIONAL.
- Currency: This is the currency that the PO is generated/issued. If you are a multi-currency database and have different currencies setup, you can choose the correct one from the drop-down. Please note that the vendor invoice associated with the PO will need to share the same currency as the PO.
- Print Footer: If this checkbox is selected, the Purchase Order Footer text that is entered under GL > Company will be included on the printed PO.
When all entries are complete, click  to add the PO line(s) to your data base.

- Status. A PO can have one of five statuses:
- REQ is a PO requisition that has been entered but not yet sent to the vendor. A REQ status PO will print with the legend ‘REQUISITION’ instead of Purchase Order. This will change once the PO changes status to OPEN.
- OPEN is a PO that has been changed from REQ to is one that has been printed and, presumably, been sent to the vendor. Note: Once a purchase order is flagged as OPEN the value of this purchase order will be added (as Open PO’s) to the job linked to this purchase order
- DONE indicates a PO that has been invoiced in total by the vendor. Note: A purchase order can be marked as DONE even if no vendor invoice was received against it or the vendor invoice was not equal to the PO amount. When the vendor invoice is entered by accounting and if there is a difference between what was ordered and what was invoiced, e•silentpartner will display an alert and the accounting individual can accept the difference and at the same time mark the purchase order as DONE.
- REQA is a PO that is awaiting review and approval based upon the PO Business Rules.
- A REQD is a PO that has been reviewed and disapproved by the approver established under the PO Business Rules.
While in the PO Entry window, the toolbar will display various icons as shown here:

To add addition lines to the PO select from the ‘Empty Lines drop down,  , between 3, 5 or 15 new additional lines.
To add a new order, click the green plus icon,  .
.
To delete a PO, client the red X icon, . Note PO’s with a status of DONE cannot be deleted.
To print a PO, click the printer icon, . Printing POs will be covered next.
To change the status of a PO from REQ, or REQA to OPEN, click the Open icon, .
.
To close a PO and change the status to DONE, click the Close icon, .
.
To duplicate a PO, click the Dupe icon, . This process will be covered in more detail later in the user guide.
For any changes that need to be saved, please click the ‘Save Changes’ button.