Search, Add, Reverse, Duplicate, Set up and Run Recurring Journal Entries
Guidelines
The Journal Entry function allows you to enter financial transactions that directly and immediately modify account balances on your general ledger.
Specifically, the Journal Entry feature allows you to:
- Search for a journal entry or range of journal entries.
- Add a journal entry.
- Review a journal entry.
- Print a journal entry.
- Reverse a journal entry.
- Duplicate a journal entry.
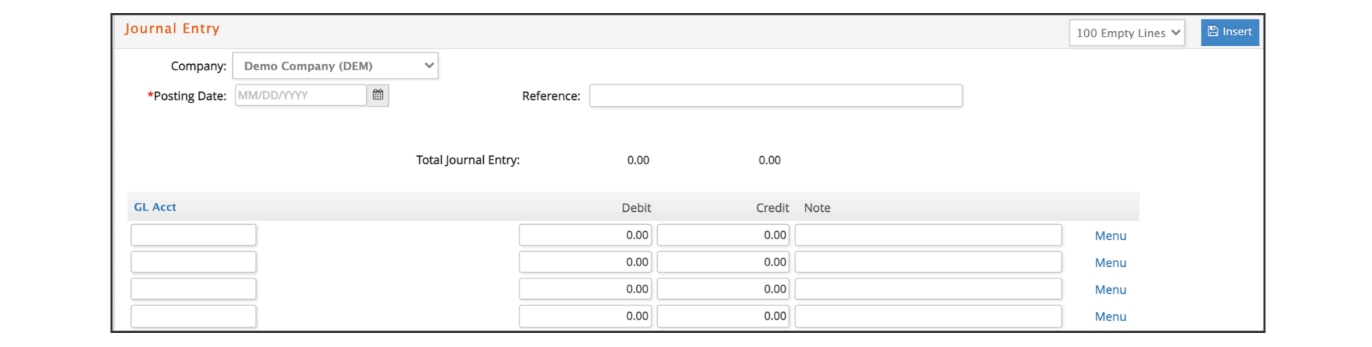
The Journal Entry feature consists of the following options:
- Journal Entry#: This number is assigned by e·silentpartner.
- Posting Date with GL Period: The date the entry is recorded to post with the associated GL fiscal period to which the entry is applied.
- Reference: This identifies the reason for the entry.
- GL Account: The GL account that is debited or credited.
- Debit/Credit: The amount that is posted as either a debit or a credit.
- Name: Name of GL account that is debited or credited.
- Note: A note further clarifying the purpose and details of the journal entry.
- Menu: Client Job related codes used to classify operating income & direct expense transactions on the Management Income Statements.
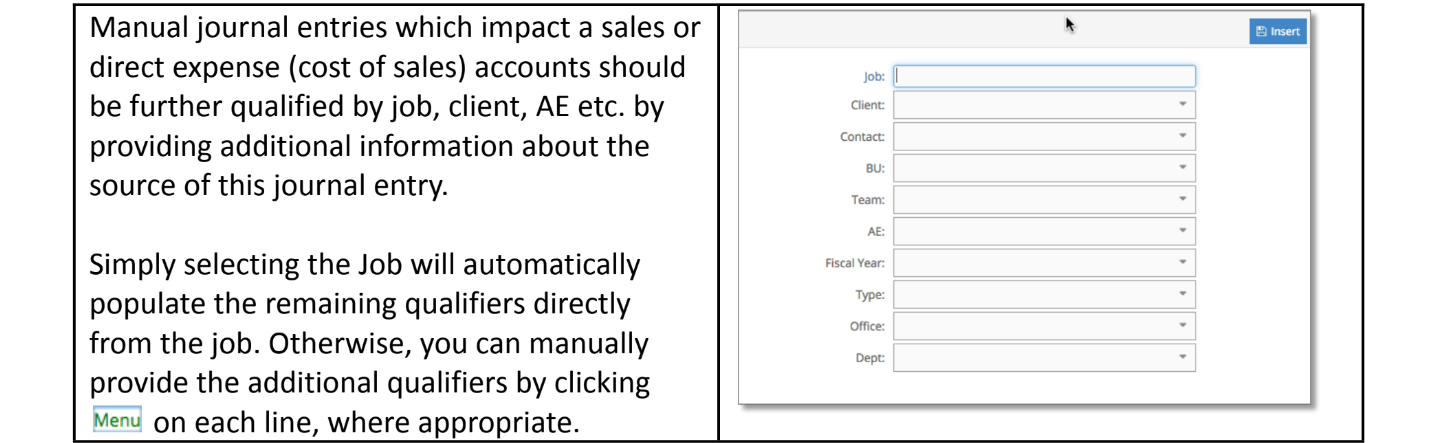
For each line on the journal entry line, you can further qualify the entry by selecting the Menu option to select one or more of the following:
- Job: The job code to which this entry applies. Select first to automatically populate the remaining fields associated with the job.
- Client: The client code to which this entry applies.
- Contact: The contact code to which this entry applies.
- Division: The division within the client.
- Team: The team ID within the agency.
- Acct Exec: The account executive to which this entry applies.
- Job Label 1: The job label 1 field variable to which this entry applies.
- Type: The type of job to which this entry applies.
- Office: The office to which this entry applies.
- Department: The department to which this entry applies.
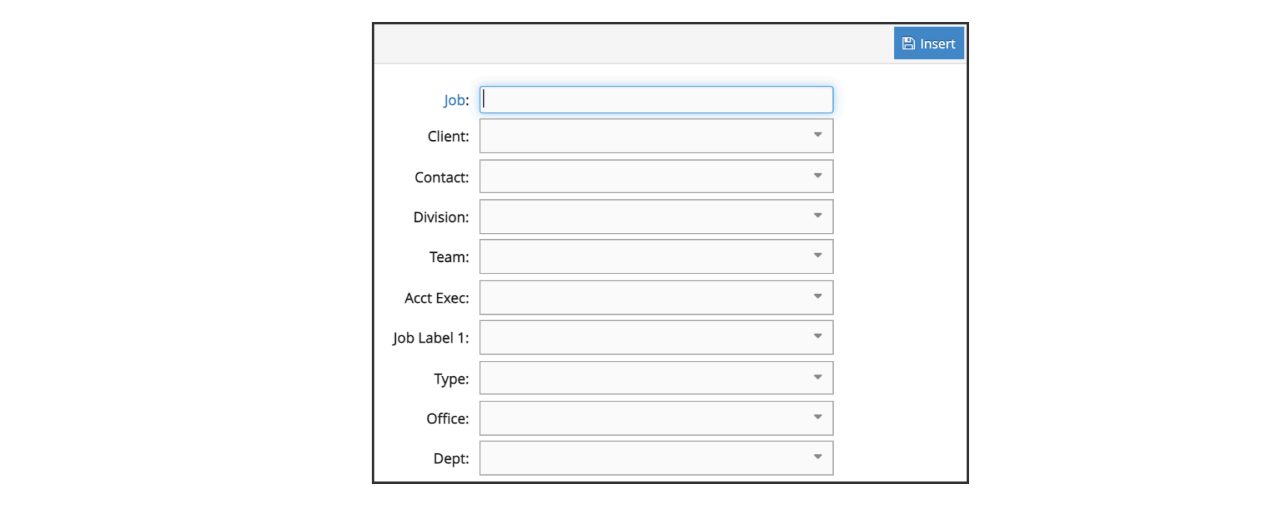
However, in order to flow into the corresponding management income statement, these menu selections are required for any operating income or direct expense accounts. Furthermore, when a Job# is selected, e·silentpartner will automatically populate the remaining Menu fields with the values associated with the job.
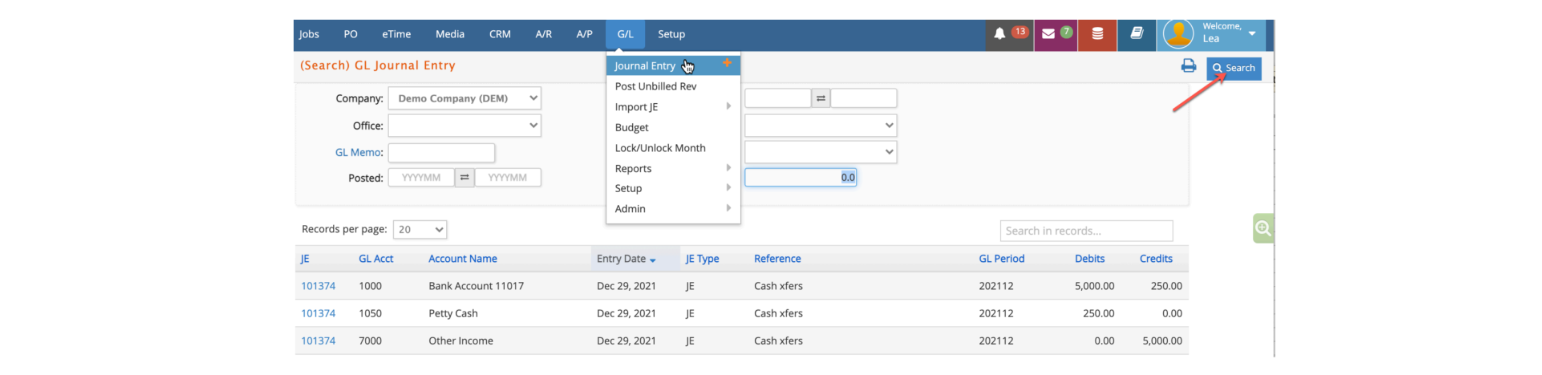
Journal Entry - Search

Enter your search criteria and click Search. The results will be displayed below.
Journal Entry - Add
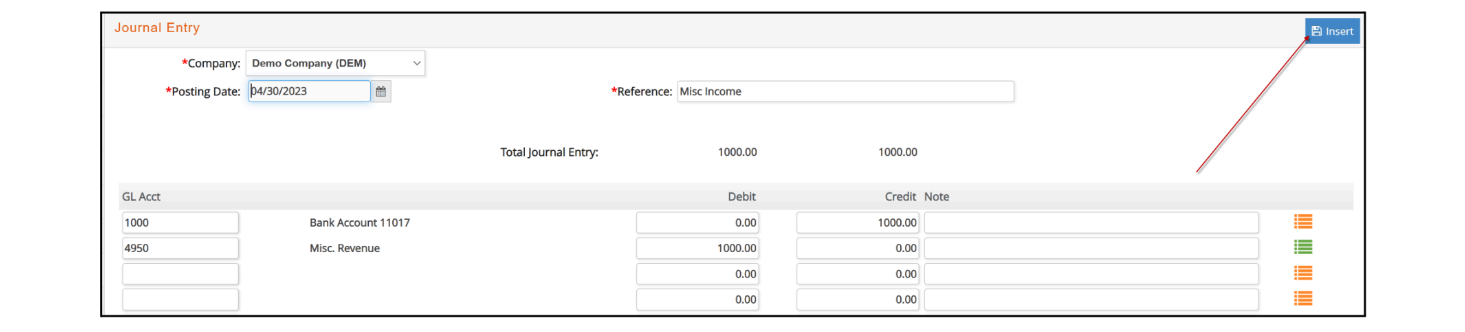
From this window, you can add a journal entry to any period of the current or next fiscal year. Of course, the fiscal period you select must be open (unlocked). Use the Last Year Journal Entry window instead under the GL > Admin menu to enter a JE to the prior fiscal year.

Enter the posting date, reference, GL accounts, debits and credits and click Insert provided debits equal credits. Optionally, enter notes and menu options (discussed below) as well.
Once inserted, the Journal Entry number assigned by e·silentpartner is unique to this entry only. It is carried forward to the individual GL transactions to enhance the audit trail.

Clicking Insert will post the transactions from your journal entry into the General Ledger. Therefore, you should only click insert for transactions that you wish to post to the GL.
You can print a journal entry by clicking the Print icon.

Click on the  icon to upload & save any digital assets associated with the JE.

For batch postings of client invoices, vendor invoices or computer checks & payments, review the list of transactions included by clicking the  icon.
icon.

To Reverse a Journal Entry
Existing journal entries can be reversed by clicking the appropriate button at the top right of the journal entry window.
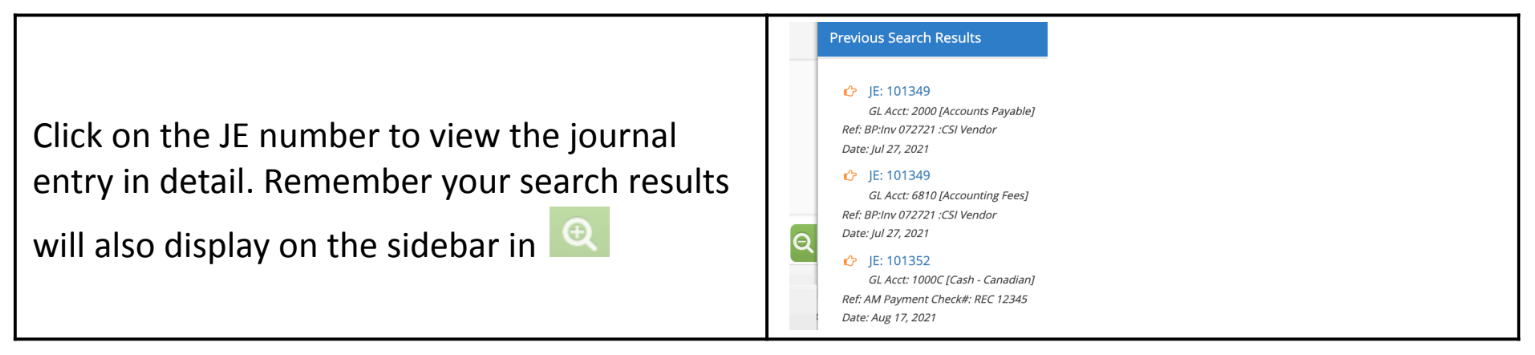
- Find the journal entry using the Search window.
- Click

- Enter the posting date.
- Click

Using the account and amounts displayed, e·silentpartner will create a new journal entry number with the amounts reversed for the accounts listed. At the end of processing, the new JE will display with notes in the reference field indicating the JE # that was reversed.
To Duplicate a Journal Entry
Existing journal entries can be duplicated (dupe) by clicking the appropriate button at the top right of the journal entry window.
- Find the journal entry using the Search window.
- Click

- Enter a date and modify the Journal Entry as necessary.
- Click

Using the account and amounts displayed, e·silentpartner will create a new journal entry number with the amounts for the accounts listed.
Run recurring Journal Entries
For those situations where you need to create recurring journal entries - entries that will need to be created multiple times at equal intervals, within a time frame, either where a depreciation percentage is applied or not - our system provides you with a functionality to create a Journal Entry based on a predetermined schedule.
Setting a Journal Invoice Schedule
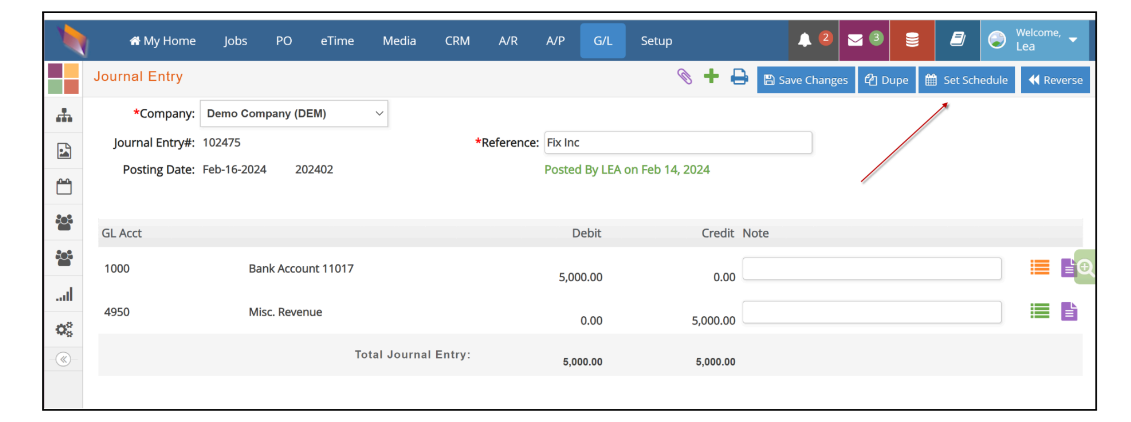
The first step is to add or select a Journal Entry to be the ‘Original’ Entry, and that will be used to recreate ‘replicas’ moving forward. You can add a new one, or use an existing one: any manual Journal Entry will show a button on the top right corner to ‘Set schedule’.
The schedule window will present you with the following information (mandatory fields are identified with an asterisk) that you need to populate to create a schedule:
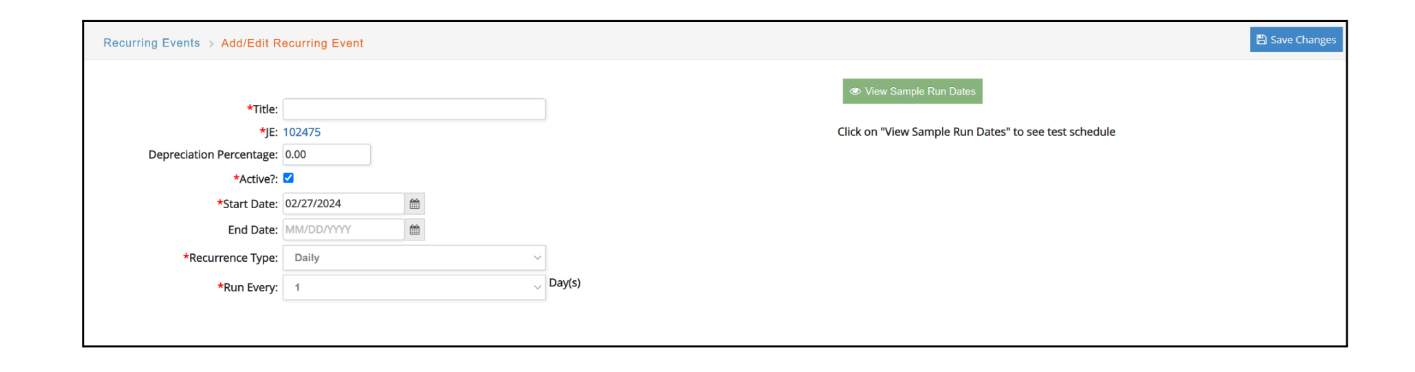
- Title (mandatory - text): use a title that will help you identify this set of journal entries. Like ‘Bank Fee’ or ‘Payroll’.
- JE (mandatory): will show you the original JE#. You can go back to the journal entry by clicking on this blue link.
- Depreciation Percntage (non-mandatory - numeric): percentage of depreciation to be calculated. Zero by default - adjust as needed.
- Active (mandatory - checkbox): Set as checked by default, will indicate if this schedule is active, meaning needs to be run, or not. You can activate or deactivate as needed.
- Start Date (mandatory - date): date to be used as starting date for the schedule
- End Date (non-mandatory - date): date to be used as ending date for the schedule. If empty, the schedule will continue running with no end.
- Recurrency Type (mandatory - dropdown): frequency to be used to create the schedule. Pick between: Daily, Weekly, Week of the Month, Day of the Month, Week and Month of the Year, Day and Month of the Year
- Run Every (mandatory - dropdown): depending on the Recurrency Type picked, this field will readjust to show you
-
a list of numbers
- Daily - every how many days you want a journal entry to be created
- Day of the Month - what day of the month you want a journal entry to be
created
-
a list of numbers + additional options
- Weekly - every how many weeks and on what day of the week you want
a journal entry to be created - Week of the Month - every how many months, on what day of the week,
and on what week of the month you want a journal entry to be created - Week and Month of the Year - every how many years, on what day of the
week, on what week of the month and on what month you want a journal entry to be created - Day and Month of the Year - every how many years, on what day of what
month you want a journal entry to be created
- Weekly - every how many weeks and on what day of the week you want
-
Make sure to click ‘save changes’ before leaving the page to record your data.
Run recurring Journal Entries
Once your schedule is set, it is time to run this process to generate journal entries under ‘GL > Run recurring JE’.

In this window you can select:
- Company (mandatory - dropdown): by default, this field will be pre-populated with the location your user’s profile belongs to. In the event of a multi-company database, you will be able to navigate throughout different locations if you have the security to do so.
- Original Journal Entry# (non-mandatory - entry field): populate this field ONLY if you want to run the schedule for a specific Journal Entry. Otherwise, leave it blank.
- End Date (mandatory - date): until what date you wish to create journal entries for. For example, if you want to create ALL the journal entries for your monthly ‘Bank Fee’ for a year, you will type here 12/31/2024, and the system will allow you to create one journal entry per month, for all the months between now and that date, following the recurrency set up.
After clicking search, the system will present you with a list of all the journal entries that can be created following the entered criteria.
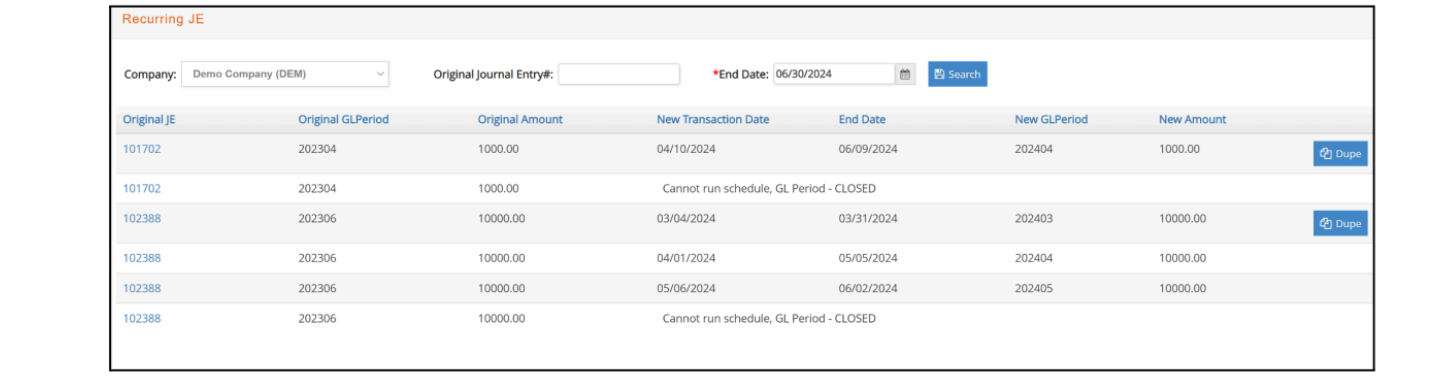
This window will present you with the following information:
- Original JE: Original Journal Entry number, with blue link to original Journal Entry.
- Original GL Period: Period when original journal entry was posted
- Original Amount: Original journal entry amount
- New Transaction Date: new journal entry transaction date
- End Date: end date of schedule for that specific recurrency
- New GL Period: Period when new journal entry will be posted
- New Amount: By default, same as the original JE, unless there is a depreciation percentage to be calculated.
Use the ‘Dupe’ buttons on the right side to decide what journal entries you wish to create, one at a time.
- NOTE> If a recurrency falls into a ‘closed’ GL period, you will be notified.
After clicking the ‘Dupe’ button, you will be taken to a pre-populated Journal entry, where you can make any adjustments if needed before the new Journal entry is inserted.
Edit recurring Journal Entries Schedule
Under the General Ledger Module, you will also have an option to quickly review any Recurring Journal Entry Schedule set in the system, active or not.
This window will provide links to the Recurrency Window, in case you need to review or make any changes.
