Computer Checks, Laser Check Formats
On this Page
Computer Checks
Select Computer Checks from the A/P menu to pay vendor invoices with physical computer checks that will be printed from the system or record electronic payments.
When the window opens, e·silentpartner will initially present you with a search window.
Find invoices to select for payment by changing the Company, AP Acct, *Due by date (required), Due by from date (optional), and/or selecting a specific vendor
from the Vendor drop down list. You can also filter by Preferred Payment type, based on Vendor’s setup. Then click ‘Find’ to show any filtered results to select for payment.


When you change a value and click ‘Find’, the invoice list will redraw and reflect your selection criteria. You can sort the list by vendor code, vendor name, invoice, date due or amount due.
You can also select which invoices and/or which portions of invoices should be paid. Select an invoice for full payment by clicking the check box to the right of the paying amount. If you desire to pay all invoices, click the pay all check box at the top right and all invoices will be selected for payment.
Enter any discounts to be applied, such as for early payment, in the ‘Disc’ column. Discounts applied automatically post to the ‘Rev Adjustments’ control account under the GL > Setup > Company window.
If you choose to partially pay an invoice, you must enter the amount you want to pay in the Paying column. The total amount to be paid will be reflected in the Paying field –under Amount Due.
When your selection is complete, select the desired payment type of Check, Wire Transfer or ACH eCheck from the drop-down and click 

Then proceed to the Disbursements window associated with the selected payment type in which to enter the bank and check printing information.
Select the bank account from the check disbursements window. Upon doing so, the check number field will be populated with the next sequential number. This number can be manually modified if the user has the proper security to do so.
The check date defaults to the current date, but can be changed. This date will be also used as the posting date.
The bank account balance prior to and after payment is displayed.

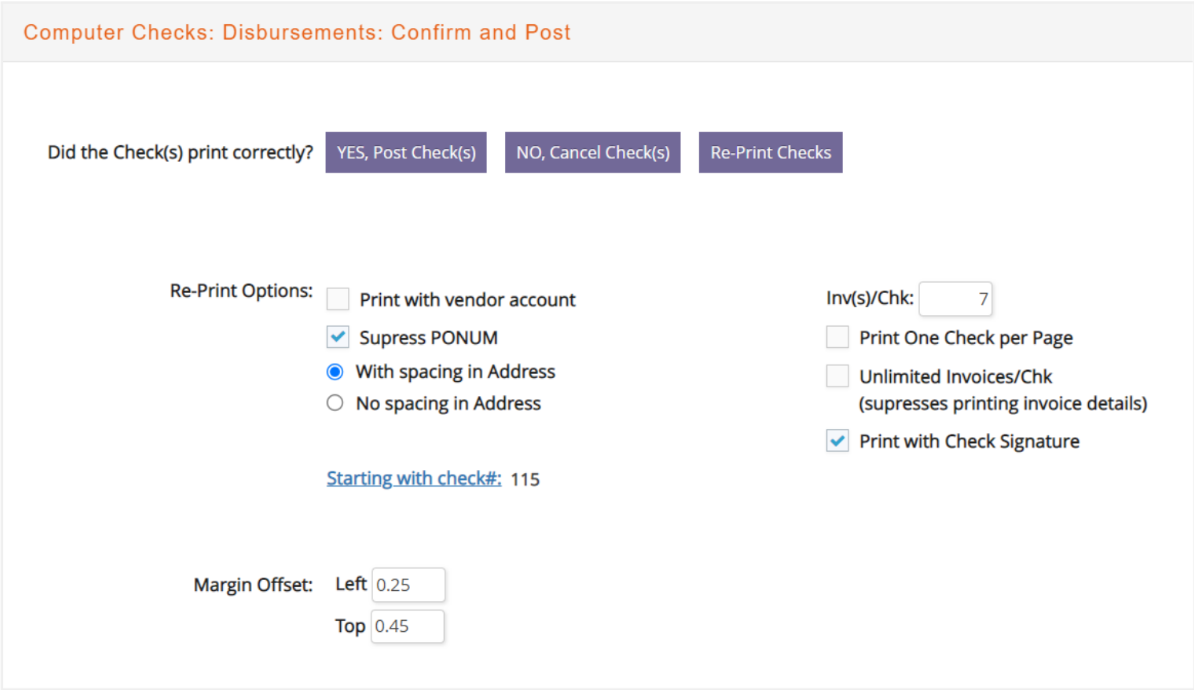
From here, check printing options –predefined under Setup > Preferences > Formatting - can also be modified:
-
Print with vendor account: This will print in the bottom left hand corner of the check.
-
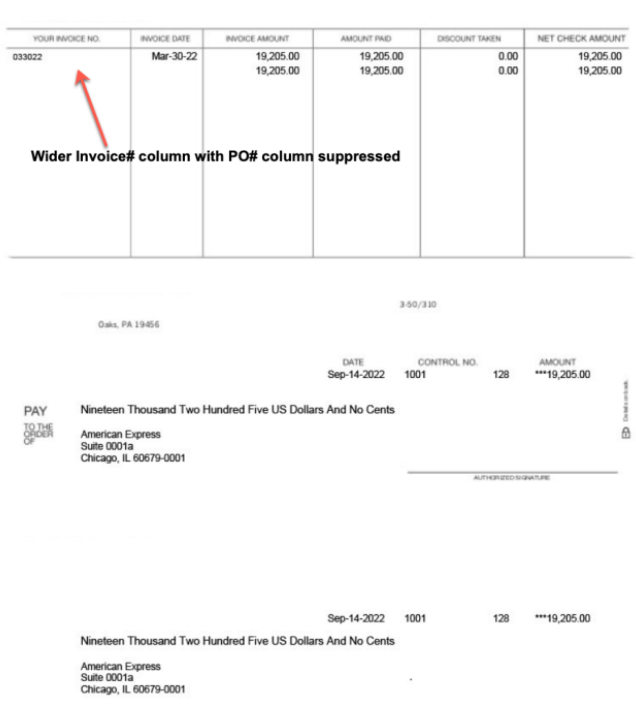
Suppress PONUM: The PO number will not be printed on the check stub. This is to accommodate longer Vendor Invoice numbers so they will print invoice# across both the “Our Ref #” and “Your Invoice #” columns instead.
-
With spacing in address: Adds a blank line before the vendor address.
-
Inv(s)/Chk: Sets the number of invoices listed in the check stub. If the invoices selected for a vendor exceeds the number of invoices per check, the check listing the invoices will be voided in your database.
- Print One Check per Page: Prints a check amount on each check. No checks are voided if the number of invoices paid exceeds the number in Invoices per check.
- Unlimited Invoices /Chk: Irrespective of the number of invoices selected to be paid, only one check will be issued to a vendor. The invoices will not be listed on the check stub.
When your settings are complete, click 
Your checks will now print, opening a new tab in your browser with the check to be downloaded, saved and printed as a pdf.
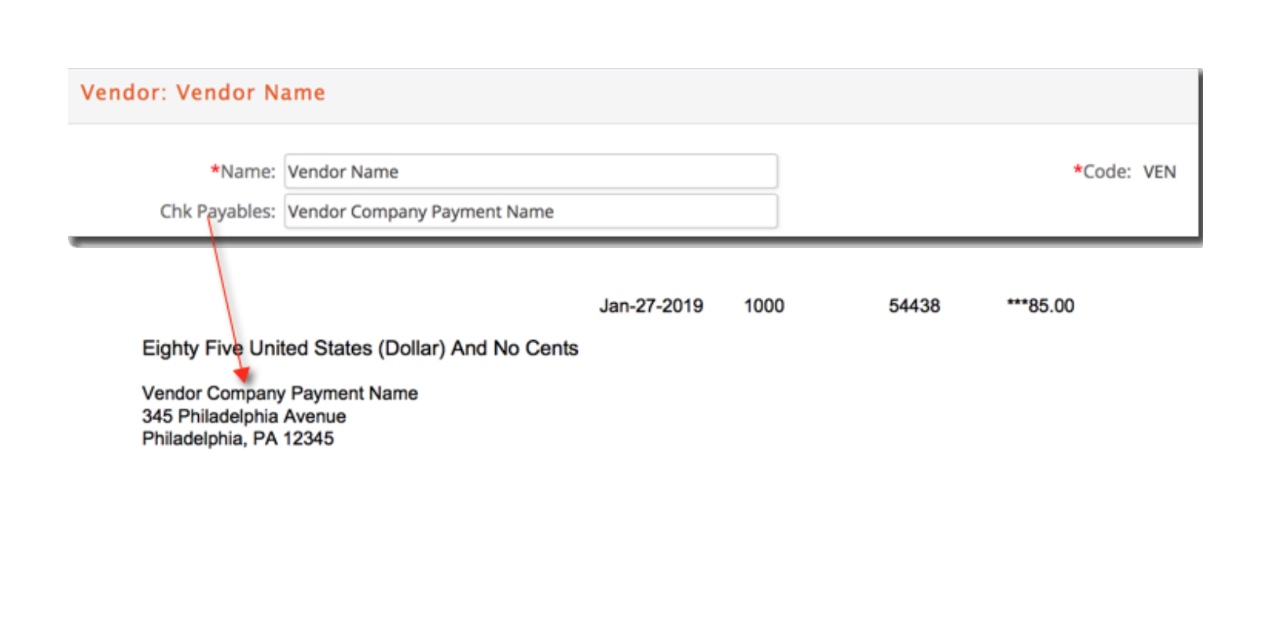
The check will print as ‘Payable To’ the Vendor’s Name unless a ‘Chk Payables’ name is specified for the vendor under Setup > Vendor. The Chk Payables name used when a check is issued will show on several AP Reports including Payments/Credits and The Check Book.
When the next window appears, verify the checks printed correctly and answer accordingly.
If you answer NO, the process will be canceled: the payment will not take place.
You can also select to reprint the checks from this window, and you can change the starting check # to print.
If you select to reprint the checks, you will be presented with the preview
window at which time you can send them to the printer again.
If the check(s) printed correctly, click ‘YES, Post Checks(s)’. The check run will post and you receive an alert that the process was successful along with the JE number created by the posting.

You can then print a Check Transmittal, Check Register, Journal Entry (JE) or Notify Vendors via email.
-
Check Transmittal: A document which lists the check numbers and the invoices paid by the vendor.
-
Check Register: A document that lists all checks and invoices paid created in this check run.
-
Journal Entry: A report that details the GL accounts updated as a result of this check run.
-
Notify Vendors: Emails each paid vendor a PDF Check Transmittal Report with a list of the invoices included in the payment. The body of the email that will be sent can be updated if needed. By default, it will say “Please, find attached information regarding your payment”.
When you are finished with the above option, click  to finalize this check run.
Laser Check Formats
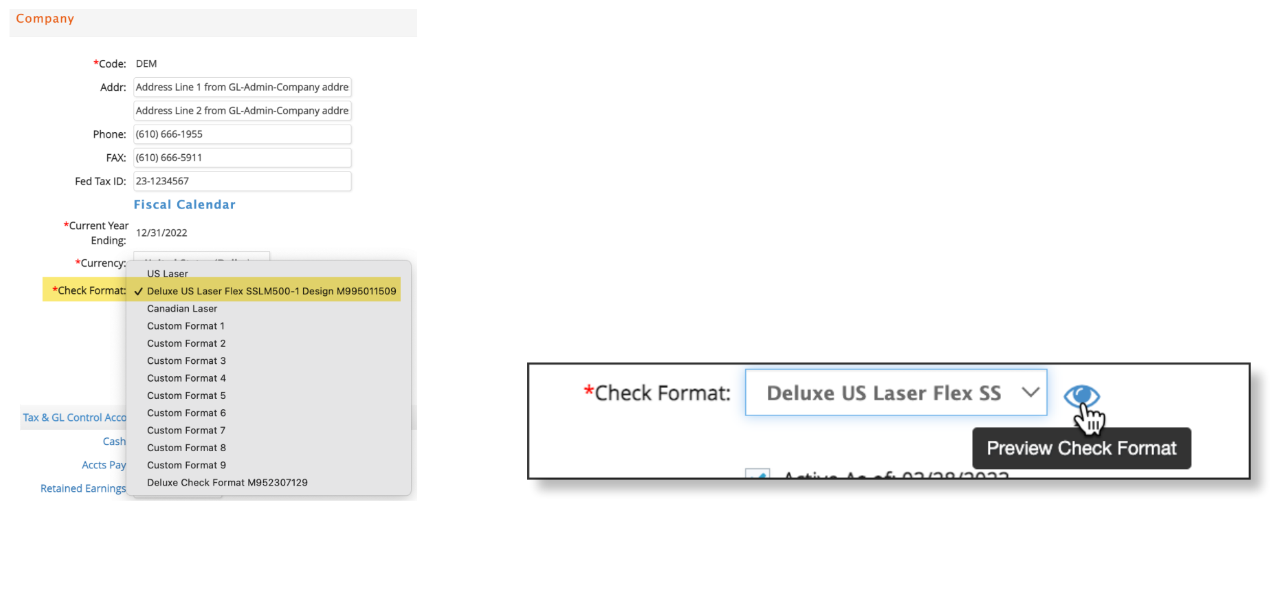
A pre-printed US Laser Check form that is customized for e·silentpartner is available from Deluxe Business Checks. We recommend contacting Deluxe by phone (800-328-0304) in order to order the customized check format. Make sure to request the “Deluxe US Laser Flex SSML500-1 Design M995011509” that was customized for e·silentpartner.
This pre-printed check form includes a top vendor stub that has a wider vendor invoice# column and excludes the PO# column that was on the older US Laser check form.
Under GL > Setup > Company the desired Check Format should be selected. To review each available format, select the format from the dropdown and click the  button to review a sample of the check layout. Then select the desired format and click Save Changes.
When test printing the first check we suggest starting with the Top and Left margin offsets as zero. Then test printing a check scaled at 100% without any options selected to shrink or fit to the page. Finally, offset the top and left margin defaults as needed for your specific printer.