GL Accounts, Company, Office, Departments, Summary Accounts, GL Pool, Account Groups, Currencies & Exchange Rates
The Setup sub-menu under the GL menu contains those sections that will establish some accounting rules and preferences for your company. The following discusses these options in detail.
GL Accounts
GL Account Setup Overview
One of the most analytical and somewhat strategic tasks in implementing e·silentpartner is formulating your Chart of Accounts – especially if you are dealing with multi-currencies, multi-companies and/or offices.
Companies differ in the level of detail with which they are comfortable and you will determine what is best in your situation. e·silentpartner provides Summary Accounts and GL Pools which allow a number of detailed accounts to be summarized or “rolled up” into one line (or show a subtotal) for reporting purposes. This allows a maximum level of detail while providing both summarized and detailed reporting. Summary accounts and/or GL pools are often set up before the detailed GL accounts, as they are included in the setup of these GL accounts.
When setting up accounts, avoid setting up an account for a specific client, vendor or employee; the sub-ledgers in the system will take care of the need to retrieve details. Provide sufficient accounts to readily identify your revenue segments and their related direct expense as in: Sales - Production and Cost of Sales - Production.
Several factors must be taken into consideration. An account is linked to a company and potentially to an office, a department, a summary account and/or GL pool account. While your income statement can be summarized in two different ways using summary accounts vs. GL pools, your balance sheet can only be summarized by summary accounts. In addition, posting items, for which you bill (materials and services), are directly impacted by the linkage of items to the specified income statement accounts. In other words, do you want your income statement to only reflect gross income on an account-by-account basis or do
you want to present sales amount followed by direct expenses.
In addition, if you are dealing with multiple currencies, you must set up accounts to which differences from currency exchange values (FX difference and gains/losses) must be accounted for. And of course, you must repeat the entire process if you are maintaining more than one company in your database. Before you define your individual accounts, it would be prudent to define those areas to which an account is linked so you do not have to go back and update the
account with its corresponding entities.
Before you enter your chart of accounts, please review its structure with your accountant and your business adviser. The chart of accounts is generally designed from two perspectives: tax liability and business management.
An accountant generally wants a reduced list of accounts. He/she is concerned how the federal and state tax reporting should be entered on a myriad of tax forms. From a business management perspective, you should want more expansive reporting. Sometimes, the needs of tax vs. business management are in conflict. For example, the tax accountant needs only to know that you received $xx,xxx,xxx in business revenue; the business adviser needs a further breakdown of the source of that revenue. A fine balance must be drawn to achieve both objectives.
This balance can be achieved through the use of summary accounts and GL pools. These serve to combine the detail of several accounts into one summarized description for presentation purposes. Conversely, don't be overly explicit in defining your accounts. A common mistake is to list every utility company as an expense account. It should be enough within the general ledger to indicate utility as one expense account. If you need to know more about the utility expense account, print the detailed general ledger for the whole year, or use the payments listing or vendor history options within AP Reports.
You need to define a chart of accounts that meets your reporting needs without overburdening yourself or your staff in trying to maintain entries against these accounts.
In addition, you also have the opportunity to segment your business into offices or GL departments that are sometimes used as divisions/subsidiaries or staff departments for time tracking purposes only. Of course, the offices or departments must have been previously entered in the Office or GL Depts windows under the GL > Admin section of e·silentpartner.
Let’s review the GL Account window so you can assess the requisite tasks and see the end results of your efforts.
GL Account - Add
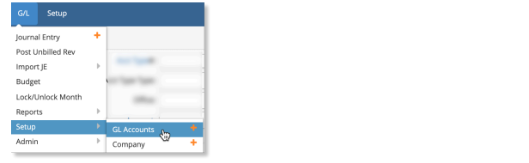
Click the plus sign next to G/L > GL Accounts.
The following rules apply when adding, reviewing or deleting GL records:
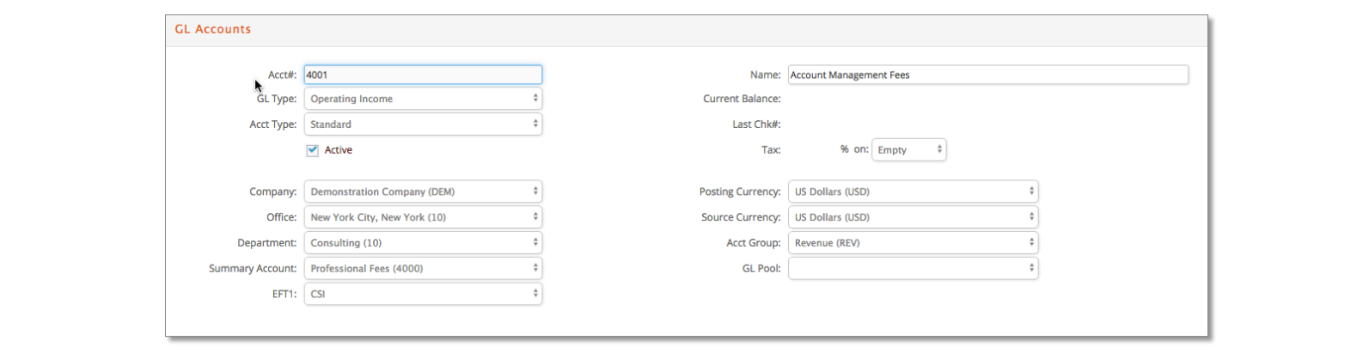
- Acct#: You must assign an account number, GL type (see account types below), name, account type (select whether it is a standard, bank, sales tax, work in process, AP or AR account), company and source currency (USD for example).
- When adding the account numbers, duplicate account numbers are not allowed.
- Any information on the account can be modified except the account number, company or posting currency.
- An account number cannot be deleted if that number is used anywhere else in the database. The account should be inactivated instead. For example, if an
account number had been previously used for a vendor invoice, you can no longer delete that number. Uncheck the Active checkbox in the GL account window and save the change.
- GL Type: An account must be defined as a balance sheet or income statement account by selecting a type from the GL Type drop-down (such as Current Asset, Operating Income, Overhead etc.). The GL Type names may be customized under the GL > Admin > Account Type Names window.
- Acct Type: Each account must be further defined with a sub Acct Type such as a standard, bank, sales tax, WIP, AR or AP account as described:
- Standard: Generally speaking, a standard account is not a bank, sales tax, work in process (WIP), AP or AR account.
- Bank Acct: Only Bank Accounts can be used in check processing and always
stores the last check number used. Also, cash must be designated as a bank
account. Additionally, accounts used for clearing vendor credit card payments
are assigned as bank accounts. Make sure to set the Last Chk# used for each
account. - Sales Tax Acct: Contains the sales tax percentage to be charged on client invoices AND defines the basis used for sales tax calculations – that is,
whether to tax gross sales, net sales or commission amounts billed. Also this
account type can be assigned to any accounts used to track purchase taxes
for vendor invoices. Make sure to set the empty type field to tax on gross
sales, net or commission as appropriate and enter the sales tax percentage. - AR Account: An account that you want to use in conjunction with your AR
subledger. Only AR Accounts can be selected when creating client contacts. - AP Account: An account that you want to use in conjunction with your AP
subledger. Only AP Accounts can be selected when creating vendors (often used to add freelancers) or employees.: Each account must be further defined with a sub Acct Type such as a standard, bank, sales tax, WIP, AR or AP account as described: - Standard: Generally speaking, a standard account is not a bank, sales tax, work in process (WIP), AP or AR account.
- Bank Acct: Only Bank Accounts can be used in check processing and always
stores the last check number used. Also, cash must be designated as a bank
account. Additionally, accounts used for clearing vendor credit card payments
are assigned as bank accounts. Make sure to set the Last Chk# used for each
account. - Sales Tax Acct: Contains the sales tax percentage to be charged on client
invoices AND defines the basis used for sales tax calculations – that is,
whether to tax gross sales, net sales or commission amounts billed. Also this
account type can be assigned to any accounts used to track purchase taxes
for vendor invoices. Make sure to set the empty type field to tax on gross
sales, net or commission as appropriate and enter the sales tax percentage. - AR Account: An account that you want to use in conjunction with your AR
subledger. Only AR Accounts can be selected when creating client contacts. - AP Account: An account that you want to use in conjunction with your AP
subledger. Only AP Accounts can be selected when creating vendors (often
used to add freelancers) or employees.
- Company: Company for which the account is associated. The company cannot be changed once an account is used somewhere else in the database. This maintains data integrity within different companies in the same database.
- Currency: Posting currency is the currency of the company. Source currency is the currency of the original transaction such as the client billing or vendor invoice. Assign the currencies the same if the company will only bill, pay and operate in one currency.
- Office: Optional field that often represents the location of an office, for example, if the company has multiple offices around the country in New York, Chicago and Los Angeles, each would be set up as an office under G/L > Setup > Office. This field could also be renamed to use as business units, company divisions or subsidiaries. Leave unassigned if GL accounts will not be set up by office.
- Department: Also an optional field that is the operating department to which this account is linked. Leave unassigned if GL accounts will not be set up by department or if departments will be used for time tracking purposes only.
- Summary Accounts or GL Pools: These are optional fields that are used for summarized reporting purposes and allow you to print streamlined balance sheets or income statements two separate ways.
- Acct Group: Another optional field that is used to generate income statements in the recommended format of the 4A’s (American Association of Advertising Agencies).
Multi-currency GL Account Setup Clarifications
Every account must be identified with two currencies. If you are processing transactions in your native currency, then both currencies are the same. However, in multi-currency situations, the meaning is paramount. The posting currency will always be the currency in which the ‘books’ are maintained. The source currency will be the currency of the job billing or original vendor transaction.
- You will set up an AP Acct – Canadian. The posting currency is USD; the source currency is CAD (Canadian dollars).
- You will set up a corresponding AP Acct – Canadian FX. The posting and source
currencies will both be the company currency which is USD.
If you are using multi-currency, remember to set up the following accounts FOR EACH currency with which you transact: - Assign the posting currency as the company currency with the source currency as the transactional currency:
- Cash account
- AR account
- AP account
- Assign both the posting and source currencies as the company currency:
- Cash FX account
- AR FX account
- AP FX account
- Advance Billings FX account (setup FX account only)
- Accrued Media FX account (setup FX account only)
In addition, an account must be established for exchange Gains/Losses and Over/Shorts. Contact support for more detailed information on multi-currency.
These multi-currency accounts are then assigned when exchange rates are set up between each currency under GL > Setup > Exchange Rates.
GL Accounts - Search
To find one or more existing GL Accounts, simply click GL Accounts from the G/L menu under Setup.
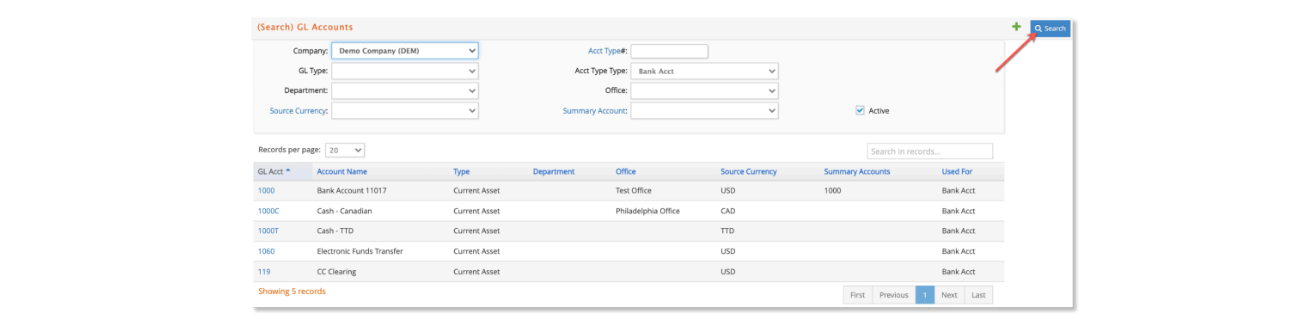
Enter your search criteria and click  . The results will be displayed below. You can also uncheck Active to search for only inactivated accounts.

Company
General Company
Within e·silentpartner you must define each company whose data will be stored in the database.
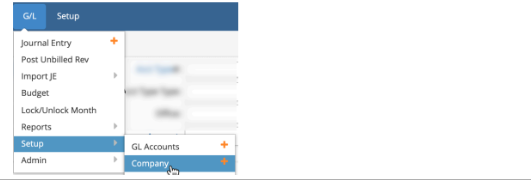
Select Company from G/L Setup.
When the window opens, you can immediately review the settings for your assigned company, click on the add a new company to your database or click on
the magnifying glass to retrieve information for a company you previously defined.

Company definition is done in four steps. First, add:
- A unique company code,
- Company name, address, and phone numbers, federal and state tax id numbers,
- The year-end date of your current fiscal calendar and
- The operating posting currency of this company
These are the basic elements to be able to create a company record in your database. You can complete the rest of the information before or after clicking Insert.
- Check format: e·silentpartner offers multiple check formats. Please, review different samples by clicking the eye icon and make your selection.
- Next Invoice, Next Debit Memo, Next Credit Memo, Qualifier: Different Counter that will be used to assign a number to your client invoices, and will be automatically updated. A client invoice Qualifier must be entered if there is more than one company in the database. This qualifier appends to the end of the client invoice number so you can immediately differentiate for which company an invoice belongs.
- Option to inactivate your company: This option does not delete the information related to the company, only prevents future transactions for that company.
- Lock AP Posting: You can also find this option under the GL> Setup > Posting preferences option. When the Batch Posting process is invoked, e·silentpartner temporarily puts a 'hold' on adjusting any vendor invoices until the posting process is completed. This is to prevent someone from adjusting an invoice that is part of the current batch being posted. When the posting is completed, e·silentpartner automatically removes the ‘lock’.
- Email: generic email for your company. It could be the email address of one of your Security Administrators.
- Finance Charge item: Item to be used if you are planning to bill finance fee invoices for any clients with overdue balances.
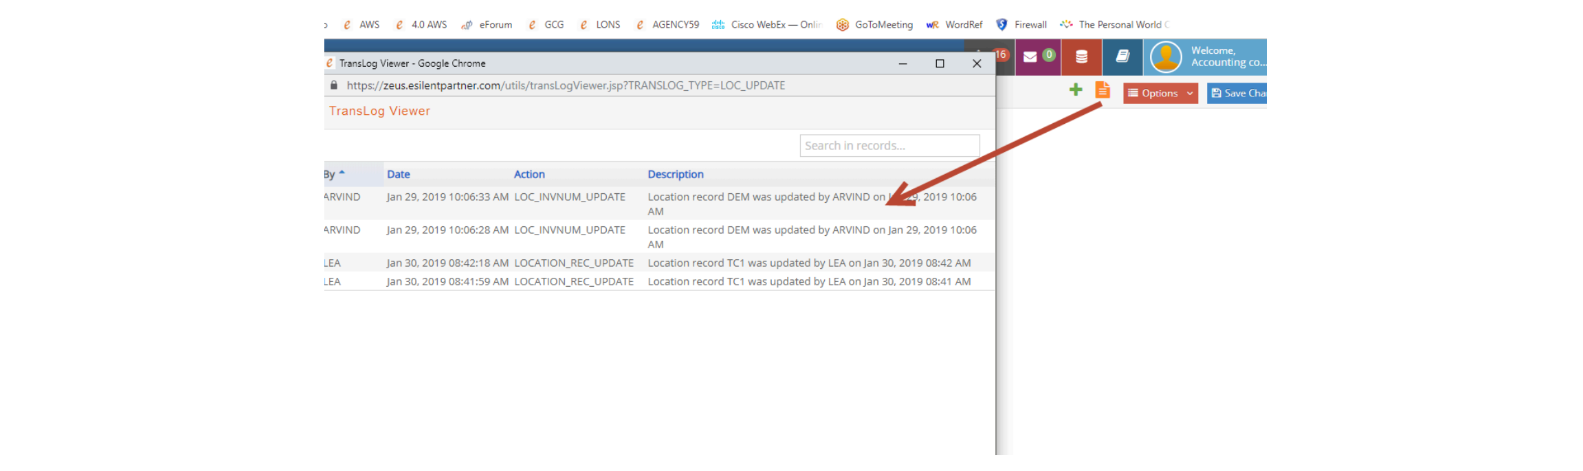
On the top right corner, you will have the option to review audit trails for any changes performed in your Company setup.
Tax & GL Control Accounts
The next step is setting the company’s control accounts. Please review The Accounting of e·silentpartner for further explanation and clarification of where and how these accounts are used.

-
Cash: The Cash account is used whenever a client payment is entered using the Post Client Payment option under AR. In this case, the amount of the client payment is debited to the Cash account number.
-
Accts Rec: The Accounts Receivable account is used when posting client invoices and payments.
-
Accts Pay: The Accounts Payable account is used when posting vendor/employee invoices and recording payments against the invoices.
-
Curr Earnings: The Current Earnings account is used to temporarily post revenue and expenses when a balance sheet is generated.
-
Retained Earnings: The Retained Earnings account is posted when you close the year. The prior year's net revenue and expenses are updated accordingly.
-
Rev. Adjustments: The Revenue Adjustment account is debited or credited with the net effect when a client's invoice has been adjusted or if a client discount or adjustments is entered in the Client Payment window.
-
Advance Billings: The Advance Billing account is credited/debited with the pre-tax amount of a client invoice that is billed or credited in advance of the work.
-
Work in Process: The Work in Process account is used to verify the amount entered on vendor invoices equals the cost amount distributed to billable jobs.
-
Unbilled Revenue: Unbilled Revenue is the account that is credited when these charges are posted. WIP is debited in his entry. (Unbilled Revenue is an optional feature.)
-
Accrued WIP: Reconciling the work in process sub-ledger to the balance sheet has been an ongoing problem because of timing factors. For example, you receive a vendor invoice charge, post it in July but bill the client and post the client invoice to June. As a result, when a client invoice is posted, every external A/P charge’s posting period is compared to the posting period selected for the client invoice. IF any external A/P charge’s posting period is later than its client invoice posting period, then the value of that charge is credited to a new account – WIP accrual. The balance of this account should be reviewed every month. If there is a balance, please review the details of that account and make the appropriate journal entry to the correct posting period to clear the balance. The JE will normally be a reclassification from Accrued WIP to WIP posted to the same posting period of the external AP charge.
-
Sales Tax Accounts: Sales tax one and two are the default sales taxes for the company. e·silentpartner provides for up to four sales taxes that can be added to each client invoice. This is purely optional and generally is not necessary for most municipalities. For example, in Pennsylvania, two sales taxes (6% for Pennsylvania and 1% for Philadelphia) could be added to a client invoice. It depends on who did the work and/or where the work was delivered.
-
The Sales Tax rules:
i. Both sales tax accounts must be on your chart of accounts, which were
entered under GL > GL Accounts.
ii. In order for a client to be charged one or both sales taxes, the sales tax indicators must be checked on the client master record. Sales tax will be
indicated on the client estimate and invoice.
iii. You must fill in both Tax 1 and Tax 2. If you only have one type of tax, enter the same GL Account number in both fields.
-
- Accrued Revenue Account: Account used to post Accrual during the Projected Revenue Recognition process.
- Projected Revenue Account: Account used to post Revenue during the Projected Revenue Recognition process.
- Deferred Revenue Account: Account used to post Accrual during the Deferred Revenue Recognition process.
- AR Advance Bill Account: If populated, this account will be used to post any receivables for invoices type Advance, regardless of the AR setup at job level.
- Accrued PO Cost Account: Account used to post Accrual during the Purchase Order Billing process.
Remember many of these accounts are default accounts for the company when the posting is in the ‘home’ currency. The defaults can be overridden in the Vendor setup section, the contact setup section or when processing third party invoices.
Footers & Finance Charges
The next optional step is to enter company default footers for client invoices, POs or client estimates. These footers will print by default on the associated documents unless specific footers are also set up for the client or individual PO.

Simply click on the blue link, enter the footer desired and click "Save Footer"

Specify a Finance Charge Item to be used when billing late payment fees for clients.
Options Menu
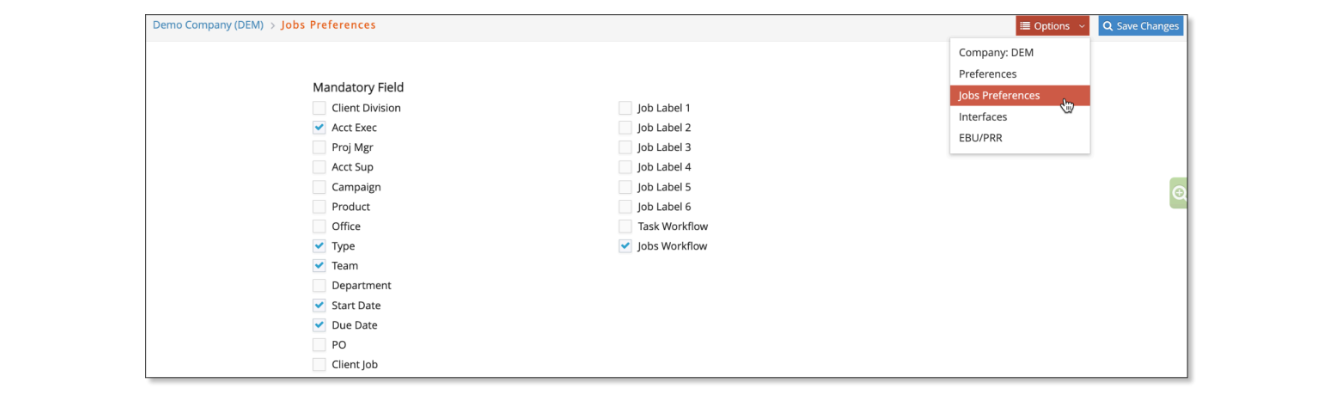
Also on the top right corner, the Options button will provide additional setup options for your company: Preferences, Job Preferences, Interfaces, EBU/PRR. Let’s review each of these sections.

Company Preferences
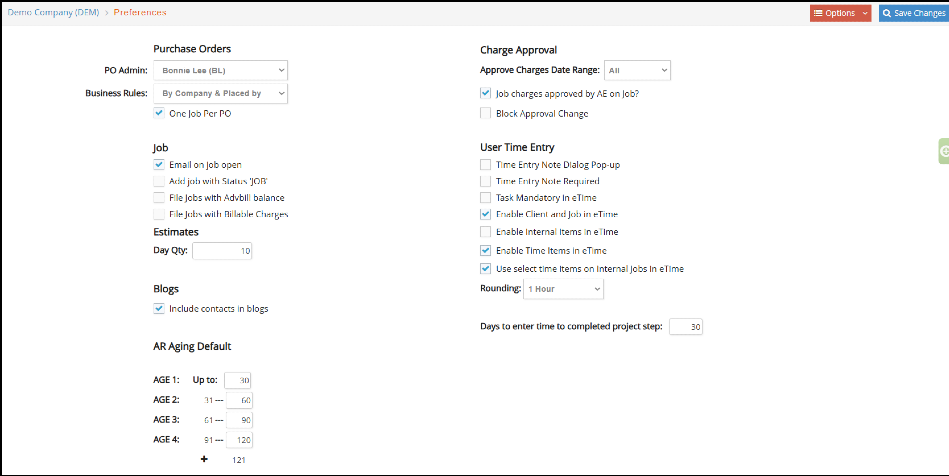
The Company’s Preferences window provides further setting options that are used in different sections in the system:
-
Purchase Orders
- PO Admin: If you are planning on having a Purchase Order approval process,
then this is where you will set your Master approver, that overrides any other
approvers in the process. For more information, check our Purchase Order
manual. - Business Rules: How to set up Po business rules. For more information, check our Purchase Order manual.
- One Job per PO: For more information, check our Purchase Order manual.
- PO Admin: If you are planning on having a Purchase Order approval process,
-
Job
- Email on Job open: Check this option if you wish the Account Executive,
Project Director or Team assigned to the job to receive an email notification every time a job is added with a status of JOB. Email notifications are also sent each time a resource is added or removed from a job. - Add Job with status ‘JOB’: Check this option if you wish to add new jobs
with a status of JOB, thereby omitting the initial QUOTE status. - File Jobs with Advbill Balance: Check this option to allow jobs with outstanding advance balances to be filed. However, leaving this option unchecked is recommended to prevent any jobs from being changed to a status of FILED if there are any outstanding Advance Bill balances.
- File Jobs with Billable Charges: Check this option to allow jobs with unbilled charges from being filed. However, leaving this option uncheck is recommended to prevent any job from being changed to a status of FILED if the jobs have any unbilled charges.
- Email on Job open: Check this option if you wish the Account Executive,
-
Estimates
- Day Qty: Default day quantity value to be used in estimate creation.
-
Blogs
- Include contacts in blogs?: Also as a preference. You may want to be able to have your client’s contacts as an option when blogging.
-
AR Aging Default: pre-define the default ages to be used when printing the AR Aging.
-
Charge Approval
- Approve Charges Date Range: Approve Charges window can be overwhelming, especially if your company does not go through the approval process very often. This window helps with potential issues due to a high volume of unapproved charges, letting you set an initial time frame when loading the window.
- Job Charges approved by AE on Job?: In the approval process, you can define
if they need to be approved by the Account Executive set at a Job level –by checking this option- or if it should be the Supervisor at the Employee level –leave this uncheck. - Block Approval Charge: Option to prevent Employee Approvers to approve
time charges.
-
User Time Entry
- Time Entry Note Dialog Pop-up: In the eTime entry weekly view you can choose to have note dialog to automatically pop-up or not.
- Time Entry Note Required: This option will force any time entry to have included a description note.
- Task Mandatory in eTime: This option will force users to select a specific task when doing time entry.
- Enable Client and Jobs in eTime: Select this option to enable Client and Job selection windows under eTime Entry module. If unchecked, users will only
be able to enter time for those jobs they have been previously assigned as Team members. - Enable Internal Items in eTime: Time Entry windows can be used for time and internal charges. Select this option to enable Internal entries in the eTime Entry module.
- Enable Time Items in eTime: Select this option to allow users to select their own time items. When unchecked, only an Admin security user will be able to select time items for each user.
- Use select time items on Internal Jobs in eTime: Option used to define the
time items that can only be used in combination with Internal type jobs during the time entry process. - Time entry rounding: will apply when doing time entry both via esp and Mobile App. If populated, time entries will be rounded to the defaulted option.
- Days to enter time to Done project step: This option defines how many days
in the future a step will accept time entries, after the step is closed.
Company Job Preferences
The Company’s Jobs Preferences window provides a way to set job related fields as required when adding or editing jobs. Jobs cannot be inserted or updated until all required fields that are checked in the Jobs Preferences window are filled out for the job. Leave Start Date unchecked to auto populate it with the system date each time a job is inserted.
Company Interfaces
The Company’s Interface window provides further setting options that are used when using any of our available system interfaces:
- The CSI window: Under the options button you can set up important information if you are going to use our CSI interface. Please, check the CSI manual for additional information.
- Strata options: Different setup options for clients who use the Strata interface, either as a Direct Link or via API.
Company EBU/PRR
The Company’s EBU/PRR window provides further setting options if you are planning to use the Earned But Unbilled or Projected Revenue Recognition processes.
-
PRR
- PRR Type: select from Gross or Net.
- Account #1, #2, #3: accounts to be used during the PRR on Net process.
- Cost %: percentage to pre-calculate cost of inception during the PRR on Net
process. - Overhead %: percentage to pre-calculate overhead on time charges during
the PRR on Net process.
-
EBU
- Allow Earned but Unbilled postings and Post Unbilled revenue to sales accts, options you can select if you are planning to use the Earned but Unbilled Process, previously discussed.
- Post-Unbilled Revenue to Sales Account. This option permits revenues from
unbilled charges to be recorded in a Sales Account instead of an Accrual Account. - MC Postings - do not recalculate Rev/Expense.
- Only select Jobs with EBU on.
Office
Office is used for three purposes: you can assign an employee to an office, you can assign a job/project to an office and/or you can link an account to an office. Any of these options provide additional reporting on the profitability of an office, workflow requirements by office and last employee chargeability per office.
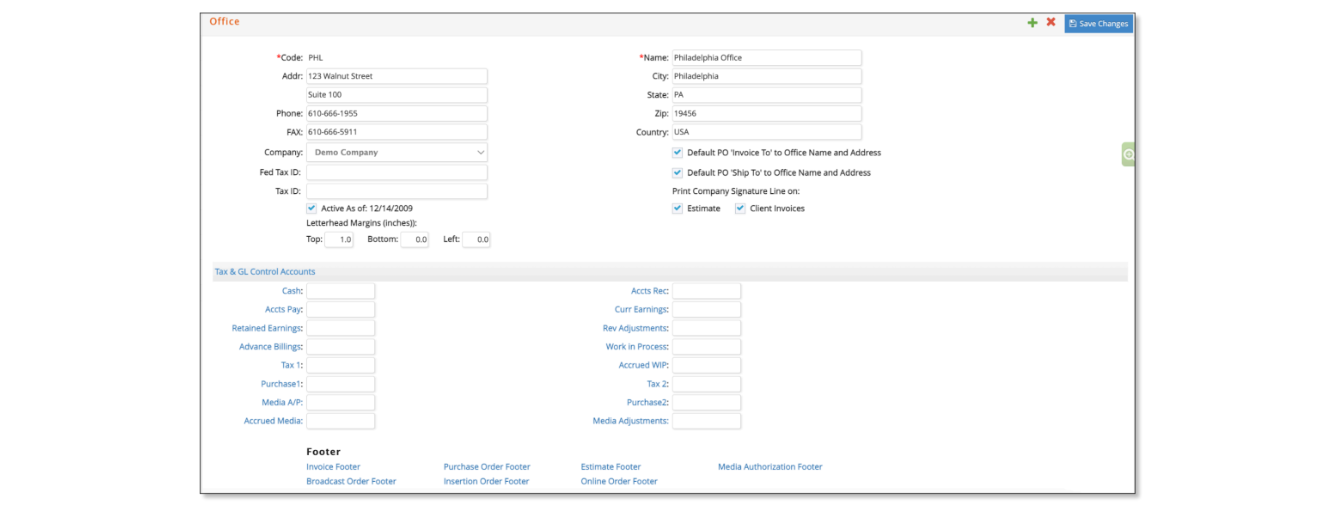
The data you can enter per office is straightforward, such as, name, address, phone/fax numbers. But you also have printing options for estimate, invoices, purchase order and if you use media placements, various forms of media orders. Review your options and decide what would be applicable for your operation.
You can also optionally track offices as distinct entities from the parent company by assigning tax IDs, tax accounts and a separate set of control accounts. Please contact customer support to discuss this option further.
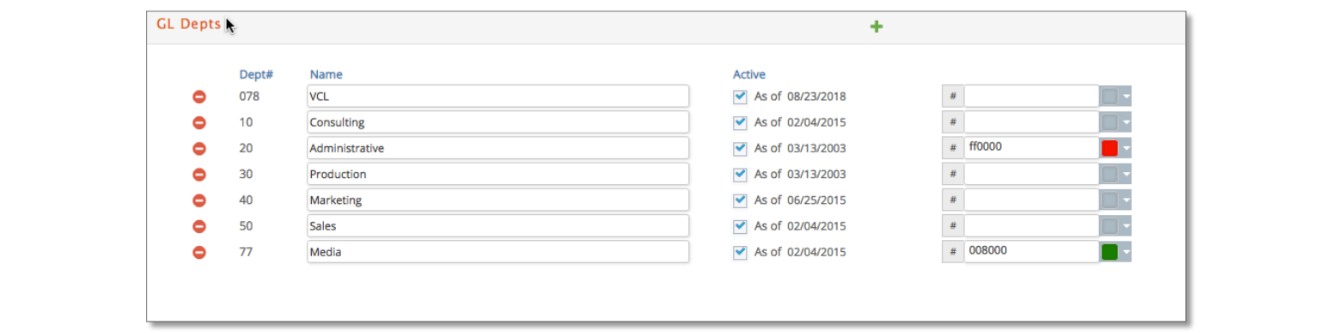
Departments
Departments are used two different ways: as staff time departments and for departmental income statement reporting. Staff time reports can often be generated or sorted by department and the client income statements can display the direct labor by department. In this instance, each employee is assigned to a department.
If you want to further expand your income statement reporting option, you can link accounts to specific operating departments. But a word of caution, if you do this, you have to link specific billing items to departments as well. For example, Design, which could be performed by either the Creative or Public Relations departments will need two item codes setup – one for Creative and one for Public Relations. Additionally, overhead accounts must be set up for each department.
Before you decide on this – remember e·silentpartner has a unique feature that allows you to achieve the same result without linking revenue and direct expense accounts to departments. The feature is simply this: when a job is opened you can indicate that this job is ‘owned’ by a particular department. So you can generate a department income statement without actually linking General Ledger accounts to a department.
The rules in this window are minimal:
- Click the + to add a new department.
- Department # must be unique.
- You cannot delete a department if it is used elsewhere in your database.
Summary Accounts
Summary Accounts can be used to streamline your balance sheet or income statement. It is not uncommon to review these financials in detail but desire an alternative format when they are presented to a financial adviser, for example.
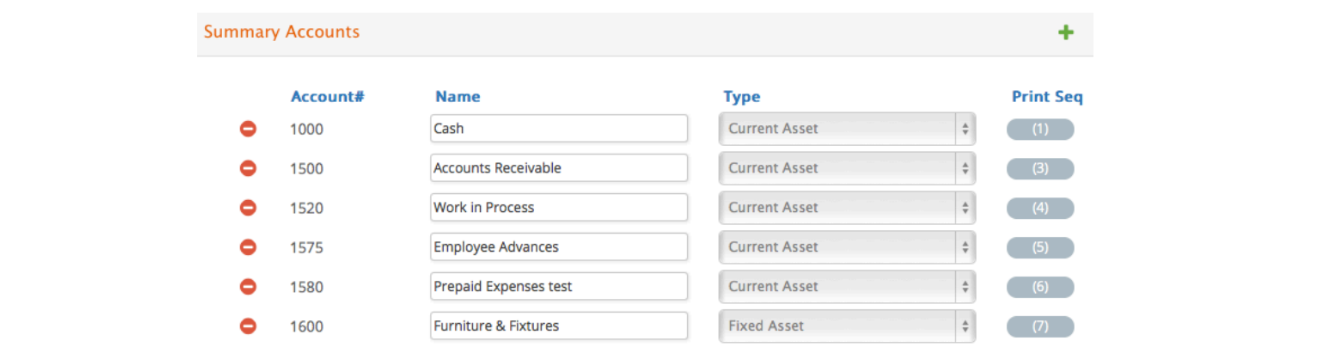
There are only a few rules when you set up a Summary Account and then apply it to the specific General Ledger account.
- Summary Accounts and GL Accounts can have the same account number. For example, account 8000, which is other expense on the Chart of Accounts, can be linked to a Summary Account of the same number and description.
- There is no limit to the number of accounts that link to one Summary Account.
- The account type of the General Ledger account that links to a Summary Account must be of the same type. For example, you cannot link an Income Statement account to a Summary Account that is designated as a Current Asset on the Balance Sheet.
- You can use the same set of Summary Accounts across companies if you are diligent in your account set up and linkages.
GL Pool
GL Pools are similar to Summary Accounts. They provide another way to format your P&L. The same rules and processes that were defined in Summary Account setup are applicable here as well.

Account Groups
The AAAA has a preferred format for income statement reporting. Following is a sample hierarchy.
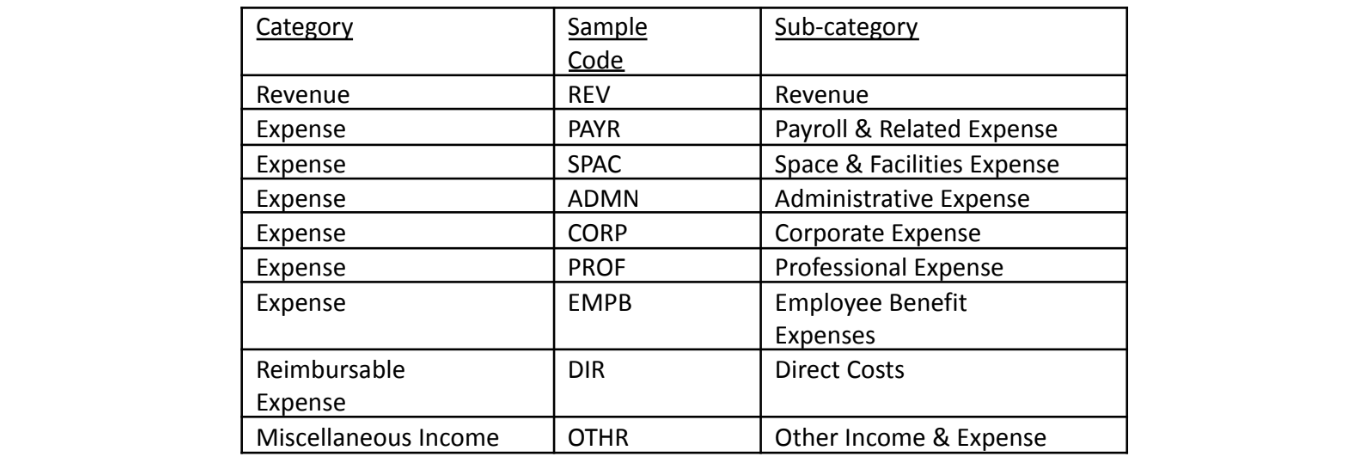
If you want to use the above sample, simply create an entry for each of the above lines in the account group window. Invoked from GL > Setup > Account Groups +

Currencies
When the e·silentpartner database is created it is loaded with several currencies. If you plan to bill your clients, post vendor invoices or use any other country’s currency in your transaction processing, the currency must be defined in the currency setup window. Select G/L > Setup > Currencies. Click the Green magnifying glass on the right side to view a list of currencies defined in your database.

This window is used to establish an individual foreign currency. Users doing business in US dollars should set up as shown.
Only a few rules apply:
- The Code must be unique.
- The Symbol you enter in the ‘symbol’ field will print on reports and forms, which use the entered currency.
- The Symbol Position is either before ($1,000) or after (500EUR) the presented number.
- The Decimal Default is either a period or comma. If the currency ‘thousands
separator’ is a period -- then select comma as the decimal default. For example, if you select comma, ten thousand is presented as 10.000,00; if you select period, the same number is displayed as 10,000.00
Exchange Rates
If you intend to process multi-currency transactions, you need to set up rates of exchange for each currency and identify the corresponding accounting function FX account.
Select G/L > Setup > Exchange Rates. Click the Green magnifying glass on the right side to view the companies and exchange rates defined in your database.
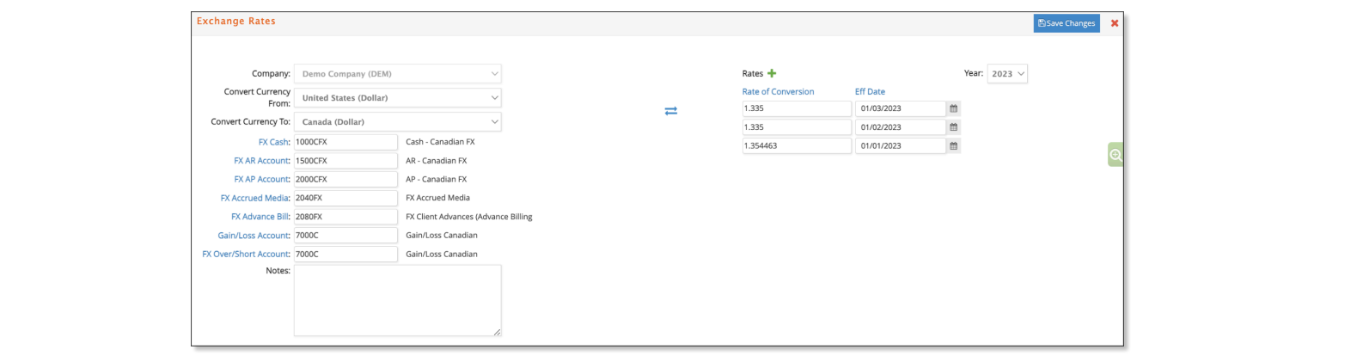
The purpose of this window is to allow you to record the history of exchange rates for your clients in the international community.
The use of each account is the following:
- FX AP Account: Used to post the difference between the source currency and the posting currency for vendor invoices. Also used to record the difference when the invoice is paid.
- FX AR Account: Used to post the difference between the source currency and the posting currency for client invoices. Also used to record the difference when the client invoice is paid.
- Gain/Loss Account: Used to record the difference in the exchange rate at the time of posting (vendor or client invoice) versus the exchange at the time the transaction was settled (paid to the vendor or paid by the client).
- FX Cash Account: Used to record the difference between the source currency and the posting currency when the vendor invoice or client invoice is paid.
- FX Adv Bill Account: Used to post the difference between the source currency and the posting currency for advance bills.
- FX Accrued Media Account: Used to post the difference between the source currency and the posting currency for media invoices.
Simply click the Rates+ option to add exchange rates for the currency combination. Exchange rates can be updated at any time, if desired, but are usually added as exchange rates change. When a user adds an exchange rate for a particular currency combination in any company in the database, the system will automatically:
- Calculate the reciprocal of that exchange rate and add it to that company.
- Populate all companies in the database with the new exchange rate and its
reciprocal for the corresponding currency combination.
For posting purposes, e·silentpartner uses the exchange rate that is effective at the time of posting. Rates are grouped by year.