Under eTime > Charge Entry, every user can pick from three available views to record their time: Daily, Weekly and Calendar.
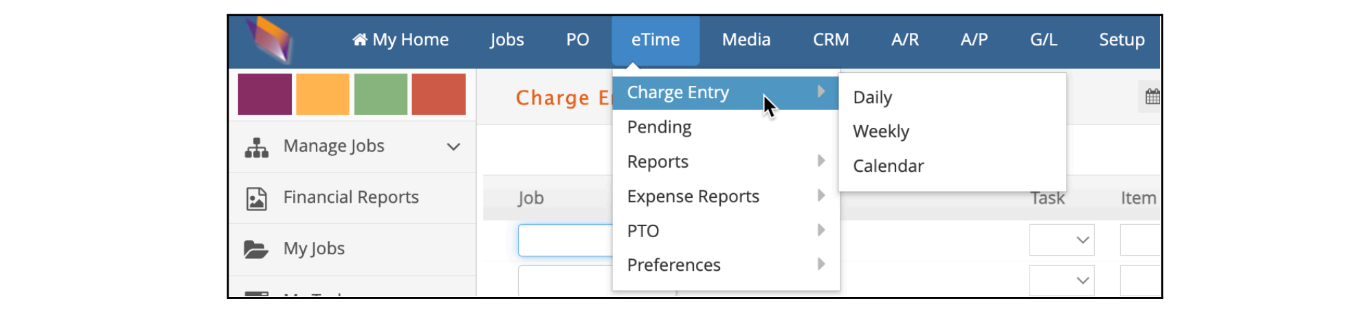
These views of the same functionality – time charges entry - provide different ways to accommodate each user’s preferences when entering time in the system:
- Daily: This window is recommended if the user likes to do time entry daily. By selecting a specific date, any time entry recorded using the dropdown options in this window will create time entries for a specific date.
- Weekly: A grid is provided in this window where the user can enter time for one day, or several days in the same week. This is particularly recommended for users who tend to have the same job/item/task combination recurrently over more than one day in the same week.
- Calendar: If the time entry is mainly task-related, this is the perfect window. Select the task, drag it to the calendar, expand the time range and save it to create a time record.
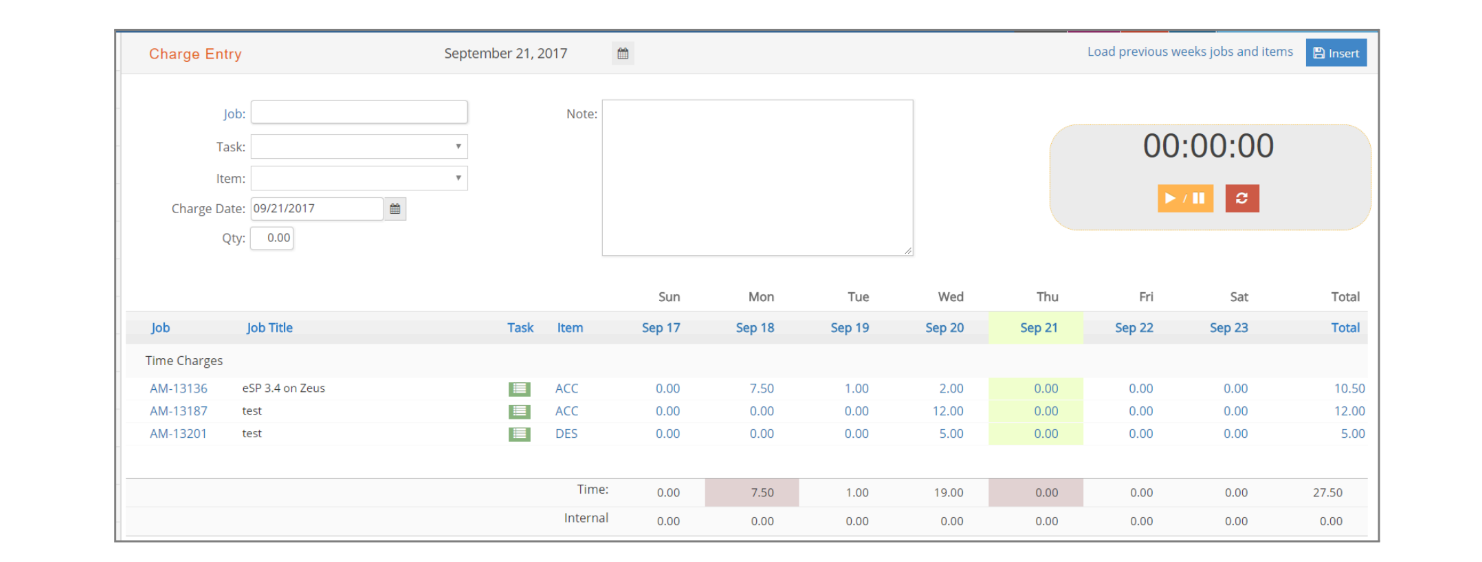
eTime Daily Entry
This window has two sections: a daily entry section (above) and a weekly grid entry section (below). Either one can be used to create time charges.
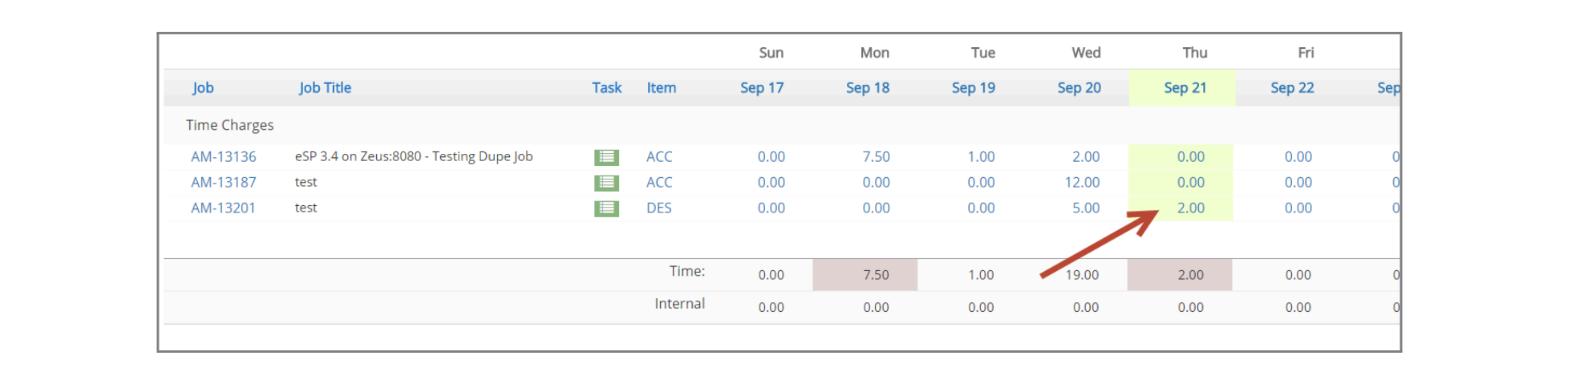
The Daily window will reflect the current date by default. It can be modified either by clicking on the calendar icon on the top of the window, or by typing a different date in the Charge Date field. The weekly grid will show the different entries created for the current week. The current day will be highlighted in green, and any previous days in the week with missing time based on the user’s setup will be shaded in gray. This is a visual way to alert users of days that need to have time entries completed.
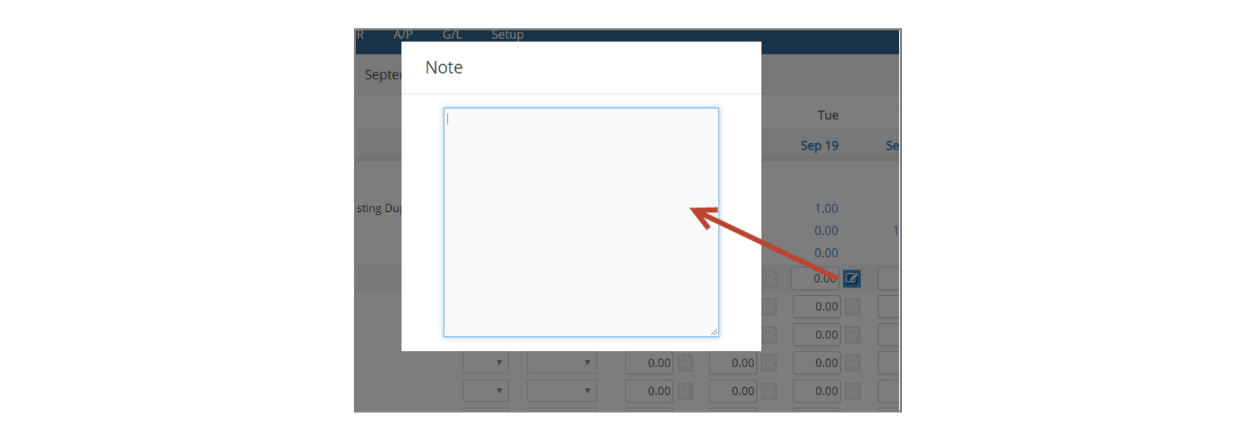
On the center of the window, a note field can be used as a way to better describe the time entry. Based on each company’s preferences, this field can be made mandatory – all time entries for all users need to have this field populated- or not – note field will be optional.
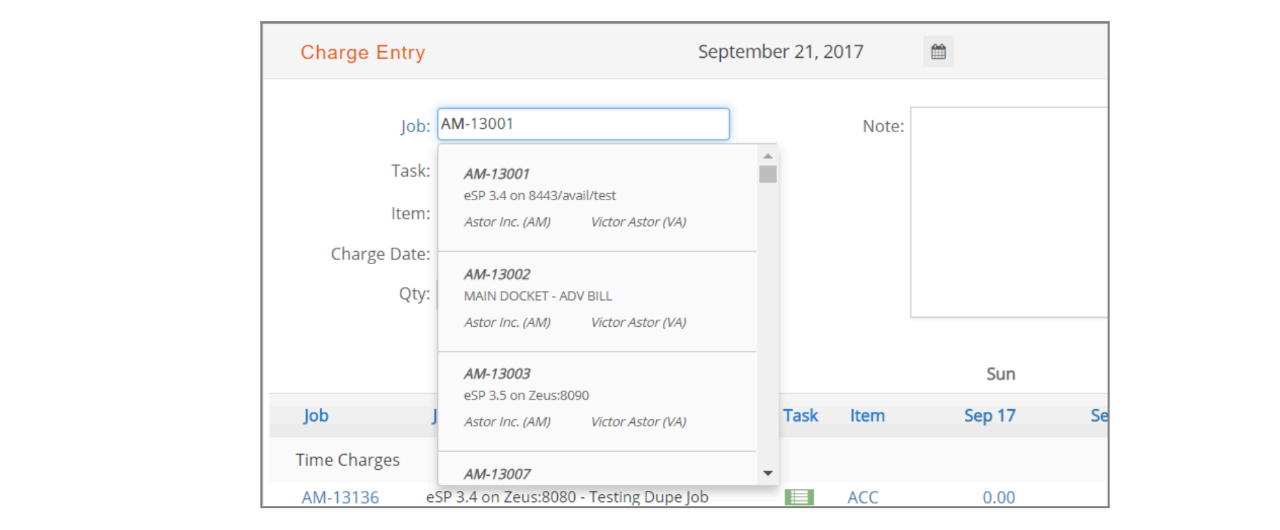
The entry process begins with the user typing in the Job field. Upon typing at least three characters (e.g. ATL), the user is presented with various Jobs that match the value entered.
‘Matching’ is performed on Job #, Job title, client name, client code, client contact name, and client contact code.
Once a Job is selected, the user continues by tabbing to the Job Task. eTime limits these selections to only Job Tasks to which the user is assigned on the Job’s Project Plan. Similar to notes, the task field can be set as mandatory in the company’s preferences. Otherwise, it is considered optional.
From here, the user continues to tab and select an Item. The list of items to populate the drop-down list will be only those that the user has selected as his/her choice of items for time entry, under the eTime > Preferences > Time.
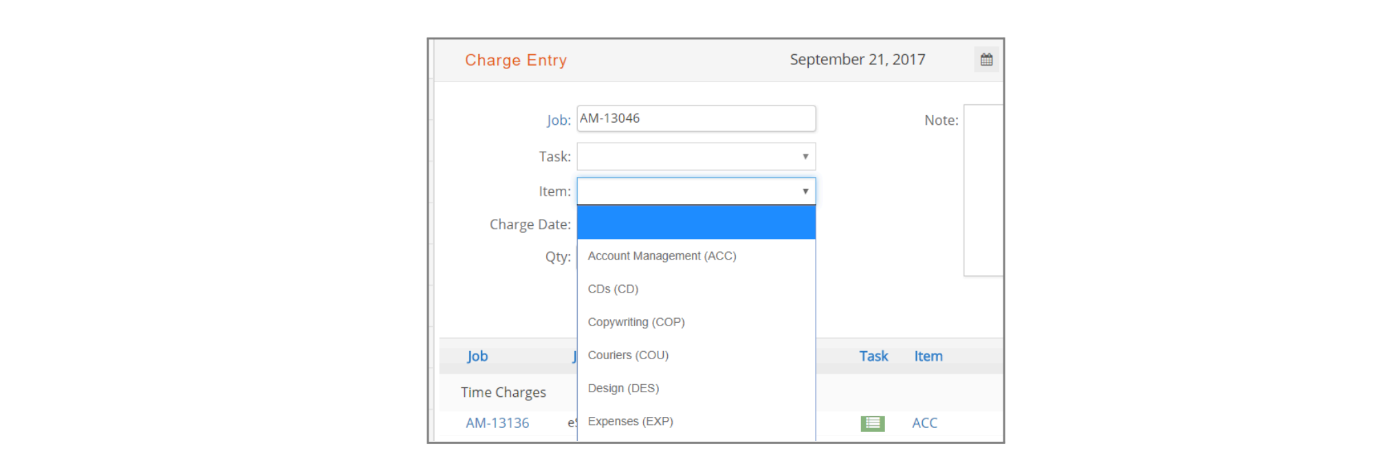
If the time entry refers to a specific task where Project Managers have predefined what items to use, the drop-down list will not show the user’s items list, but the items linked to the specific task.

After the charge date, which can be modified if needed, the user will need to select the quantity. Quantities are full units of time: 1 is the equivalent of a full hour. So if the performance of a specific task took 30 minutes, the quantity to be entered will be 0.5.
After entering a description in the note field, click insert on the top right corner of this window to add a time entry to the job – job/task selected.
The weekly grid will be automatically updated with the information entered, either to add or update existing information.
The weekly grid section can also be used to add any additional time charges for an existing job / task / item combination to any specific day of the week view. Click on the blue link of the quantity for any day to open a pop-up window where to record a new time entry.
If an existing time charge is not approved, edit and delete functionalities will also be available from this same pop-up window.

eTime Weekly Entry
This window offers a weekly grid section as a way to insert new time records or edit existing ones.
Weekly window will display by default the current week. A different week can be selected by clicking on the calendar icon at the top of the window. The weekly grid will show the different entries created for the current week. As with the daily view, the current day will be highlighted in green, and any previous days in the week with missing time based on the user’s setup will be shaded in gray.
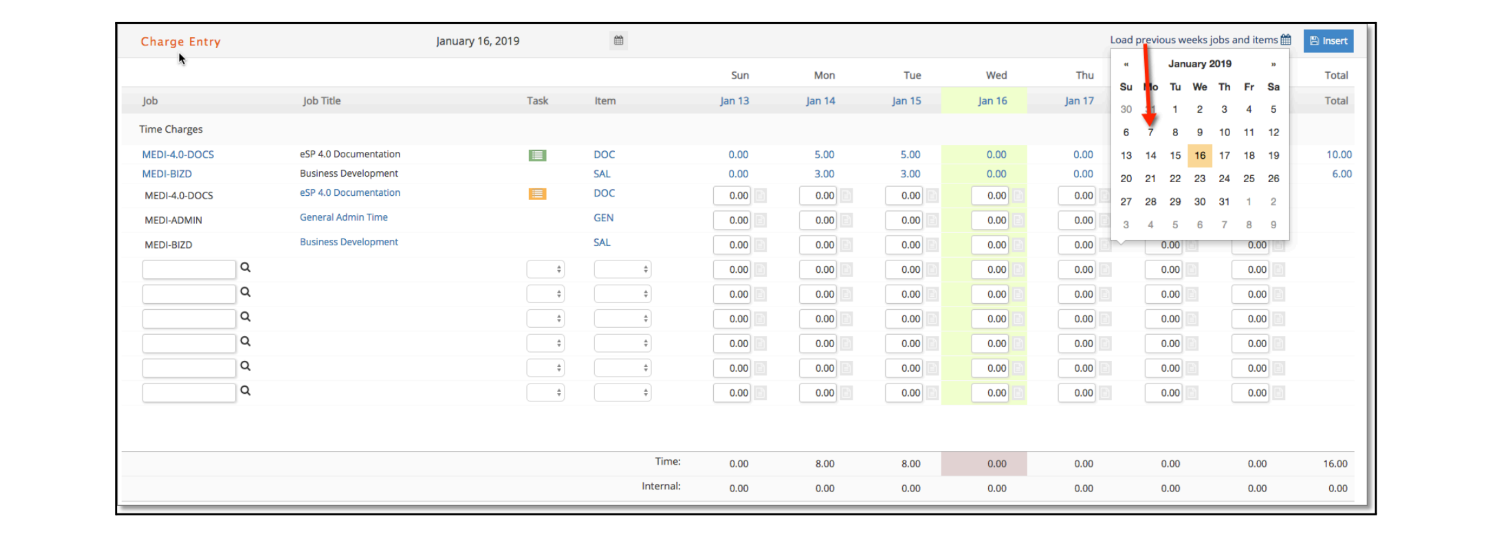
Click the Load previous weeks’ jobs and items calendar link at the top right to easily enter recurring time. This will load the matrix with the job & item combinations entered for any previous or future week selected. Inactive jobs with a status of Done or Filed will be excluded automatically. Fill in the hours with notes for the desired entries and click Insert. Time will only be inserted for the entries with quantities entered.
Navigation is slightly different than in the previous window. New entries can be done by finding a job typing in this field either the client name, contact code or name, job number or title to let the system provide you with results that match this information, selecting task (optional) and item – same rules as the ones mentioned previously on what items will be part of the options-, and entering a quantity under the corresponding day. When tabbing out, the notepad icon may be used to enter an additional description.
Time charges can also be created by clicking under any empty day for a given job / task / item combination to add a new entry.
The weekly grid will be automatically updated with the information entered, either to add or update existing information.
Repeat this process until all entries are completed. Click Insert at any time to save your entries to the database.
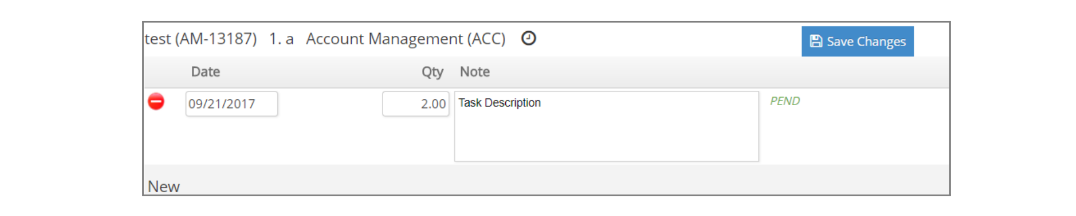
Regardless of the window used to create the time charge, time entries can be edited or deleted- on the time entry within the grid and from the pop-up window, by clicking the  icon – as long as the charge has not been approved. Charges not approved have a PEND status – or REQD if the user requested approval for charge and the approver sent charge back for adjustments.
Once a charge has been submitted for approval (REQA status) or has been approved (BILL or NOBILL status), then only the note description can be modified.
eTime Calendar Entry
This window provides each user with a list of all tasks they are assigned to and a calendar (weekly or daily) view.
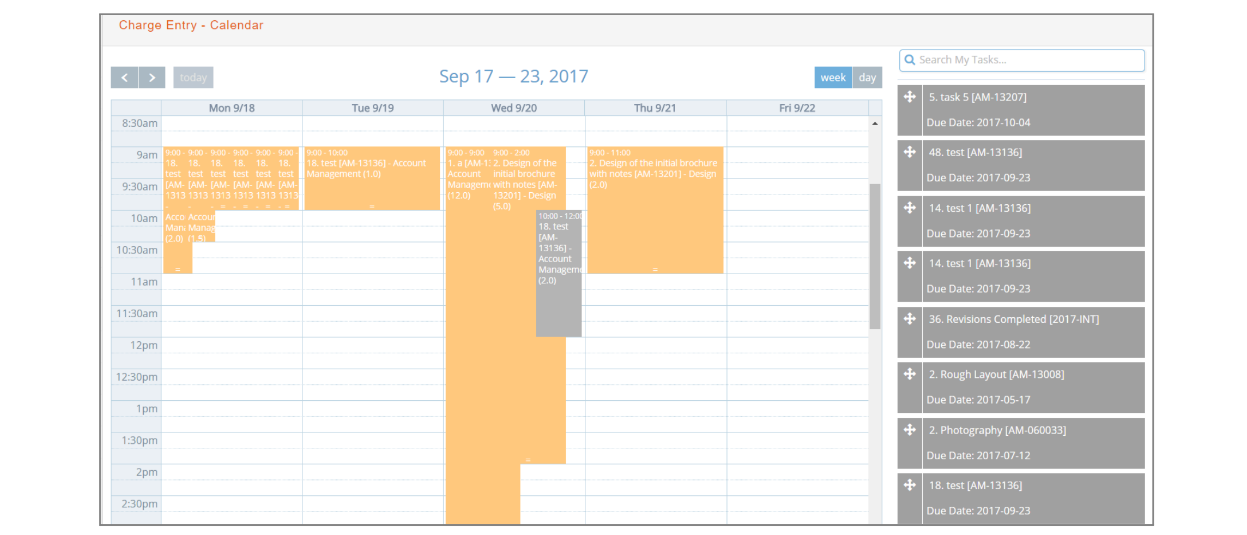
New entries can be done by finding a specific task, typing in ‘Search My Tasks’ field either the job number, task number, task description or due date to let the system provide results that match this information. Once the desired task has been found, it can be dragged and dropped to a specific day. This will create a time slot that can be increased or decreased to represent the time spent working on the specific task. To complete the entry, click on the entry. A pop-up window will be presented. An item needs to be selected out of the available list – same rules as the ones mentioned previously on what items will be part of the options. A note with a
description can also be entered.

Click on the lock icon to save these changes. Repeat this process until all entries are completed.
Any unapproved PENDing time can be deleted from the matrix in the Daily or Weekly windows.
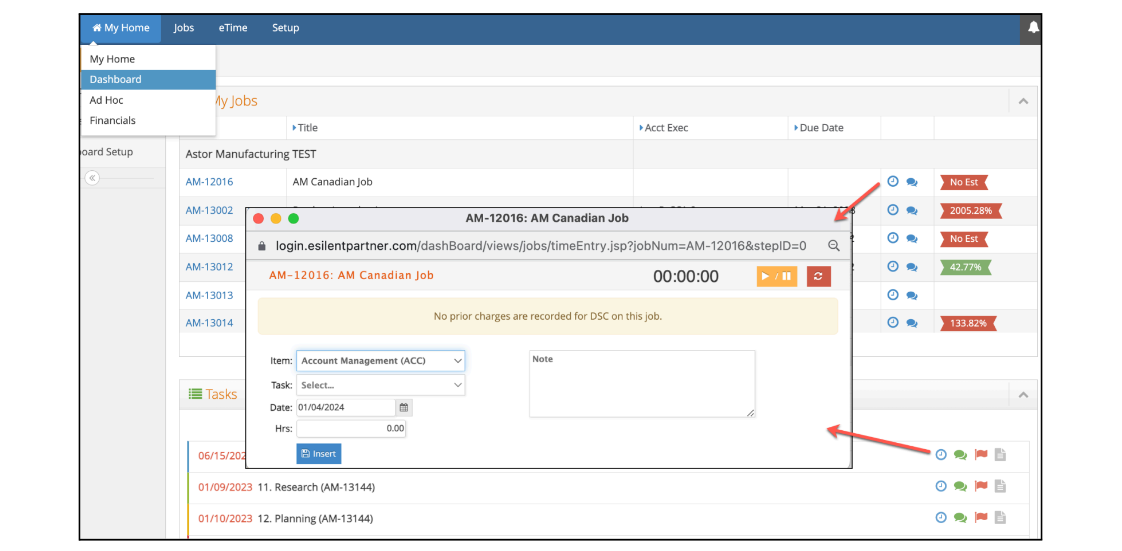
Sidebar & Dashboard eTime Entry
Based on a user’s security access, time may be entered from their My Home > Dashboard or sidebar under My Jobs or My Tasks. In each case, the user clicks on the clock icon to open a pop-up entry window.
from My Jobs

From My Tasks
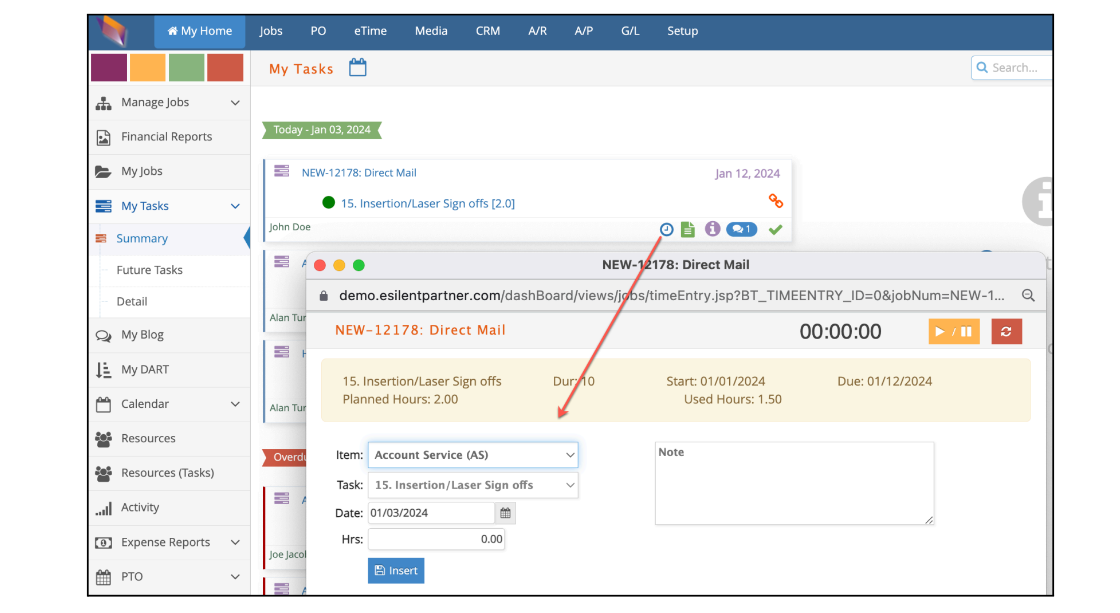
From My Home Dashboard