How to setup job traffic/project plans (with or without the
templates).
Whether you load a template or enter your tasks and milestones, you can manipulate: add, change, or delete tasks, assignments, dates, etc. The simplicity or complexity of the plan depends on you.
Let’s start at the beginning ... the Job Start window. Find or enter a new job.

Planning Technique
Which planning technique should I use?
Select Plan under the Job# drop-down menu.
There are four views of the same Job Plan, each with a different intention and technique: To Do’s, Simple, Gantt, and Plan (New).
- To Do’s: This approach is designed for plans where start and or due dates are not essential. In this view, there are no dependencies or established durations for a task.
- Simple: Designed for projects with dates, timelines and -if needed- dependencies. This is the most complete view - and the one we recommend to use- since it is the one that provides more options.
- Gantt: A graphical presentation of the timelines and dependencies of each task, that is, the length of a task and its interaction (dependency) with one or more other tasks. This is a view-only approach.
- Plan: It’s a newer version of the Simple view, with more time-saving options and a more integrated approach to assigning resources. You can find out more about this view in the Project Management guide.
Irrespective of the technique used, some rules are applied. They are:
- Job Type defined in Job Start window: If there is a template defined for that job type, the job type template will load. If there are roles defined in the template tasks AND if one or more of the team members has a role, those team members whose roles match the template task will be automatically assigned to the task.
- Job Type not defined in Job Start window (or job type does not have a template of tasks): An empty window will load. However, at this point, you may want to select a template from the drop-down list in the Plan window.
- Additions/Changes/Deletions made in one window will show in the other windows: Although the windows are separate, behind the scenes each window accesses and presents the same data. So be assured, if, for example, you enter dates for a task, those dates will show in the other windows.
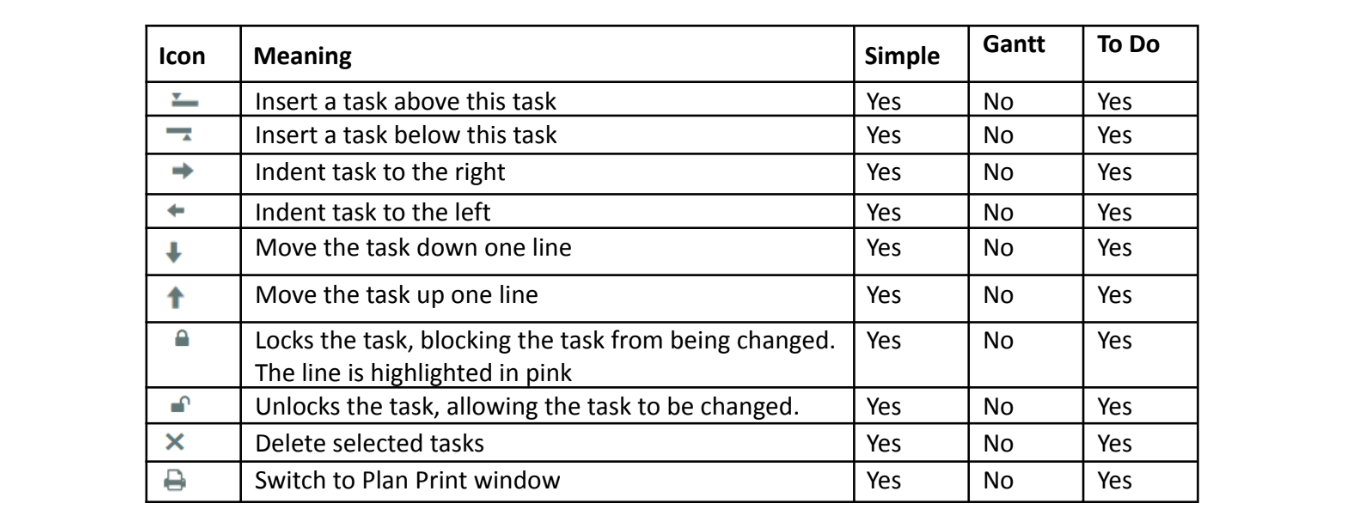
Plan window icons
what do they mean?
There are three groups of icons: Action Bar, Tasks Action Bar and Tasks Icons. Some icons show on all windows; other icons only appear (or do not appear) on the Gantt window.
We will review them all now.
Action Bar
Some of these icons do not appear on all windows:

Let’s review each icon:
- Switch to other plan views.
You can always move from one view to another using the To Do’s, Simple or Gantt icons. - Activity icon.
The Activity option presents a chronological view of all activities on a project. These activities include assignments, blogs, digital asset capture, task additions, task completions, task deletions and kanban workflow activities.
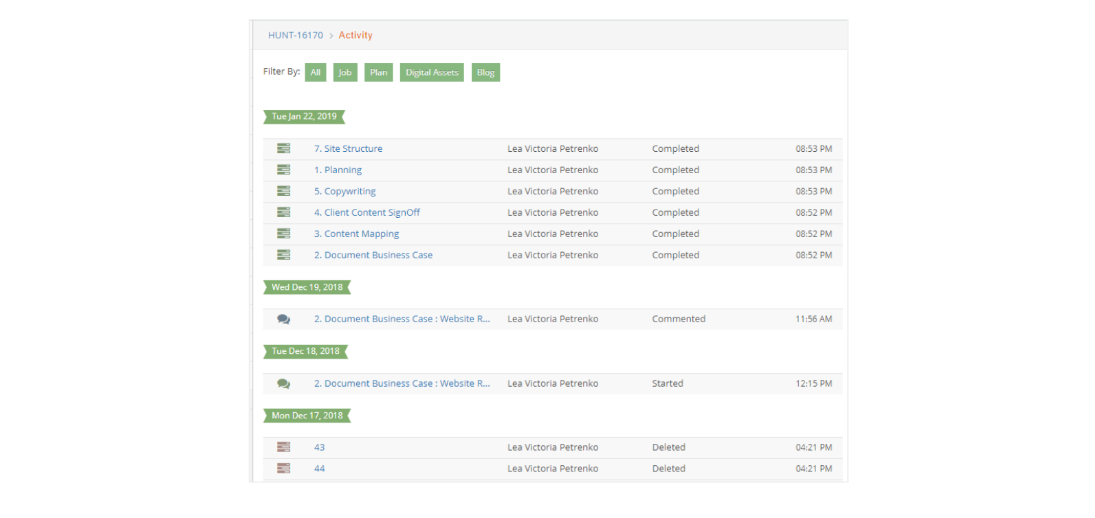
Each of the above activities is identified with an icon. Click on the reference next to the icon to review and/or, in the case of a blog, respond to the blog.
For example:

Click on the above reference displays the complete content on the right. From this window, you can click on the blog icon at the bottom to reply:

- Transfer Plan Tasks to a different job.
Yes. When you are in the To-Do's Plan or Simple Plan window, if you click the  (transfer tasks), e·silentpartner will allow you to transfer selected tasks in the current plan to another job's project plan.
To transfer associated blogs from a desired task, simply check "Transfer Blogs" below the job section input box.

What task(s) can I NOT transfer? > In order to maintain the integrity of a job, there are a few rules pertaining to the above.
They are:
-
A task that is either marked complete or has charges cannot be transferred.
-
A milestone task cannot be transferred.
-
A transferred task will be set to have an indent level of 0 and a dependency of 0.
-
A task can only be transferred to a job with a status of "JOB" or "QUOTE".
-
Book Hours.
Later, in this document we will review how to book at a task level: how to assign a team member to work on a specific task, defining the number of hours needed during the days the task is scheduled to take place. This option allows for an automatic booking of hours, based on planned hours, for all open tasks in a plan.
This option allows to
- Front Load: hours are booked based on available hours per user assigned to a task, fully occupying their schedules until no more working hours per day are available.
- Evenly Distribute: hours are booked equally distributed among the assigned team members and days the task is scheduled to last. You can also decide to apply overbooking - meaning the system will book hours following this rule, even if that means overbooking the assigned team members.

- Recalculate Tasks dates.
There may be times when a project schedule has to change. When you are in the Simple Plan window, if you click the (Recalculate Plan), e·silentpartner will recalculate the plan based on a starting from date (Recalculate beginning to end), or an ending by date (Recalculate end to beginning). You can also select the task you wish to use as a starting point for the recalculation.

The recalculation algorithm uses the plan's task dependencies to calculate the next task's dates. If a task does not have any dependencies, then the task start date will be set to the "Starting From" date, or the task due will be set to the "Ending By" date.
When recalculating forward, using the "Starting From" date, if a task has a dependency task that is marked as complete, then Lead/Lag time will be added with respect to the dependent task done to date. The done task dependency will be deleted to maintain the integrity of the plan. Below you will see that task 6 was recalculated based on task 4's done date.

- Baselines.
Baselines are versions of the same plan. Since updating the plan is real-time, i.e., changes take effect immediately, there may be a need to compare various iterations of the plan ... "this is what we say we were going to do ... This is what we did".
When you are in the Simple Plan or Gantt chart window, if you click the  (add baseline), e·silentpartner will save a copy of the plan displayed on the window. You can save versions of the plan as many times as you want. More importantly, you can go back and compare the current plan to the original baseline or any versions you saved. You have two views: a side-by-side view of a task list and Gantt chart. Simply click the 'baseline' icon.
Gantt Chart comparison: Current plan vs. the original baseline or any Revision.
For example:
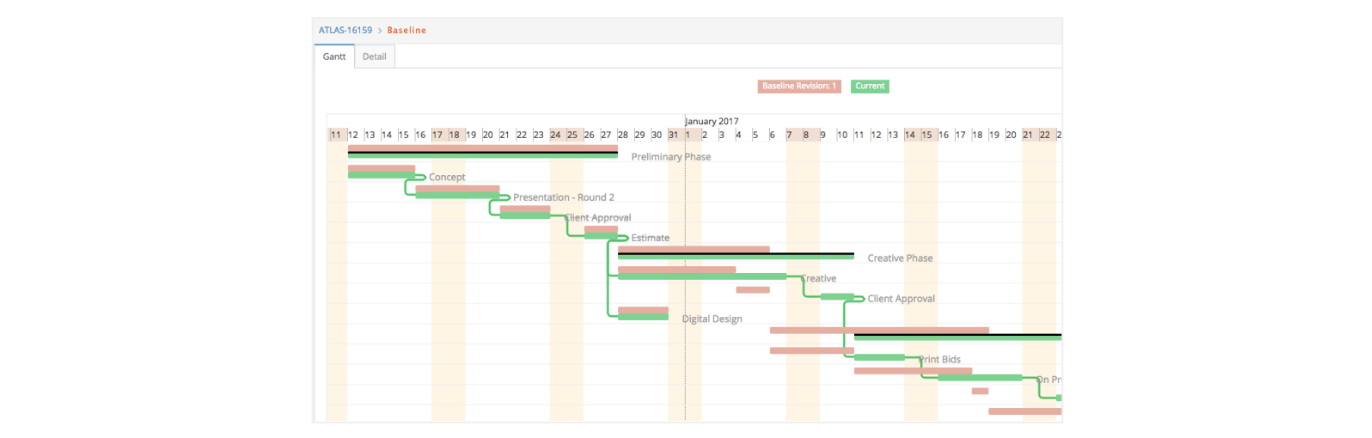
Click on the Detail tab to view the task list

On the top right-hand corner of the window is a drop-down of Plan Revisions as well as the original baseline
Remember the comparison is always against the current plan.
Tasks Action Bar
Located under the Action Bar.

Let’s review how to use these icons:
-
Adding new tasks.
Tasks are always automatically created as soon as you click under the last task created. But you can use the insert above or below tasks icons to add a task in between created tasks. -
Indenting tasks.
Indentation allows tasks to be part of a Milestone - or to be removed. To be part of a specific group of tasks that are considered a unit. -
Moving up or down tasks.
This functionality allows you to modify the order of tasks. -
Locking tasks.
This functionality prevents any changes from being added to tasks. No changes to notes, task description, changes in dates, etc. -
Delete tasks.
Either individually or in a batch process, tasks can be deleted as long as they are still open or there are no time charges against them.
Tasks Icons
Present in each task, will reflect the special features of each of them. We will learn how to read each of them
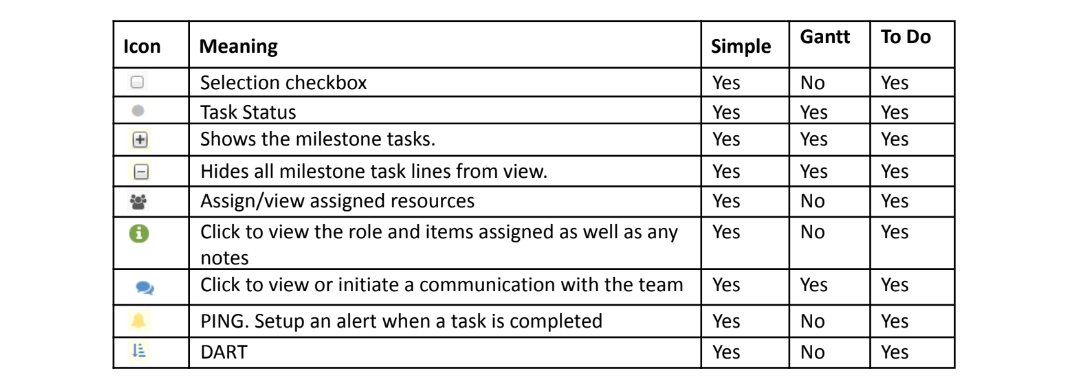
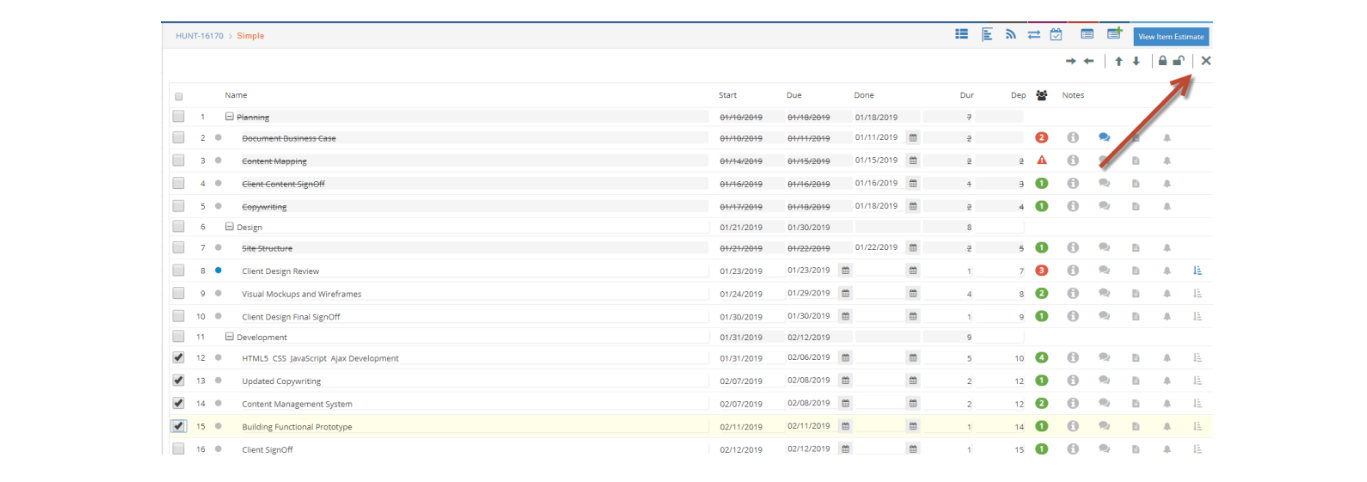
- Checkbox.
Although Task Action bar functionalities can be applied individually to one task at a time - the task itself will show up highlighted, you can use checkboxes to select several tasks and apply one of the task action bar functionalities to all of them at once.
In the example below, tasks 12 - 15 are checked, so you can delete them all at once.
- Task Status.
Visual indication of the status of a task. The number of status, names and colors can be defined by you under the SETUP > PREFERENCES > CLIENT DEFINED FIELDS > TASK_STATUS section.
Add a code and name, select a color (optional) and the list will be available to be chosen from in each task.
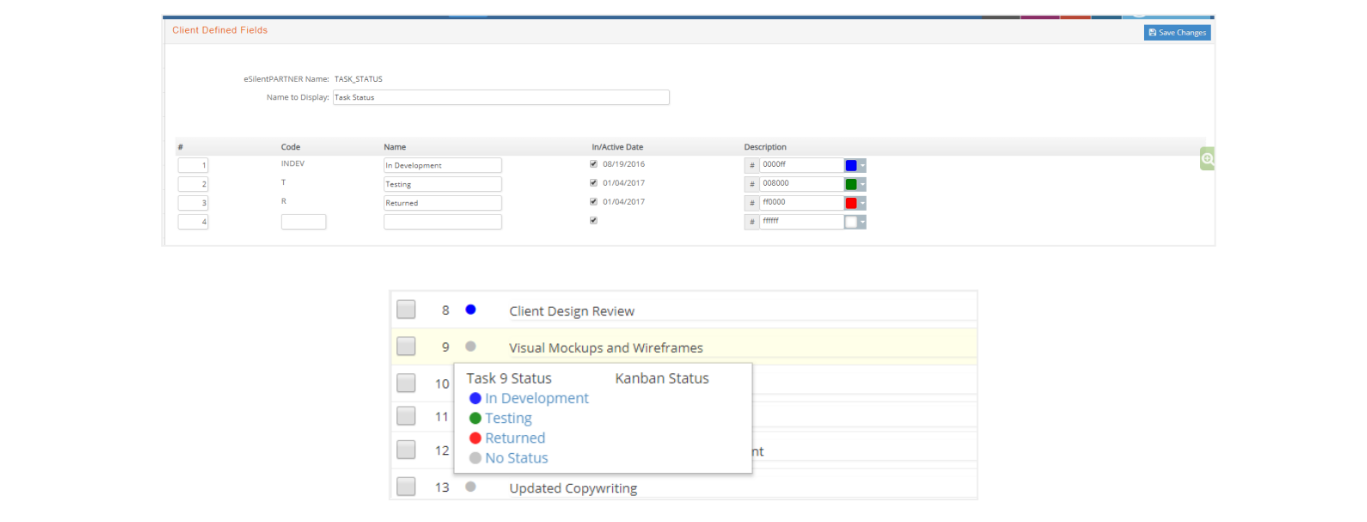
When using colors to represent status, your associates can easily recognize the status of each task they have been assigned to - and even what is expected from them.
- Milestones.
Milestones are used to group a number of tasks under one ‘header’ or milestone. Milestones can be opened -and show each individual task that is part of it- or collapsed - to hide all tasks that are part of it.
Milestones are originally regular tasks, but when indenting tasks below them, these tasks become milestones.
- Resources.
The resource icon will show a number, representing the total number of team members assigned to that task.
You simply click on the  . As described in setting up the Traffic Plan template, you can define what role and what item should be used with each task.
Now with the actual plan, there are a few rules pertaining to the above. They are:
- Team members will automatically be assigned to task(s) if the task has defined roles and there are one or more team members who have those roles.
- You can assign any team member to a task – even if the team member does not match a task role or there is no defined role for the task.
- You can assign any role to a task.
- If you assign a member to the team AFTER the plan is developed, that new team member will automatically be assigned to any task that has the same role as the team member.
Remember, the inherent benefit of defining task/team member roles in the plan template is you will save time while creating the actual plan.
Click  on any task to view/modify assignments.
- If the circle is gray, this means no one is assigned to the task.
- If the circle is green, the number in the circle is the number of people assigned to the task, but there are no planned or booked hours.
- If the circle is red, the number in the circle is the number of people assigned to the task, and hours are booked to any or all individuals. It could also mean that there are irregularities with plan vs booked hours for one or more employees.
- If there is a
 icon instead, it means that planned hours and booked hours do not match ALL the resources on the task
The following task spans four business days/six calendar days.

In the role field, there are two roles: Consultant and Creative Assistant. These are the default roles that are defined for this task in our traffic template. You can keep them, delete them and/or add new roles.
The role field is quite handy because when you click on the  Calendar icon , e·silentpartner will display a list of associates who have the same role.
Example:
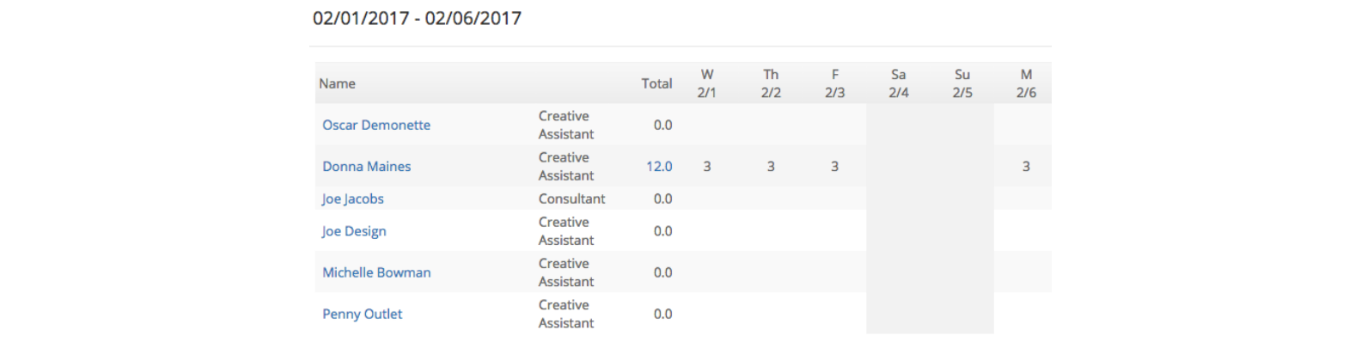
The above window shows you associates who match the role(s) you need. It also shows you if they are booked on other projects. If you want to see what projects an individual is assigned, simply click on the number under the total column.

To add an individual to your task, simply click on the name.

Once you have selected the individuals, simply key in the hours you want them to work on this task on a daily basis or put the hours in the ‘Booked’ field.
e·silentpartner will distribute the hours on an even basis across the days. Accept that or modify the hours on any of the days.
Four more icons and their meaning:
 Delete an individual from the task
 Click to assign specific time items to the individual for time entry
 Click to view other assignments for the individual for the time frame of this task.
 This is an indication to you that hours are planned for one or more individuals on a task but no hours are booked. Once you book/assign the hours, the red triangle goes away.

- Information.
This is the information icon to quickly view roles and/or items assigned to a task as well as a task note. Every task can be further described by adding a note, a general description of what needs to be done.
Also under information you can define roles that are needed in the task, items to be used, and even a number of hours required. This information will be automatically populated if a template type has been used to create the plan -and roles and items were defined- or manually entered in each task.
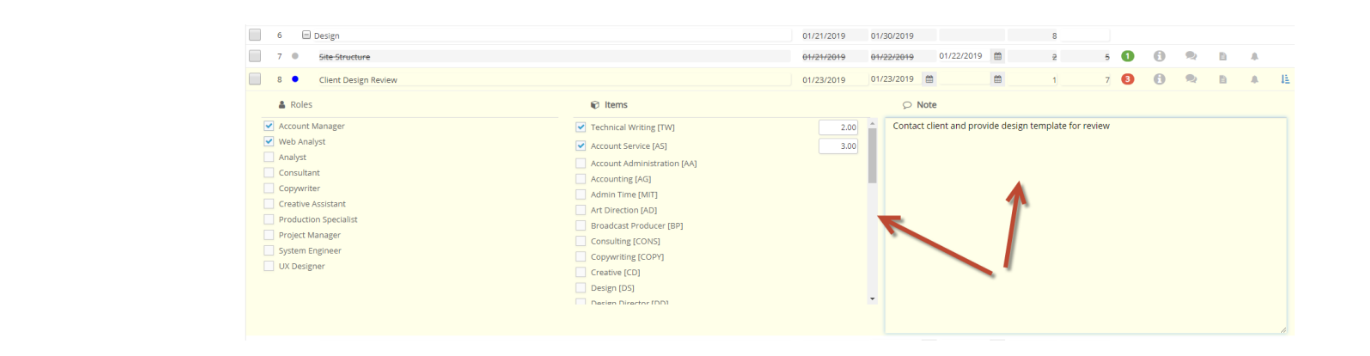
You are indicating for this task (in the above example) is that:
- You need an Account Manager and Web Analyst.
- 3 Hours of Account Service and 2 of Technical Writing should be used to perform this task. These items will be the only available when entering time, and they can be used to generate an estimate for this project.
- Lastly, you can enter a reference note for the task itself.
The above three entities are mutually exclusive. You can enter a suggested/role for the task. You can select an item or items to be used for time entry and/or estimate generation.
- Communication.
Communication is an important requirement when undertaking a task. Maintaining a knowledge base, the ‘record’ of instructions, actions and decisions is also important. Within e·silentpartner, you can accomplish it easily.
As you view the planning window, notice the  . This is one icon for the messages. When it is this shape, it means there are no messages. When the shape is
  , it means there are messages and possibly digital assets.
Remember if you capitalize on this feature, everything about the project will be WITH the project. Consider the value of going back to a project at a later time and reviewing everything that happened with a project even if the team members have moved on to other positions.
Please review the Communication guide to know more about blogs.
- Pings.
That little bell is a ping. It provides the ability to have e·silentpartner automatically send an email to a user(s) when a task is completed. Think of how this could be used.
- You want to notify accounting to bill a percentage of the project or
- You want to notify members of the team that a critical task on the project is completed and the next step is starting.
All you need to do is click on the bell and enter the message and recipients.
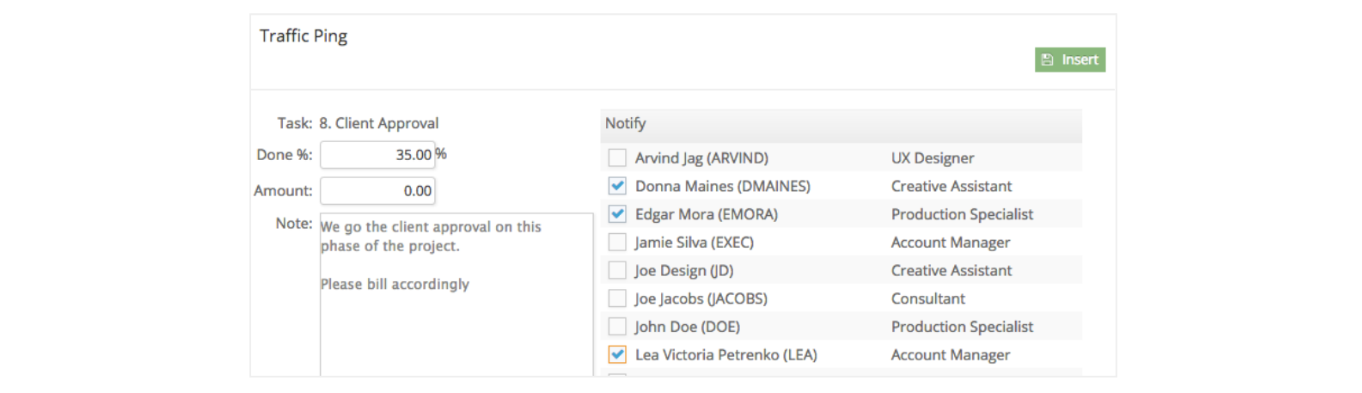
Keep in mind, e·silentpartner automatically sends this message to the recipients when the task is marked completed. Equally important, the message can be sent to anyone – even if they are not part of the team. Now let's return to the overall project/job plan options.
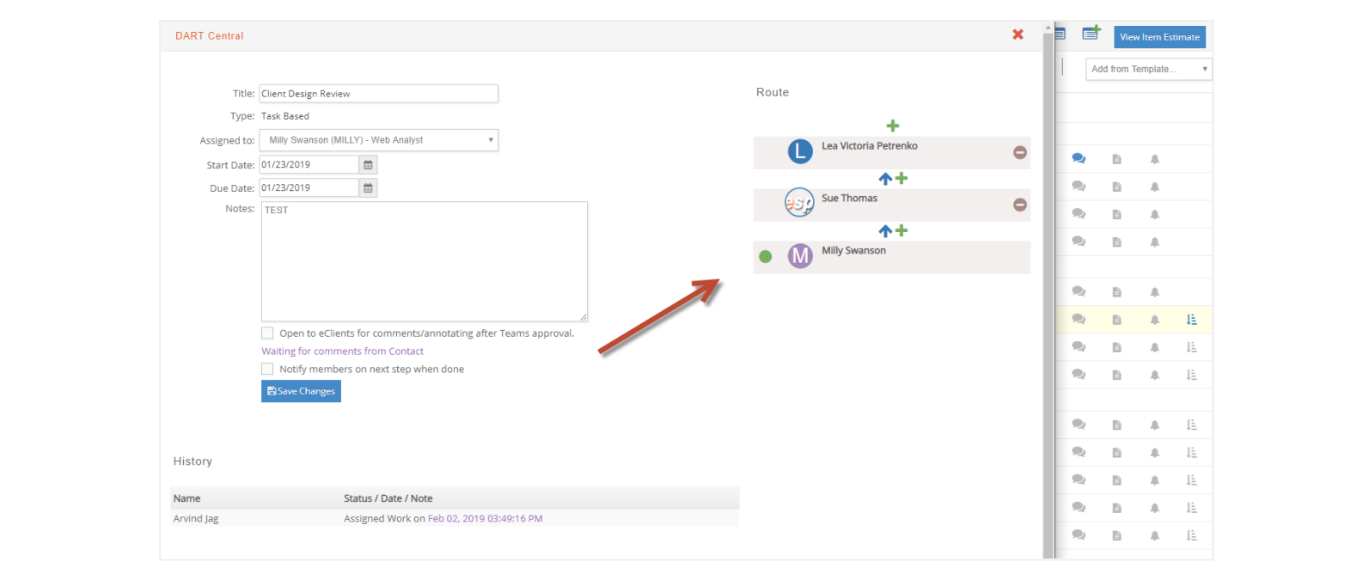
- DART.
Whenever more than one team member is assigned to work on a task, and you wish to create a specific workflow, you can use DART.
Click on the icon to define the workflow. Start and due date will be as defined for the task. And create the workflow route by clicking on the plus icon on the right.
You can use as many team members as wanted, and the approval route can be modified as needed. This will define who needs to be working on the task, and who comes next. The green icon lets you know who is currently working on the task.